Lately I’ve been trying different ways to finish the edges of my quilts. Especially since these two are full of handwork, it seemed fitting to do a more rustic edge. The first you have seen–I named it Worlds Within Worlds. Many years ago I thought about this–how you can live for a long time and never know that there is a whole “world” out there that you never knew existed. Like, for example, the world of angora rabbits and showing angora rabbits. I did that for a while, because I was a spinner/knitter at the time. Did you know this world existed? Heck, I didn’t even know there was a whole world of spinning out there, with conventions and everything, much less the crazy world of English Angora show rabbits!

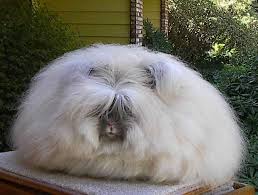
A real live English Angora show rabbit!
To bring it closer to home, we all know that the majority of people do not know about the big world of art quilts OR the world of show quilts. When you say you are a quilter, they only see what they know–bed quilts, usually grandma’s flower garden quilts 🙂
Here is the quilt Worlds Within Worlds with a hand-satin stitch edging using #5 perle cotton. I have to laugh at myself when I say I won’t do binding by hand because it takes too long, but I was perfectly willing to sit for several days doing this edging.

Close-up of the edge:

The next quilt you have also seen. It just sat sadly on my sewing table for months, waiting to be finished. Truth was, I didn’t know how I wanted to finish it. Then I noticed a small quilt I had done a long time ago, with a fringed edge. That seemed perfect for this very rustic cloth. And since it is all white around the edge, I wanted to make a quilted backing for it. I looked through my blue fabrics, and this bright dark blue was my favorite. I haven’t finished the quilting the blue, but wanted to share with you anyway.

Here’s how I did the fringed edging. Measure and cut the quilt to the size desired. Sew two lines closely together around the edge (about 1/8 inch apart.)

Carefully cut out the batting close to your sewn line.

With little scissors, cut fringe on the bottom layer (for reference, that bottom layer is muslin.)

Then take your fingernail and run it both ways along that fringed edge to make it fringier 🙂

Lastly, since this was a homespun type of fabric, I pulled the threads to make the top fringe. If the top had been made of regular fabric, I could have just cut it at the same time I cut the bottom, and done the same with the fingernail.

As my surgery date approaches I find myself starting new projects and working on finishing old. But I am distracted, so I’m afraid not much will get done in the next week or so. I started a new scarf/shawl, using some of my handspun yarn that is so beautiful–a blend of merino wool, bombyx silk, and cashmere. And I made myself a bead project kit, using Robin Atkin’s excellent book: Heart to Hands Bead Embroidery. I am hoping that it will be a good project for my post-op healing time.
