Two Finishes

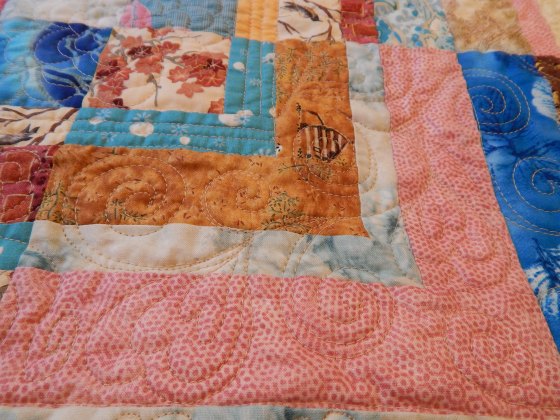
Still working through that box of unfinished quilt tops! Who remembers French Braid quilts?! That was the next top I pulled out. I remember when my friend and I worked on our French Braid quilts together. In my opinion, it is a difficult pattern to follow. I did not enjoy that part of it, but I did enjoy choosing all the beautiful fabrics and arranging them just so. My BF really loved making the French Braid quilt, and she went on to innovate and make a Christmas Tree skirt out of the French Braid pattern–it was included in the second French Braid book!!

I had carefully folded some extra fabric with this top. The top was long and narrow, and I think I had a plan to make side borders. This probably wasn’t my original plan, but it got the job done. After looking at quilting ideas online, I decided that stitch in the ditch was the very best for this quilt–it didn’t detract from the beautiful prints. That made the quilting go very quickly.

DSCN5506

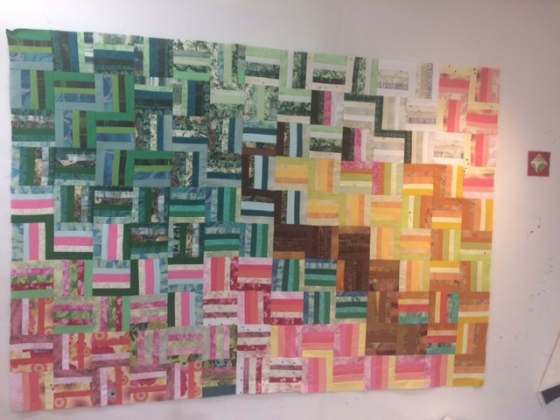
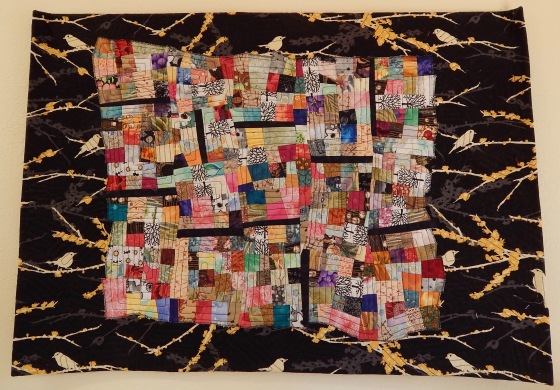
The next was a little 48″ square improv piece that I made to use up a lot of light and dark strips that I had pre-cut for some other project. You can see I used some of my two inch squares, and I also chose a “feature fabric”–that blue with green print. It will make a nice lap or wheelchair quilt for someone. I decided to stitch about 1/4 inch from the edge of each strip. This was also fun and easy to quilt.

DSCN5512

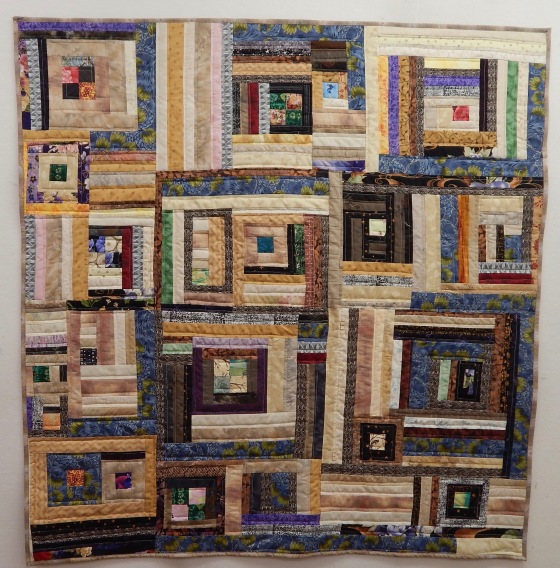
A word about backing choices: for the french braid quilt, I chose three different solid greens to make the back. Many times I will piece a back out of different fabrics, so that doesn’t bother me. But using those solid color fabrics, when my thread was an off-white? Not so much–all my little wobbles and back stitching show up very well. In contrast, I chose a taupe print for the improv piece. It was a very good quality fabric, but not one I particularly liked. And it is a PERFECT backing fabric! Goes well with the neutrals on the front, and the print is just enough that the quilting is not distracting on the back.

Lots of handwork continues in the in-between times. I’ll have more to share next week.

A Mystery

On Sunday I doodled this in my journal:

DSCN5507

Do all of you have a box of two inch squares? I love my box, and it has come in handy so many times. Truth is, I have so many two inch squares, I now have two boxes of them. Whenever I get to the end of a project and there are good scraps left, I cut them into two inch squares. When I cut the excess backing fabric off of a finished quilt, more two inch squares.

Okay, so choosing the path of least resistance (pre-cut pieces, and sitting in my easy chair) I chose to try doing this by hand stitching with the box of two inch squares. Each cross takes 5 two inch squares. I found quickly that the easiest way to keep from being confused was to stitch the crosses, and THEN join them.

DSCN5484

When I have done single motif hand stitched quilts in the past (hexagons and diamonds) I have always joined a certain amount and then started another piece, simply because it was easier to handle smaller pieces of fabric. So that’s what I did here.

And I found that there is NO WAY to join these pieces without leaving one or two block empty spots. There’s got to be some mathematical reason for this…

Now you can see in my doodles, that I actually drew the crosses with spaces in between them. I also took some graph paper last night and tried to figure out what the problem is. It is actually hard to DRAW the crosses without leaving empty spaces between them. It is not hard to sew them together without empty spaces.

For now, it is an experiment (albeit an experiment that I have spent a good part of the week on.) I could choose to leave spaces on purpose (that I could easily fill in with more two inch squares.) Or I can just work on joining them together into one continuous quilt. I do like them joined the way I have them now. If any of you want to try this, I can tell you that it seems that to be joined without “spaces,” you either need to join 3 or 6 sides, if that makes sense.


Something Old, Something New

DSCN5465

Something old: I washed an older quilt and put it on my bed to fold it up, and thought I would share it with you. I call this quilt “I Live in Pine Grove.” I do live in Pine Grove, and at the time I made this quilt there was a lot of different fabric with pine trees and pine branches and pine needles on it. I had so much fun collecting all the different pine fabrics. I had just a few fabrics with birds on them, and I made all the blocks and then had fun fitting them together. I hand quilted it. And it is still a quilt that I like very much.

DSCN5466

DSCN5467

A new finish: After agonizing over each area–should I add more stitching here? What about this area? How should I do the background? I finally just took the plunge, and finished all the stitching on this quilt. My BF was here for a one day visit, and she asked if I had considered turning it sideways. I hadn’t, but the more I looked at it that way, the more I thought that was the way it should be!

DSCN5476

I wanted to wash it before I blocked it and finished the edge, so I zigzagged around the edge and washed it very gently. And then blocked it on my design wall. I thought about how I wanted to finish the edge, and I decided that I want to do a hand-finished edge. I will do a satin stitch with perle cotton all around the edge. I am going to use the ecru thread that I used for the background. It is busy enough–no need to add any more color to it.

After I cut the edges to their final size, I stitched very carefully around the edge, just to keep it nice and neat while I hand stitch the edge.

DSCN5479

I did enjoy using chain stitch to color in some of the solid areas. Close-up of stitching:

DSCN5481

DSCN5480

Something new: And then I wanted to play and make another small quilt to embroider. I LOVE the piece that I used for the What They Said series:

dscn4528

And so I chose some new fabrics, and made the same block, only larger. Starting with one background fabric, you cut and insert strips and then a circle and then more strips, etc. Very fun to do. I want to explore this more!

DSCN5482

Of course now that I’ve got it done and the sandwich made and basted and all, its like I get all shy, and I don’t know how I want to stitch it! But I’ll just think about it for a bit. That’s part of the fun, isn’t it?


Another Finish

This is just another quilt in my big box of unfinished quilt tops. This one took quite a while to get quilted. Not only did I do a lot of quilting on it, but I put it aside while I worked on “My Flower Garden.”

DSCN5391

I put a lot of thought into how I would quilt this. I did a camellia-type flower in the center of each block, and then surrounded that with some straight line quilting.

DSCN5396

I did this pattern of swirls and hearts over all the rest of the center of the quilt.

DSCN5395

And finally finished the border with feathers. I LOVE the fabric in this border.

DSCN5394

I used muslin for the back. You can see the quilting pattern a lot better on it.

DSCN5397

But the thing I learned (again) is that when a quilt top is so full of busy prints, it doesn’t really matter how you quilt it–it just looks like generalized quilting after you wash it! (all these pictures were taken pre-washing.)

My Flower Garden

Remember this quilt? That’s the one I made in class with Katie Pasquini Masopust. I pre-cut a few too many strips for that quilt.

DSCN4952

So I used the leftovers to make this simple quilt. I didn’t really enjoy making this quilt. But it will be a nice baby quilt for someone.

IMG_3126

I thought I had used up all the leftover strips with that quilt. One day I went out to clean up the studio a bit and opened a plastic bin. What??? More leftover strips? Well, I finally remembered that they were the smaller  strips (1 1/4 inch) and I had planned to put them in a ziplock bag to give to whomever wanted them.

I looked at them for a few minutes and thought–why not play around with them and see what I come up with.

This is a quilt I made a long time ago, and I really like it. It was the inspiration for how I decided to use these small strips, and how to construct the top.

DSCN5321

As I went along, I decided it would be like my own flower garden, that was constructed a bit at a time, fitting things together as we went along.

DSCN5320

I didn’t add any more strips to what I already had. I chose a few flower and leaf prints to add to the “garden.”

DSCN5319

When I quilted it, I used straight lines and pebbles for the “paths” in my garden. I just outlined the flower and leaf prints.

DSCN5318

This is my favorite of all three quilts that I made from those strips.

DSCN5316