Christmas is a Time to Finish Things!

I notice I have this pattern at Christmas. I like to finish things. So far I have knit four scarves from my handspun yarn for gifts. Not just knit them, but I blocked them too! And then I decided I had delayed finishing this Christmas quilt for too long. so I just went out there and finished the quilting. I put a binding on it, and then it needed a lot of blocking because of the embroidery in the middle. I’m not 100% sure that I accomplished what I was trying to achieve with this quilt.

DSCN6412

If you remember, the embroidery was done with the Cottage Threads perle cotton from Australia.

Here are some close-ups:

The lettering:

DSCN6413

Embroidered motifs:

DSCN6416

DSCN6417

I added a little embroidery to the trees and “rocks”:

DSCN6415

DSCN6414

And, I finished my Kantha blanket! The running stitches are about 1/2 inch apart. I also put two lines of turquoise thread 1/4 inch apart about every six inches, just to add some interest. The rest of the quilt was stitched with some variegated silk thread that I bought at a weaver’s convention!

DSCN6418

DSCN6419

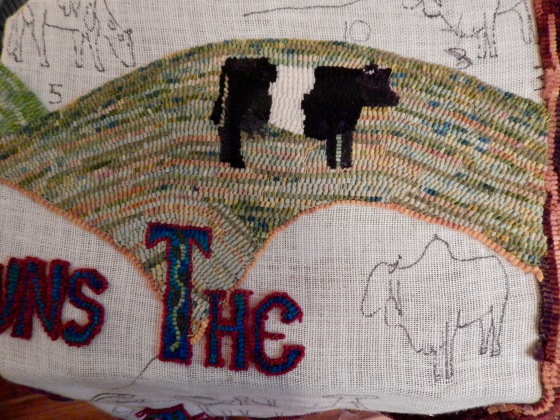
Oh, and most importantly, at Christmas time I always feel pressured to try to finish my rug that I started this past February. I would like to share it FINISHED when I go to my rug hooking thing this February, but I’m afraid there is a lot that is still unfinished. I wrote “make a cow” for three or four weeks on my weekly to-do list. Somehow I get afraid of rug hooking when I don’t do it consistently. But finally, I DID make a cow :))

DSCN6427

I also hooked the entire hillside behind her. It took several mornings to finish that.

If I don’t write again before Christmas, I hope everyone has a very merry and blessed Christmas.


Ta Da!!

This turned out to be such a fun project! It went well beyond “stupid sewing” 🙂 While I was sewing the little blocks together I noticed a sparkly thread on my sewing table that looked like it went with the blocks. So I thought I might try a meandering thread through the piece. Then I added some black lines and some french knots. Yesterday morning I got up and put a binding on it. Finished, I thought! But then I thought it would be fun to add some words to it. This time, instead of a Bible verse, I wanted to add a saying that a good quilting friend had shared with me. Thanks, Catherine!! I really love this saying.

She was unstoppable. Not because she did not have failures or doubts but because she continued on despite them.       –Beau Taplin

The really finished quilt:

DSCN6205

A close-up:

DSCN6206

Today I’m planning to get back to some rug hooking, work on my big PEACE rug for a bit, and get the dye studio ready for a session of dying tomorrow. I LOVE a free week!!

Final Finishes!

Here are some final finishes on some projects that have been around for quite a while.

A number of years ago I went back to Vermont for a workshop with Judy Dales. Her work is so beautiful. I learned her techniques and made this little piece. And then I lost it for many years. I found it again recently and decided I needed to make it into a quilt sandwich and finish it completely. Not how I originally planned, but I think it looks better on the diagonal.

DSCN6166

I made these next four little trees about three years ago on a vacation in Sisters. I saw a tree pattern somewhere, and decided I could do that myself. I made one tree for each season. All done using my no-fusible zig zag technique. I liked these little trees and they were hanging in my dining room for quite a while. But they weren’t really quilted enough, and I kept thinking that I wanted to add the words from Psalm 1 onto them. so I added a little embroidery, added some fall leaves, and embroidered the words on. Then I added the straight line quilting to the background of each one. And I even put a sleeve on each of them! Now they are REALLY finished!

DSCN6151

DSCN6152

DSCN6153

DSCN6154

Rug camp is coming up. That means I really had to finish a rug! Here is the owl rug, all blocked and with a whipped edge on it.

DSCN6155

I’m looking forward to rug camp. I’ll be back with a report of what I’ve done at camp. I am going with a blank canvas and planning to draw an Aboriginal style piece as I go along.

Catching Up

Posting on Instagram has been fun. Its easy to take a picture at the end of the day and write a sentence or two about what you’ve been doing. So here’s what I’ve been doing since my last post. My Instagram name is debbyschnabel.

I finished another kantha blanket. This is one I pieced last fall just before I went to Art Quilt Tahoe. I really liked the central tree panel, and just chose some nice fabrics to go along with it. Still needs to be washed and blocked a bit.

DSCN6058

Taking a break from embroidering on the Wonderful Counselor quilt. Considering next steps. I think I still need some embroidery in there between the words. And maybe some embroidery in the borders, although I do plan to machine quilt most of the borders.

DSCN6059

Close-up of the words. You can see I used the blue disappearing ink quite a bit on this quilt. I did a sample to make sure the ink would come out before I used it on this radiance fabric (hand dyed 50/50 cotton/silk)

DSCN6060

Close-ups of some of the embroidery:

DSCN6062

DSCN6061

I started working consistently on the big PEACE quilt. While it was still on the design wall, I chose 12 spots to put verses and marked those spots with the blue disappearing ink, and chose 12 verses about peace. Its been fun to choose a verse, write it in the spot, and get it embroidered on there. I am hoping that this will be the next quilt I machine quilt.

IMG_E0095

Right now this quilt is under the Juki. I am taking my time and trying to quilt it nicely. I made it a long time ago, and I still like it.

IMG_0110

I got it into my head that I should do another sample quilt from the quilt kits I put together. So fun to make small pieces like this. The small pink triangles are actually the leftover pieces from cutting out the big pink circle! I am teaching Quilted Embroidery at the Cotton Patch on April 21. 

IMG_0109


And since I finished my kantha blanket and am taking a break from the Wonderful Counselor embroidery, I needed something to work on. Out came the big mitered square blanket. I laid it out on my bed and marked how much larger I want it to be, so at least I now have an ending place in mind. Still a lot to do on it. I’m using bits and pieces of leftover yarns and some of my old handspun yarn too.

IMG_0122

Sunday my sister called and asked if I had ever made a jelly roll quilt. Well, once I made a top using hand cut strips, basically the same as a jelly roll. As I talked with her about the math and how to do it, I remembered I had a project box with some leftover strips in it–leftover from the big PEACE quilt. They were cut 1/2 inch finished and 1 1/2 inch finished. Most of the 1/2 inch strips were brights and darks. Most of the 1 1/2 inch strips were neutrals. So I started sewing those together. I couldn’t believe it when I sewed the narrow and wider strips together–they were exactly the same length! So then I did a little math, and realized that there still was not enough for a decent sized quilt. I did some more math, and decided that if I would make some 3 inch finished strips, that would make the quilt big enough. For the 3 inch strips, I used both neutral and bright fabrics. I sewed everything together without planning. And when I finally finished, and threw it on my bed, I was really pleased with how pretty it was. Now I’m just thinking about how to quilt it.

IMG_0124

Speaking of quilting, one thing I have been doing lately, is going to Joann’s when they have a sale on (haha, when do they NOT have a sale on,) and buying four or more yards of one fabric so that I have quilt backs for my never-ending box of quilt tops that I have not finished. Since I don’t seem to be too good at selling, I have enjoyed finding places to donate quilts for people that might enjoy them. A young couple I met are working with Afghan refugees that are coming to Sacramento. I told them I could send some quilts to them.

I hope all of you are enjoying your creative time. Just working consistently every day it is surprising how much you can accomplish.


An Unexpected Finish

As I stitched on various projects in the evening, I started to realize that I was close to finishing one quilt. So I started to concentrate on stitching on that one. Maybe I could finish one more project before surgery!

And sure enough, on Friday evening, I took the last stitch. I don’t usually quilt on Saturday, but I couldn’t resist applying the binding in the morning, and then when I returned from the gym in the afternoon, I set to work hand stitching the binding down. I rarely hand stitch binding any more, but I figured with all the handwork on this quilt, it deserved it. And besides, I really enjoyed working on this quilt, and it just extended the joy for one more day.

Which quilt is it? Its the second Kantha blanket. On this one, because of all the different blocks and seams, I decided to stitch each block, in the hopes of avoiding most of the seams. The pattern is so busy that I don’t think the different stitching makes a  big difference in the  overall appearance of the quilt.

DSCN5726

I used DMC Coton Floche for the stitching, and it was wonderful to stitch with, but a bit more frail than perle cotton, and also I noticed that it pulled more easily when, ahem, little doggies’ toenails got caught in the thread….  I used a nice thin cotton batting, and muslin for the backing, so again, it was extremely pleasant to stitch. I am sure I will do another one of these, perhaps with a less busy pattern, and maybe I can do more variation with the direction of the stitching.

Some close-ups so you can see the different direction of the stitching.

DSCN5727

DSCN5728

DSCN5729

And this will probably be my last post for a while. I have four project boxes all ready for my post-op period! Hopefully I’ll have plenty to share with you by the time I feel up to blogging again!

Some Different Edge Treatments

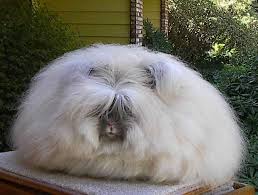
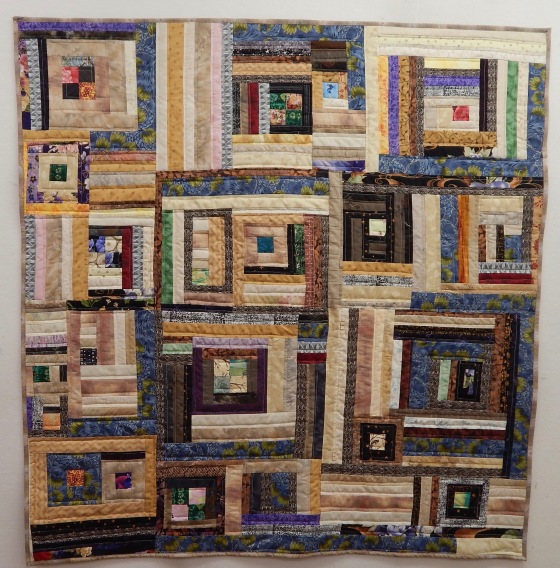
Lately I’ve been trying different ways to finish the edges of my quilts. Especially since these two are full of handwork, it seemed fitting to do a more rustic edge. The first you have seen–I named it Worlds Within Worlds. Many years ago I thought about this–how you can live for a long time and never know that there is a whole “world” out there that you never knew existed. Like, for example, the world of angora rabbits and showing angora rabbits. I did that for a while, because I was a spinner/knitter at the time. Did you know this world existed? Heck, I didn’t even know there was a whole world of spinning out there, with conventions and everything, much less the crazy world of English Angora show rabbits!

Unknown

A real live English Angora show rabbit!

To bring it closer to home, we all know that the majority of people do not know about the big world of art quilts OR the world of show quilts. When you say you are a quilter, they only see what they know–bed quilts, usually grandma’s flower garden quilts 🙂

Here is the quilt Worlds Within Worlds with a hand-satin stitch edging using #5 perle cotton. I have to laugh at myself when I say I won’t do binding by hand because it takes too long, but I was perfectly willing to sit for several days doing this edging.

DSCN5513

Close-up of the edge:

DSCN5514

The next quilt you have also seen. It just sat sadly on my sewing table for months, waiting to be finished. Truth was, I didn’t know how I wanted to finish it. Then I noticed a small quilt I had done a long time ago, with a fringed edge. That seemed perfect for this very rustic cloth. And since it is all white around the edge, I wanted to make a quilted backing for it. I looked through my blue fabrics, and this bright dark blue was my favorite. I haven’t finished the quilting the blue, but wanted to share with you anyway.

DSCN5708

Here’s how I did the fringed edging. Measure and cut the quilt to the size desired. Sew two lines closely together around the edge (about 1/8 inch apart.)

DSCN5553

Carefully cut out the batting close to your sewn line.

DSCN5552

With little scissors, cut fringe on the bottom layer (for reference, that bottom layer is muslin.)

DSCN5555

Then take your fingernail and run it both ways along that fringed edge to make it fringier 🙂

DSCN5554

Lastly, since this was a homespun type of fabric, I pulled the threads to make the top fringe. If the top had been made of regular fabric, I could have just cut it at the same time I cut the bottom, and done the same with the fingernail.

DSCN5556

As my surgery date approaches I find myself starting new projects and working on finishing old. But I am distracted, so I’m afraid not much will get done in the next week or so. I started a new scarf/shawl, using some of my handspun yarn that is so beautiful–a blend of merino wool, bombyx silk, and cashmere. And I made myself a bead project kit, using Robin Atkin’s excellent book: Heart to Hands Bead Embroidery. I am hoping that it will be a good project for my post-op healing time.


Two Finishes

Still working through that box of unfinished quilt tops! Who remembers French Braid quilts?! That was the next top I pulled out. I remember when my friend and I worked on our French Braid quilts together. In my opinion, it is a difficult pattern to follow. I did not enjoy that part of it, but I did enjoy choosing all the beautiful fabrics and arranging them just so. My BF really loved making the French Braid quilt, and she went on to innovate and make a Christmas Tree skirt out of the French Braid pattern–it was included in the second French Braid book!!

I had carefully folded some extra fabric with this top. The top was long and narrow, and I think I had a plan to make side borders. This probably wasn’t my original plan, but it got the job done. After looking at quilting ideas online, I decided that stitch in the ditch was the very best for this quilt–it didn’t detract from the beautiful prints. That made the quilting go very quickly.

DSCN5506

The next was a little 48″ square improv piece that I made to use up a lot of light and dark strips that I had pre-cut for some other project. You can see I used some of my two inch squares, and I also chose a “feature fabric”–that blue with green print. It will make a nice lap or wheelchair quilt for someone. I decided to stitch about 1/4 inch from the edge of each strip. This was also fun and easy to quilt.

DSCN5512

A word about backing choices: for the french braid quilt, I chose three different solid greens to make the back. Many times I will piece a back out of different fabrics, so that doesn’t bother me. But using those solid color fabrics, when my thread was an off-white? Not so much–all my little wobbles and back stitching show up very well. In contrast, I chose a taupe print for the improv piece. It was a very good quality fabric, but not one I particularly liked. And it is a PERFECT backing fabric! Goes well with the neutrals on the front, and the print is just enough that the quilting is not distracting on the back.

Lots of handwork continues in the in-between times. I’ll have more to share next week.

Another Finish

This is just another quilt in my big box of unfinished quilt tops. This one took quite a while to get quilted. Not only did I do a lot of quilting on it, but I put it aside while I worked on “My Flower Garden.”

DSCN5391

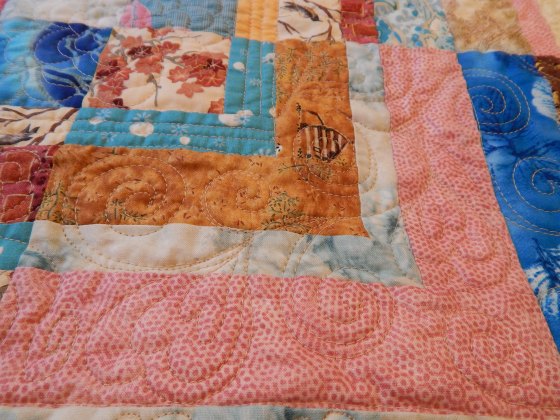
I put a lot of thought into how I would quilt this. I did a camellia-type flower in the center of each block, and then surrounded that with some straight line quilting.

DSCN5396

I did this pattern of swirls and hearts over all the rest of the center of the quilt.

DSCN5395

And finally finished the border with feathers. I LOVE the fabric in this border.

DSCN5394

I used muslin for the back. You can see the quilting pattern a lot better on it.

DSCN5397

But the thing I learned (again) is that when a quilt top is so full of busy prints, it doesn’t really matter how you quilt it–it just looks like generalized quilting after you wash it! (all these pictures were taken pre-washing.)

Finished!

dscn4346

When I returned home from Empty Spools, I had a couple of projects that I had left mid-stream, and I went back to work on those. Once those were well under way, I went back, determined to finish my project from Katie’s Artful Log Cabins class. Yesterday I finished the piecing and made the quilt sandwich, and today I completed the quilting, and put the binding on. Gotta love a 30″ X 40″ quilt. Even with dense quilting, it moved right along.

I don’t think its a masterpiece, but I am pleased with the finished product. I think it reflects my garden well, and I will enjoy looking at it for a while.

I did try Katie’s method of grid quilting block by block, and I did enjoy that.

DSCN4952

I am especially pleased that I made the decision to change the quilting in two areas–the reflective opening of the imaginary cathedral window, and pebble quilting to imitate the flower shapes of the white flowers. Oh, and you might notice that I circled the one little ladybug that showed up on the quilt 🙂

DSCN4953

I had enough pre-cut strips to use as the binding! And, I definitely over-cut the amount of strips I needed for class. I am thinking about making some regular  log cabin blocks with the leftovers. It might be fun to experiment with them.

Last Quilt of the Year!

dscn4856

When I last wrote, I vowed to clean up the studio. I did start that. I made one last Artful Oven Mitt, and then I put away all those scraps and insulbright. And I started to clear off the Janome table. And I came to this quilt, that had been folded up on the back of the table for….maybe a couple of years! I know I had the idea to make it after Victoria Findlay Wolfe won Best in Show at Quiltcon with her double wedding ring quilt. I found a date of 2012 for that quilt, so maybe I started this one in 2013.

ANYWAY, it has sat there for a while. I knew it was there, but I thought I was stuck on how to quilt parts of it. When I unfolded it, I found that I had made that decision at some point in time, and all it needed was to continue on quilting that design to get it finished. This is what I was enjoying on the Juki when I first got it–finishing up old tops and half-finished quilts!

dscn4848

This is one of my zig zag wedding ring quilts. I really do enjoy making these. They seem to hold up very well in the wash. You can see where I thought I was being artful and incorporated some decorator big print fabric in there. And I carefully organized the colors for the background squares and the small squares for the rings. I’m not sure any more what exactly I was thinking of…

ANYWAY, when I finished it and threw it on my bed to see if I had missed any spots, I was pleasantly surprised. I really like this quilt, and will keep it for myself for a nice springtime quilt.

dscn4850

I think it shrank quite a bit when I washed it, because most of the background fabric was some loosely woven hand dyed fabric. That caused the small “ring” squares to poof up bit more than usual.

dscn4849

I decided to not do an end-of-the-year review. Just too much work. I know that I have worked consistently, and am content with what I have produced. The Hallelujah! quilt took the majority of the time, but I also finished up the “what they said” series. And I did make a serious dent in the large bin of unfinished tops.

Happy New Year to one and all! Be sure to make time for quilting and creating in the new year.