Some Different Edge Treatments

Lately I’ve been trying different ways to finish the edges of my quilts. Especially since these two are full of handwork, it seemed fitting to do a more rustic edge. The first you have seen–I named it Worlds Within Worlds. Many years ago I thought about this–how you can live for a long time and never know that there is a whole “world” out there that you never knew existed. Like, for example, the world of angora rabbits and showing angora rabbits. I did that for a while, because I was a spinner/knitter at the time. Did you know this world existed? Heck, I didn’t even know there was a whole world of spinning out there, with conventions and everything, much less the crazy world of English Angora show rabbits!

Unknown

A real live English Angora show rabbit!

To bring it closer to home, we all know that the majority of people do not know about the big world of art quilts OR the world of show quilts. When you say you are a quilter, they only see what they know–bed quilts, usually grandma’s flower garden quilts 🙂

Here is the quilt Worlds Within Worlds with a hand-satin stitch edging using #5 perle cotton. I have to laugh at myself when I say I won’t do binding by hand because it takes too long, but I was perfectly willing to sit for several days doing this edging.

DSCN5513

Close-up of the edge:

DSCN5514

The next quilt you have also seen. It just sat sadly on my sewing table for months, waiting to be finished. Truth was, I didn’t know how I wanted to finish it. Then I noticed a small quilt I had done a long time ago, with a fringed edge. That seemed perfect for this very rustic cloth. And since it is all white around the edge, I wanted to make a quilted backing for it. I looked through my blue fabrics, and this bright dark blue was my favorite. I haven’t finished the quilting the blue, but wanted to share with you anyway.

DSCN5708

Here’s how I did the fringed edging. Measure and cut the quilt to the size desired. Sew two lines closely together around the edge (about 1/8 inch apart.)

DSCN5553

Carefully cut out the batting close to your sewn line.

DSCN5552

With little scissors, cut fringe on the bottom layer (for reference, that bottom layer is muslin.)

DSCN5555

Then take your fingernail and run it both ways along that fringed edge to make it fringier 🙂

DSCN5554

Lastly, since this was a homespun type of fabric, I pulled the threads to make the top fringe. If the top had been made of regular fabric, I could have just cut it at the same time I cut the bottom, and done the same with the fingernail.

DSCN5556

As my surgery date approaches I find myself starting new projects and working on finishing old. But I am distracted, so I’m afraid not much will get done in the next week or so. I started a new scarf/shawl, using some of my handspun yarn that is so beautiful–a blend of merino wool, bombyx silk, and cashmere. And I made myself a bead project kit, using Robin Atkin’s excellent book: Heart to Hands Bead Embroidery. I am hoping that it will be a good project for my post-op healing time.


The Trouble with Teaching

The trouble with teaching is that it takes a lot of brain power to prepare for it. At least that’s how it is for me. I can’t really think about starting a NEW. IMPORTANT. PROJECT. when I am thinking about teaching. All I can think about is “oh, I could share this,” or “wouldn’t that be great to have a sample of that to share.” And you can see, those are not bad thoughts. I just won’t be starting one of the big projects I have in my mind until after this teaching gig is done.

In the meantime, I wanted to have as many examples as possible to share with the class. I had a LOT of unfinished samples…ahem…have I mentioned I don’t like binding quilts?

In fact, I had five small pieces that needed to be finished. So one by one, I set out to get that done. I also didn’t have any handwork for my evenings, so finishing these substituted for that for a few days.

This is the “header” for the “what they said” series. It has a facing instead of a binding. This is my favorite method to face quilts now. 

DSCN3988

You’ve seen this before. Its not finished (I’m planning to bead it) but I wanted to take it to share with the class. So now it has a binding on it.

DSCN3990

And a binding on this little wonky piece, just to keep it contained. Oh, you’ll notice that I hand-stitched the binding to the front. Usually I machine sew my binding down. But I always say I think its weird that quilters do all of that beautiful hand-work on a binding, and hide it on the back.

DSCN3989

And this piece has been hanging around FOREVER, with unfinished edges. That was partly because I just didn’t know what to do with it. It was stitched almost to the very edge, and I didn’t want to cover up any stitching with a stupid old binding. I thought about zig-zagging the edge. And then it came to me–just do that by hand! It took quite a while. But I think it is the perfect edge for this little piece.

DSCN3987

Close-up. Hint: if you do this, it goes a lot quicker with #5 perle cotton 🙂

DSCN3986

And then I had this hexagon piece. I just didn’t know WHAT to do with it. I thought about mounting it on a board. I thought about putting it on top of another quilt (which is what I did.) But how to finish all those dang edges… I just didn’t want to fool with binding it. I was pretty sure it would not be my best work, trying to turn all those corners. So because I had “zig-zagged” the previous piece by hand, I thought, hey, that might work! I literally took 5 stitches, and said, no way am I going to go around this whole piece by hand. So then I decided to try zig-zagging by machine. I auditioned several green fabrics, and in the end, this beautiful piece won out. I placed the hexagon, which was already a complete quilt sandwich, on top of the piece, got it just where I wanted it, and pinned it carefully in place, on a flat surface. First, I straight stitched about 1/8″ from the edge, all around the piece. I thought zig zagging might distort it. Then I started zig-zagging. Three colors of thread, and three rounds of small zig zag later, it was firmly in place. Then I could cut out the back of the foundation fabric. Made a sandwich, and quilted it simply. It came out just the way I envisioned. Oh, and side-note. I thought I would just quilt it on my Janome, since I had a big quilt under the Juki. I had to stop three times in the first five minutes for stupid things, so I switched over to the Juki. Ahhhhh… much better 🙂

DSCN3985

Close-up:

DSCN3983

As I mentioned, I didn’t have any piece to work on in the evening. This was driving me nuts. I also have seen quite a few things lately that have little tiny pieces of fabric sewn together. I got this book. Her work fascinates me. So finally, after all these little quilts were finished, I decided one night to just make a sandwich out of some leftover muslin and batting that was laying around in the studio.I brought the sandwich, my bag of Cherrywood little scraps, and four or five “neutral” fabrics out to my comfy chair. I was somehow going to sew patches on top of this. As soon as I sat down, I knew I didn’t want to have muslin showing through on the front. So I set about hand piecing little bits of fabric together. Yesterday I got tired of hand-piecing, so I put the rest of it together by machine. And now I have a fun little piece to stitch on in the evening.

DSCN3991

So you can see, there are more good than bad things about teaching! I am looking forward to this assignment.

Moving Along

It seems like progress has been slow lately, but if you just keep plugging along, eventually stuff gets accomplished.

I thoroughly enjoyed my quick trip to Santa Cruz for Maria Shell‘s workshop! I stopped at the San Jose Museum of Quilts and Textiles, and they had a brand new exhibit up–what a treat!

Maria’s workshop was great, and she had lots of ideas for us to try using solid fabrics to make prints.

I had this great grouping of fabrics in my tote bin, and right away I thought “wouldn’t those work together well?”

IMG_1947

So I used them to make these curved pieces. When I started working on them, I wasn’t quite so charmed with their colors. So I put them up on my design wall when I got home, and I am pondering the possibilities. Even if I don’t use these particular pieces, I love the technique that she taught, and I know I will use it again soon.

DSCN3487

My gardener was due for a visit, and so the pressure was on to finish the quilt for his first granddaughter. Do any of you have “issues” with charging for your work? I don’t ever want to do anything for free, but on the other hand, I would not pay what I charge for a baby quilt–I want to say “go to Marshall’s, you can get a great baby quilt there for a fraction of the cost.” Nonetheless, we traded work hours for the quilt. MLG has done a miracle in my yard–worth so much more than a quilt.

DSCN3496

Here is the finished quilt–I just quilted simply around the birds, put some radiating lines around the “frames,” and did simple wavy lines in the sashing. I ended up following the fabric pattern to quilt the border. I wanted it to be sturdy, but not too densely quilted for a quilt that I hope is used and loved for a long time.

DSCN3492

I had the idea to cut out one of the bird prints, and use that space for the baby name and info. I was really pleased with how this came out.

DSCN3490

In the meantime, mostly in the evenings, I kept plugging along at the little squares that I was embroidering. Last night I finished the 153rd square! Now I am going to quilt it, and add a backing fabric onto it. I had a muslin back on it, just for stability, but now for the first time I am going to try my idea of adding a second back so that the embroidery thread work won’t show on the back. I am only going to show you a few of the squares that I finished. You’ll have to wait until its finished to see the whole thing.

DSCN3502

DSCN3501

(oops, I just noticed I didn’t finish the french knots on this one!)

DSCN3500

DSCN3503

And now on to the studio!

Anatomy of a Quilting Retreat

Amidst all of the construction of the past few months, I have been able to work here and there in the studio. Not in an organized fashion so much, or as consistently as I would like, but enough to keep the creative juices alive. So when it came time for the sheetrock installation, and that involved my toilet being removed for a few days, I decided to take a little spiritual/creative retreat. Oh, what a good idea that was! I was only here for about half an hour after the sheet rock work started–kind of like being at the dentists–eeeek!

I thought I’d share the evolution of my “creativity” on the retreat. BTW, I went to a great little place in Lake Tahoe that I have gone to before–3 Peaks Resort. I had rented a regular room, but as I heard the customer in front of me discussing a “suite,” I asked how much it would be to upgrade to a suite. It was $30/night. I did think about it for a bit, but decided that for $150 total, it would be well worth it to be able to spread out a bit, and to have a kitchen for my food.

IMG_0865

I took a lot of stuff with me. I had one collection of fabrics that I had put together at the end of my Sisters trip.

IMG_0871

I gathered another pile of interesting prints and solids in darker colors. I had my zip lock baggies of Cherrywood scraps (LOVE these.) And I brought what I thought would be good background/neutral fabrics. Oh, and a couple of squares of wool that I had nabbed at PIQF, and of course a case of my beloved perle cotton thread. And a couple of journals, my sewing machine, and of course some magazines and books for inspiration.

IMG_0869

DAY ONE: I had some general ideas of what I wanted to do. I started out with this checkerboard. I thought if the strips were cut unevenly, they might look sort of woven.

IMG_0870

Ick. That was so dismal that I almost went into that spiral “what made you think you were an artist? You’ll never be able to create anything worthwhile. etc.” You all know the drill.

That afternoon I regrouped. I put together the original set of fabrics, and decided to make a strip set of them, to use in creating SOMETHING. I have found that cutting into the fabric is key to moving forward. So I will generally cut strips and/or pieces out of the fabrics that I want to use. I don’t know the end use, and that may lead to some waste, but at least I start moving forward. And that was enough work for one day.

IMG_0872

DAY TWO: I cut some bigger pieces of those “neutral background fabrics” and started inserting the strips I had cut from the strip set fabric. The kitchen floor worked pretty well as a design wall 🙂

IMG_0878

In the afternoon, I decided to put together a little composition so I would have something to embroider on in the evenings. I also wanted to use that square of wool that I had brought with me. I remembered a “kantha tree” I had sketched in one of my journals from a photo of an actual Indian kantha quilt. (The “border” there is just the backing that I fold over to the front to keep the edges neat while I am hand stitching.

IMG_0879

DAY THREE: I decided I wanted to work with some of the other fabrics I had brought, so I cut various sized strips and made square-in-a-square blocks with crosses inserted two ways. Very fun. But tedious.

IMG_0881

Back to the kantha tree. I thought it needed a little more color.

IMG_0882

Eek. TOO MANY red dots. Took them off right after snapping this photo.

Playing with the squares on my “design wall”:

IMG_0883

DAY FOUR: I had tired of making the little squares. But I had a lot of strips still left. Just did some big log cabin style squares to use up the strips. I actually like these big squares very much.

IMG_0884


IMG_0887

DAY FIVE: Back to the original composition. I wasn’t that happy with it. So I tried adding some “borders” to it (greatly improved,) and then, surprise! I cut out and added some circles to it. I didn’t have my zig zag machine with me, so that was as far as this piece was going to go on this trip.

IMG_0889

In the afternoon, I went out for my usual cup of coffee, and Hey! Is that a bead store I see over there?? I indulged myself with a few types of beads, and then bought one spool of beading thread and a pack of those little blanket thingies that make beading so easy. Usually, buying the beads is as far as I go 😦 So I made myself get them out and start adding some to my little kantha tree.

IMG_0893

Hey, this beading actually goes faster than my hand-stitching! Who knew?

IMG_0895

BTW, I sew those circles on raw-edge with no fusible. The perle cotton keeps the edges nicely in place.

IMG_0896

DAY SIX: I had seen an article in a magazine about adding circles and cross-cutting the fabric. Kinda like what I’ve already done with my crosses, but taking it a step further. I didn’t follow the instructions in the magazine, and I didn’t get the same results as they had shown. But it was pretty fun. And might be something I keep in my arsenal. This piece, as well as the big log cabin blocks, and the little square-in-square blocks are all from the same group of fabrics. So they might end up in the same composition, or they might be used for all different quilts. I’m considering them “parts department” a la Freddy and Gwenny.

IMG_0898

Ooh, and in my little box of sewing supplies, I found a few yo yo’s that I had made on my Sister’s trip. I auditioned them on the Kantha tree quilt.

IMG_0899

Thus ended my little retreat. It was a very beneficial trip. It seems that someone who lives alone would not have to leave home to have a quilting retreat. But (aside from the construction) there are always distractions and responsibilities at home. It is good to get away and have no other responsibilities than being creative!


A Quilty Vacation

I wrote all about my trip to Sisters here. Suffice it to say, I had two whole weeks in Sisters, and the main activity was quilting! I arrived on a Friday and set up shop on the dining room table of the house I had rented. That gave me a couple of days to fool around before the Rosalie Dace workshop started. I had brought a LOT of fabric with me, both for the workshop, and for use outside of the workshop. So I picked out a few colors and pieces that I wanted to play with–mostly blues and greens, and put together some little pieced blocks. Then I played around with putting them on a background. I left a lot of space on this one on purpose–so I can add some words, probably for the “What They Said” series. (that edging is just the backing pulled around to the front of the sandwich to keep the edges clean.)

DSCN1931

I had leftover pieces, and I liked that backing fabric, so I made another little composition just for fun. Got some blank space on this one for words too 🙂

DSCN1932

And then it was time for the workshop to start. This was a workshop taught by Rosalie Dace about the influence of Kandinsky in the world of art, and how that could be used/interpreted in quilting. Rosalie is such a talented artist, and she is also an excellent teacher. If you ever have a chance to take any of her workshops, I would really encourage you to do that. This workshop was held at the Stitchin’ Post quilt shop, and I highly recommend it as an excellent place to take a workshop! Plenty of workspace and wall space for each student, comfortable chairs, good lighting, and an excellent lunch was served each day. Plus, you get a coupon for 15% off of any purchase made during that week!

It was interesting to hear the various reasons that people had signed up for the class. Many of the people said “I don’t like Kandinsky, but I wanted to take a class with Rosalie.” That was sort of how I felt. But as the class went along, I found that there was a lot to learn from studying Kandinsky. Rosalie spent time every day discussing various interesting aspects of his work.

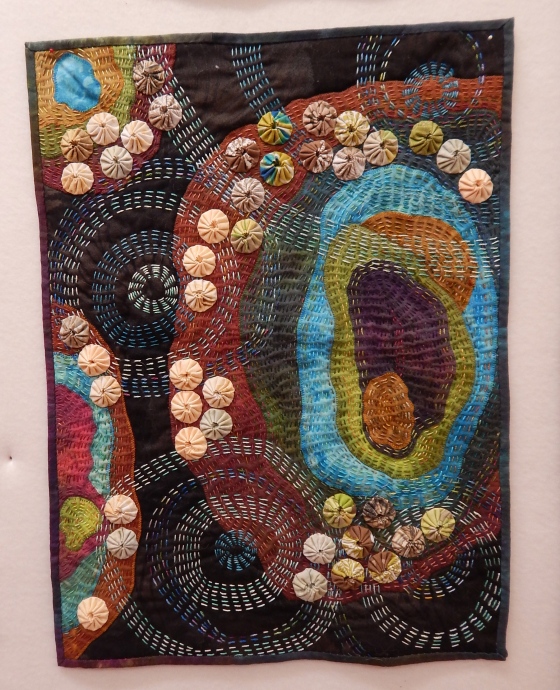
Remember this little piece? In the evenings, after the workshop, I would go home and relax and stitch on this little piece. I thought about how maybe my work has been influenced by Kandinsky after all–the curved lines, the straight intersecting lines, and of course the circles. The influence came second hand, though, since I had never looked at a Kandinsky painting before signing up for this workshop.

DSCN1930

Close-ups:

IMG_0534


IMG_0533

Back to the workshop. Our first assignment was to draw a bunch of geometric designs using some of the things that Kandinsky used in his work. Okay, that was fun.

DSCN1933

Then we were to choose one of those, and interpret it in cloth. I think I chose this simple one  because I thought it would be fun to add my stitching to.

IMG_0551

Rosalie came along, and said, now try it with a different background.

IMG_0550

Ahhh, much better. You can see I added a few other little embellishments.

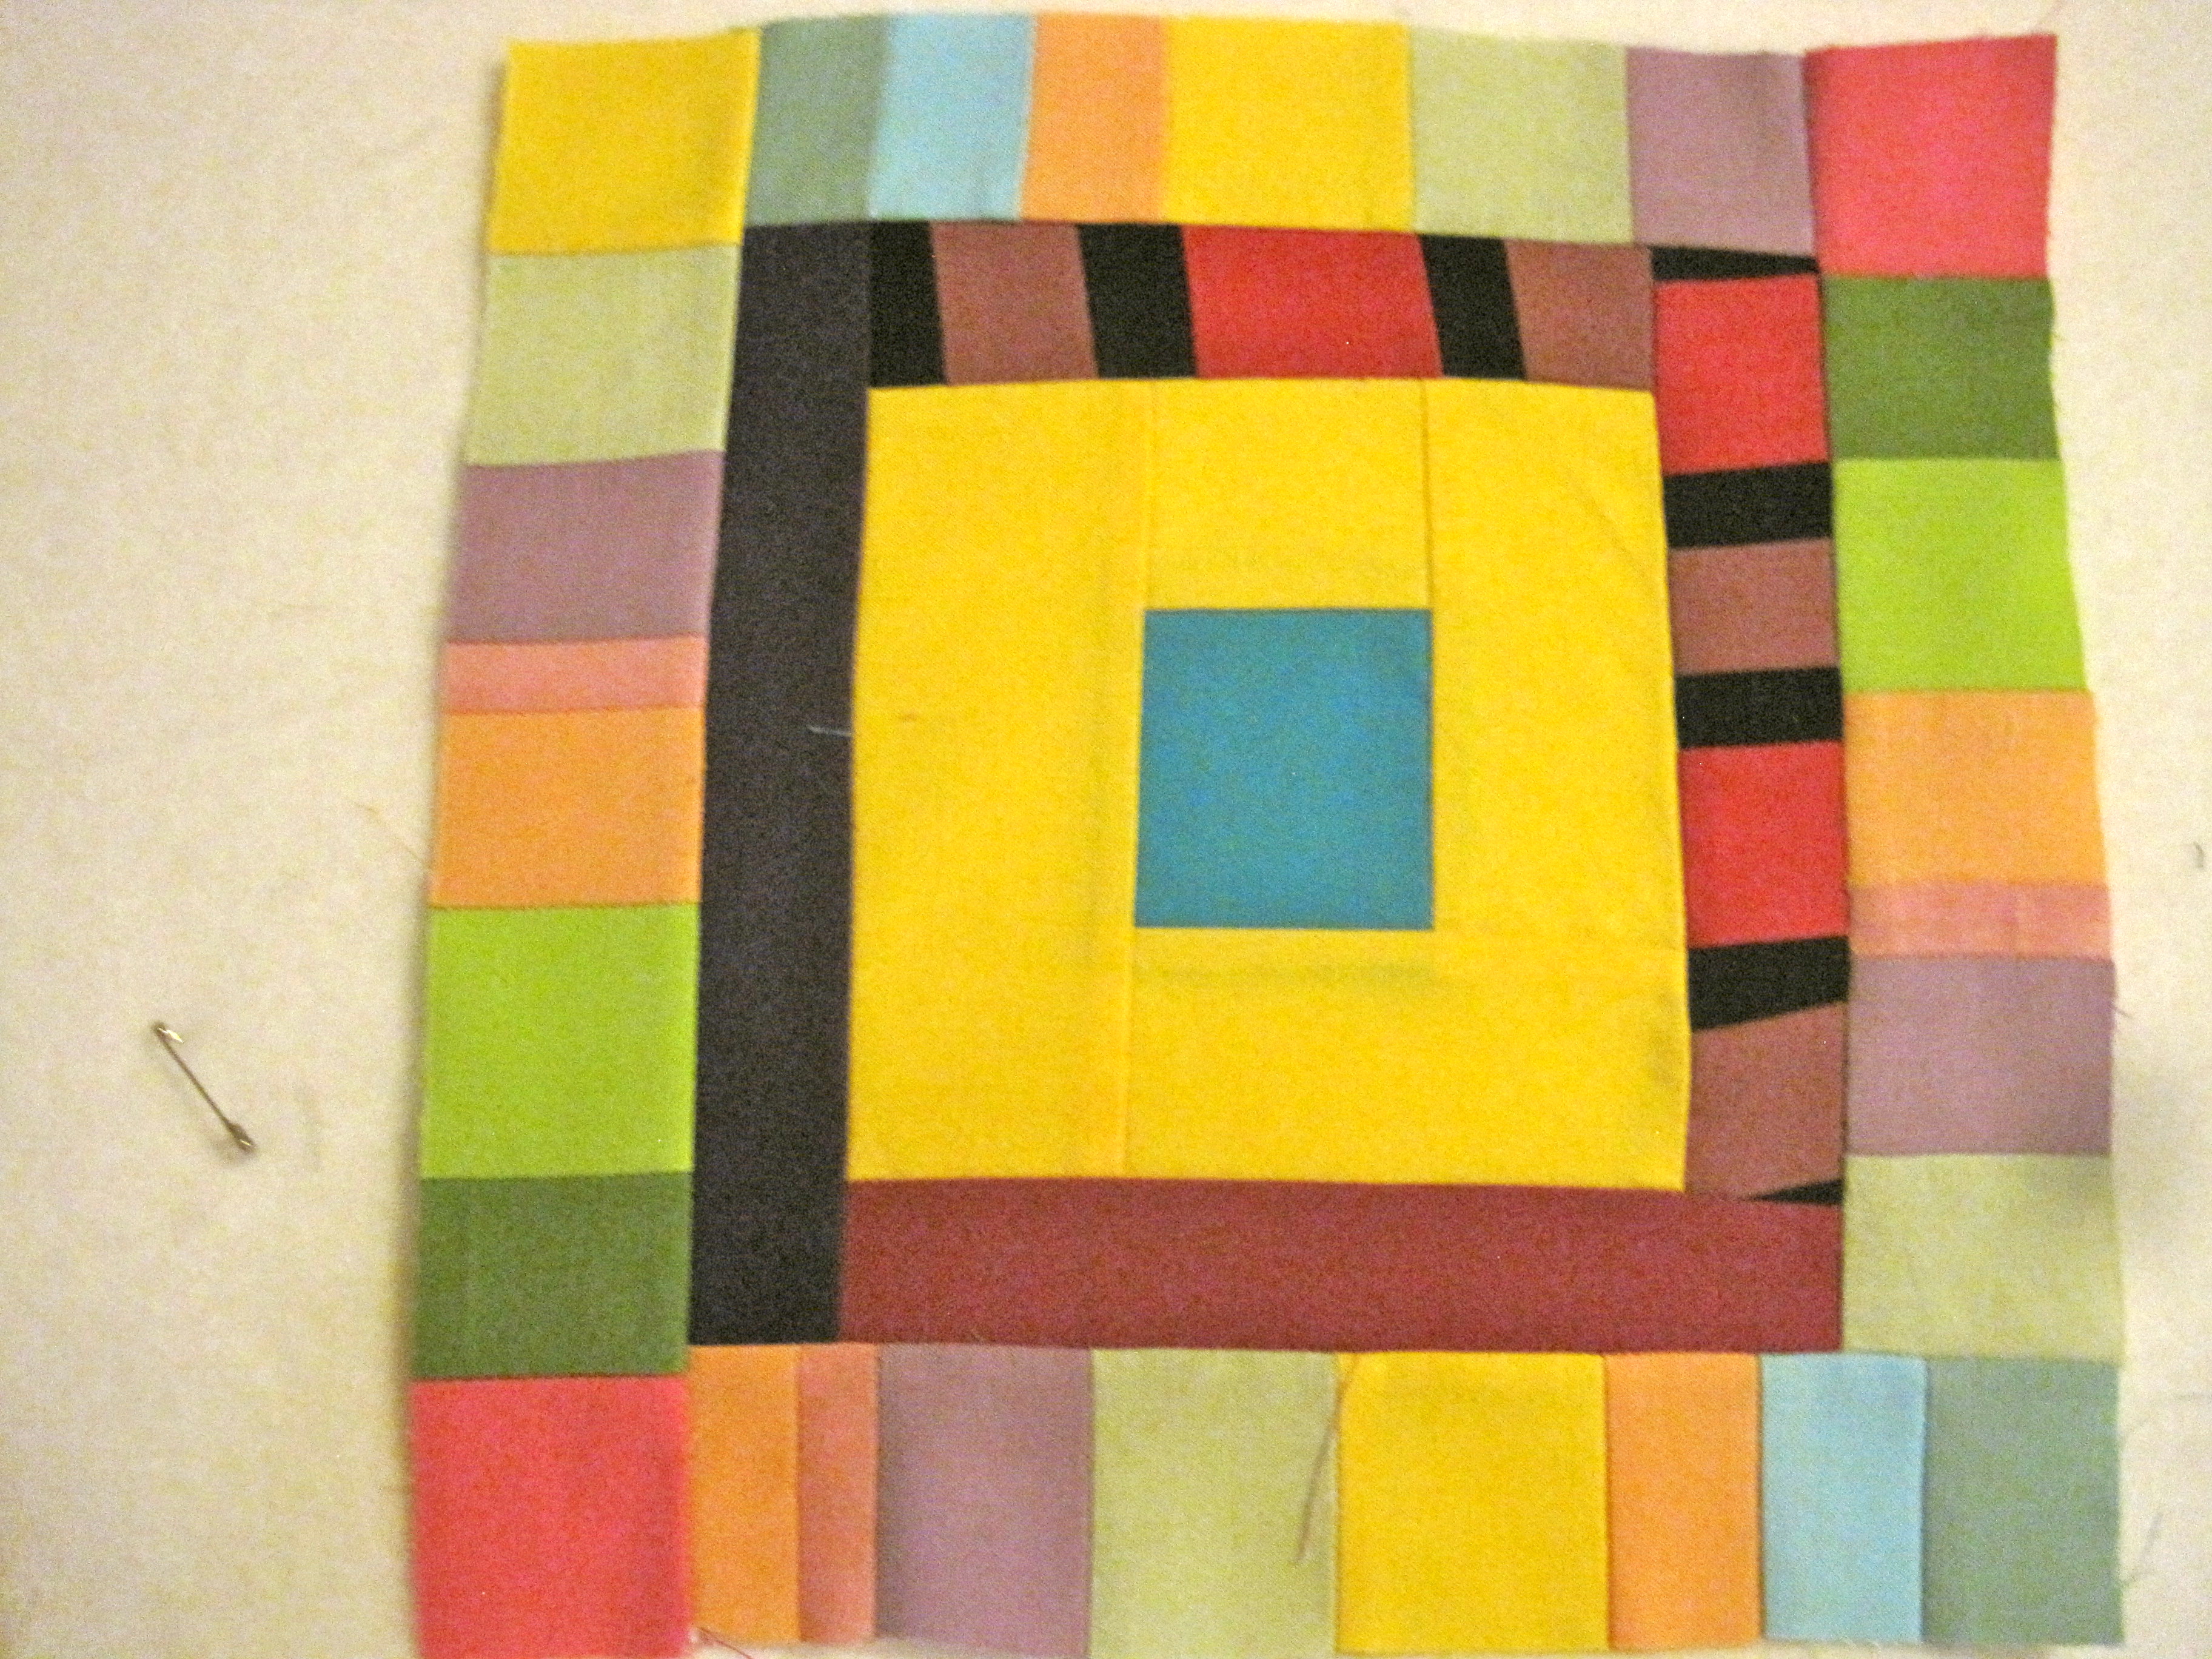
Next, we were to draw just some circle designs. LOL, nothing new for me. But I tried to challenge myself to do something different with the circles.

DSCN1934

In the afternoon, I stared at these four drawings, trying to decide what to do. Rosalie came by, and I pointed to the one with the most circles, and said, I like that one, but SO MANY circles to cut out. And her reply was “What else are you going to do this afternoon?” That was actually a good learning point for me.

So here’s the little circle composition I did. You can see its not an exact copy of the drawing, but its the same feel. (BTW, these little compositions are only about 10-12″ square.)

IMG_0548

And then the next morning (I think) we finished up one of the little compositions. I really like this little piece.

IMG_0582

One thing I learned from my table-mate was to use the zig-zag satin stitch to make these narrowing lines. Very cool, I think. You just set your machine to satin stitch (zig zag set on the narrowest width) and then start at one size of stitch, and keep decreasing it gradually as you stitch along (like–5.0, 4.5, 4.0, etc.)

IMG_0556

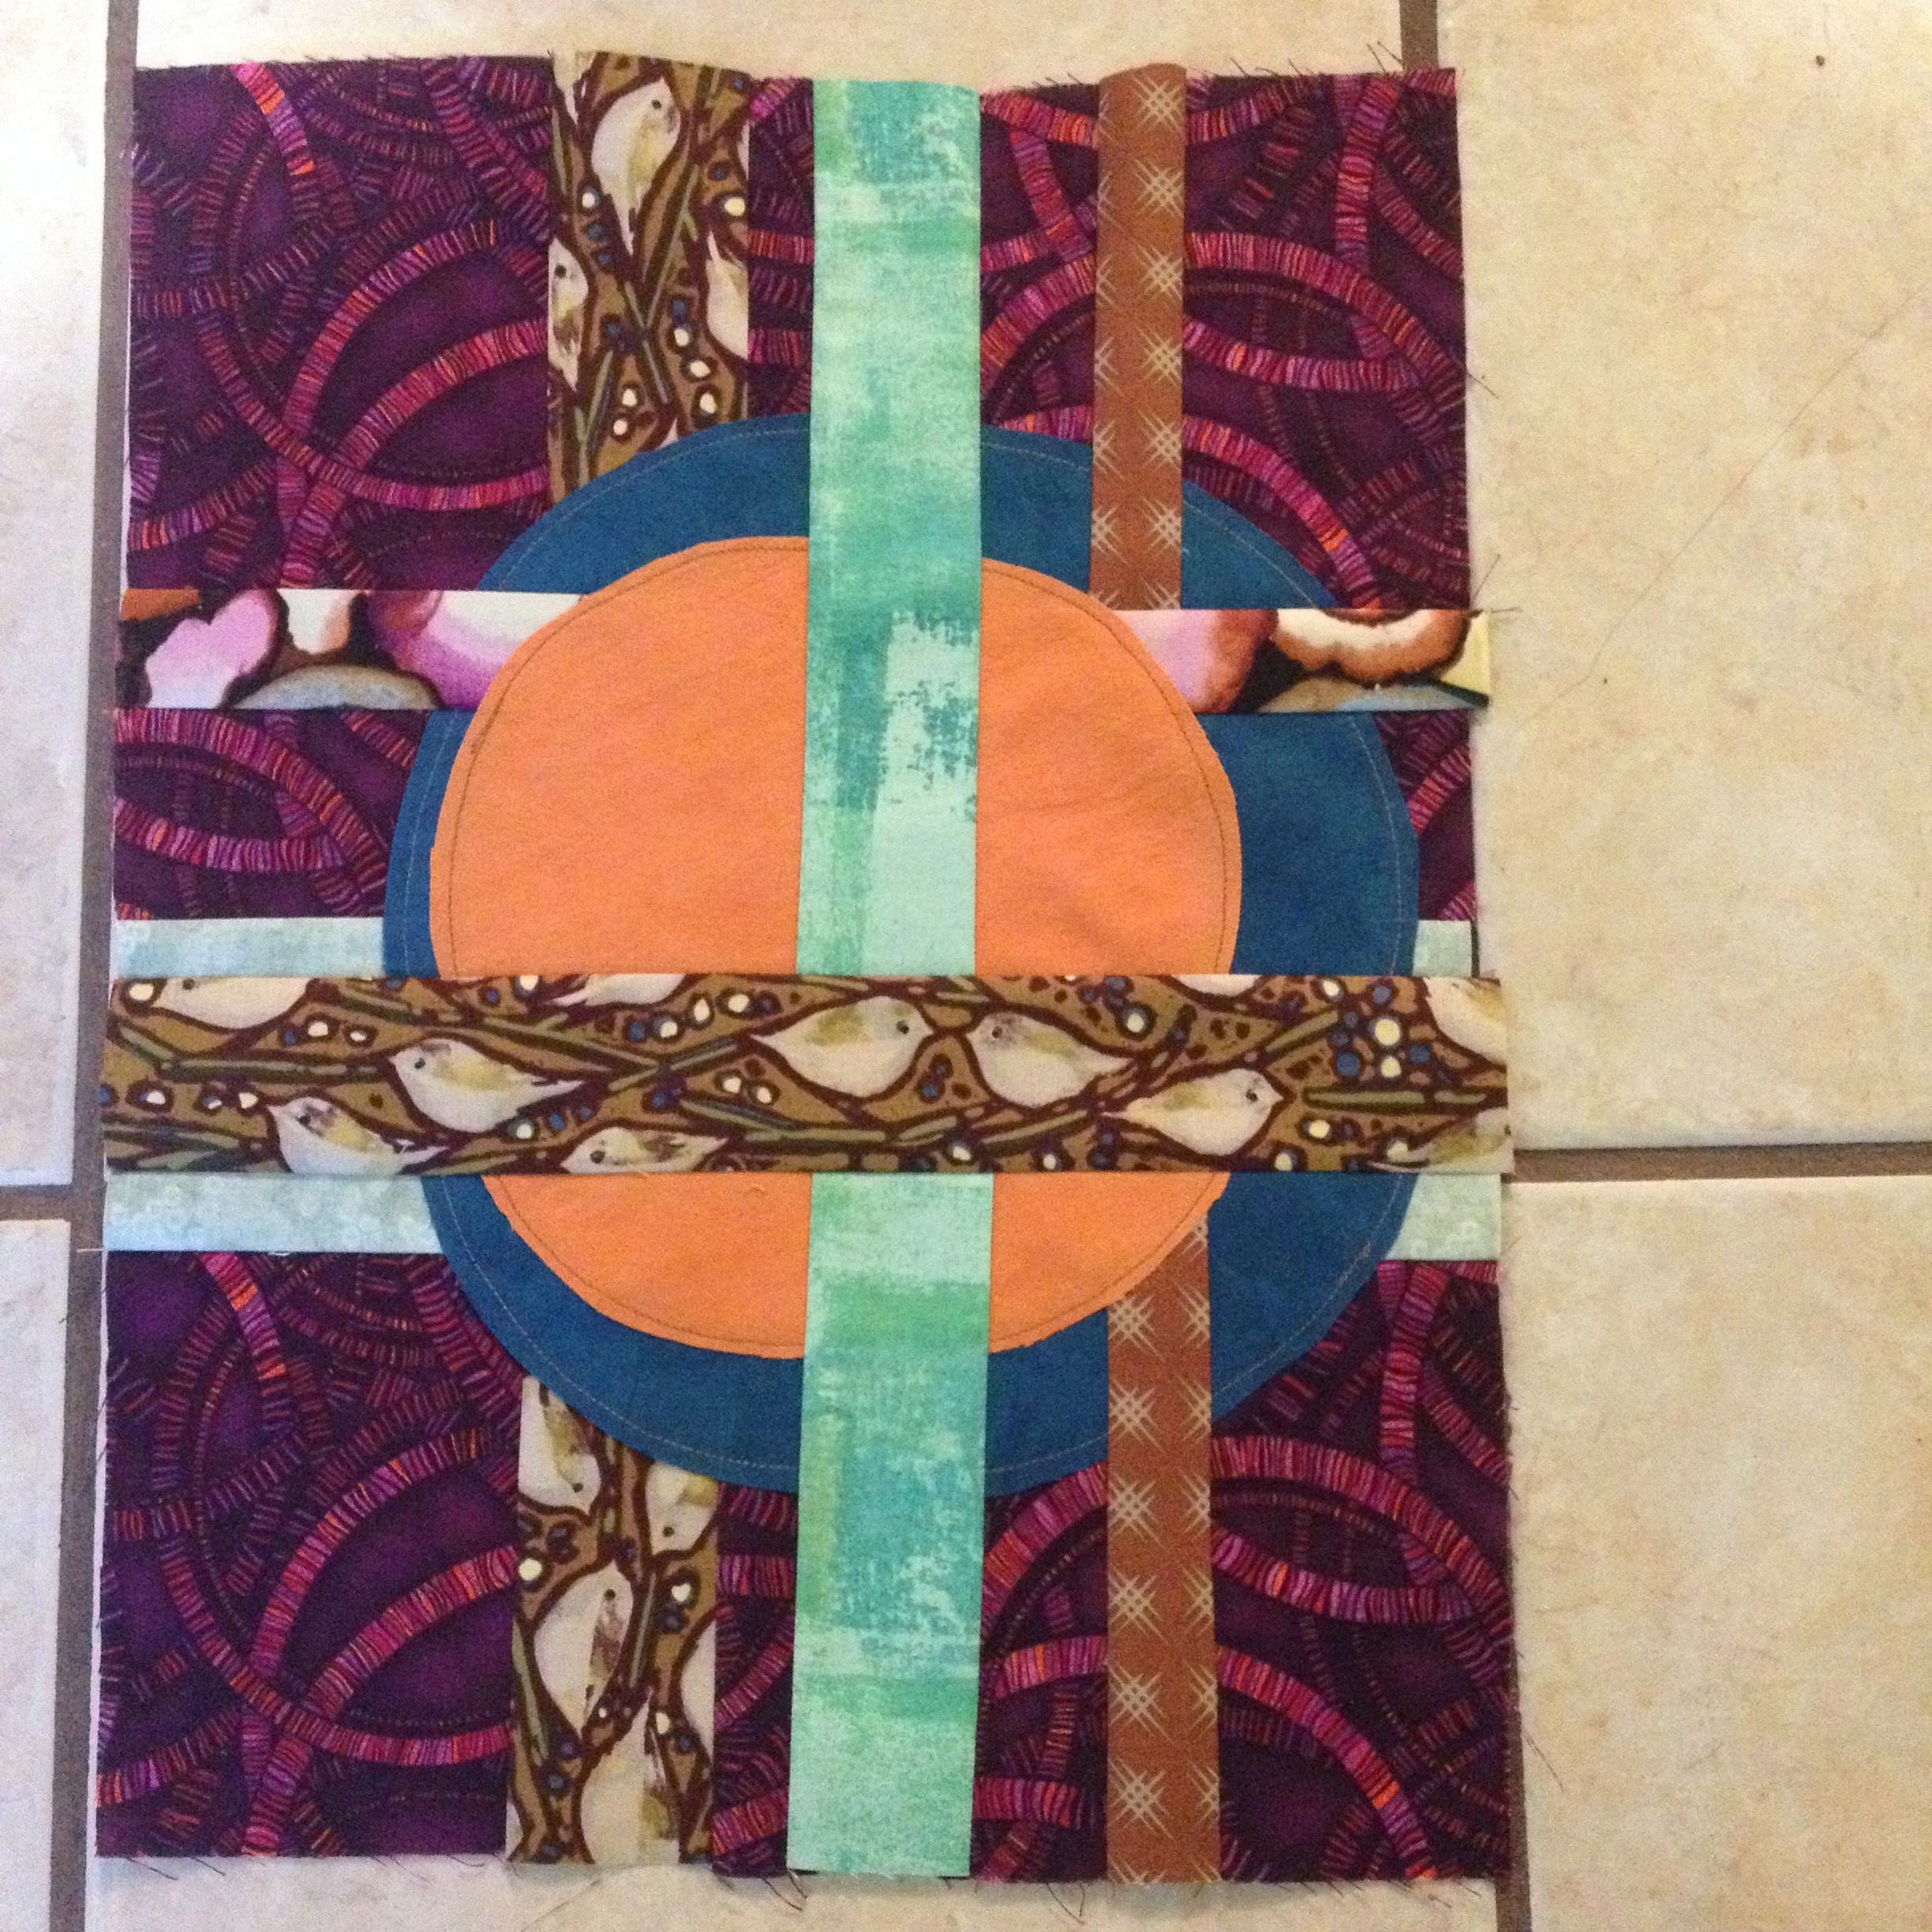
One morning, Rosalie did a slide show that included several of Kandinsky’s works. I saw one that piqued my interest enough that I drew a quick sketch in my journal. It was of overlapping rectangles. I thought that might create an interesting background to put other shapes on. I liked that idea well enough that I decided that would be the composition I would choose to work on for the remainder of the workshop.

I chose one of my hand-dyed pieces that I liked the most, and then pulled out a bunch of browns for the rectangles. Here is the beginning of my piece.

IMG_0560

And this next picture is as far as I got by the final day of the workshop. One thought I had about creating in a workshop–you are working in a pressure cooker. I usually only work on “art” pieces when I am alone. When I get stuck, I stop and think about it for a day or two. You don’t have that luxury in a workshop. So, while I like this piece enough to finish it, I don’t have any illusions about it being a great piece.

IMG_0581

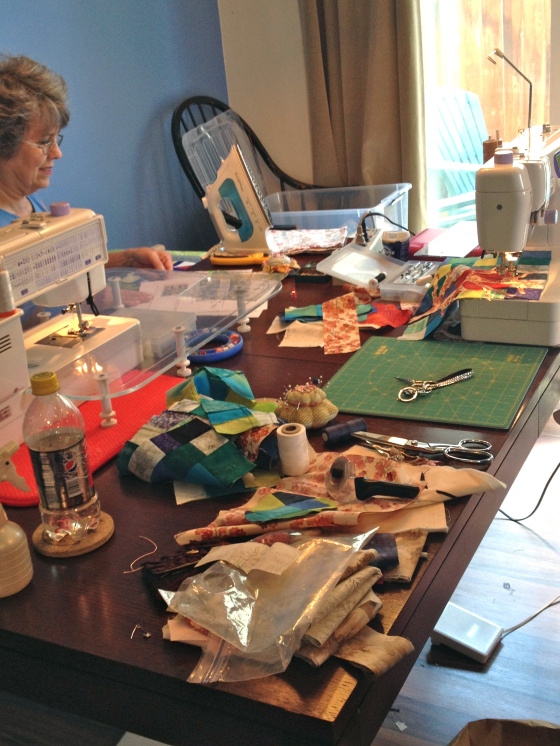
The last day of the workshop, my BF came to town. We were going to have our own private mini-quilting retreat!

I took a break from the workshop project, and started sewing the leftover blue and green strips from the beginning of my trip into nine patches. Then I didn’t quite know what to do.

IMG_0599


IMG_0600

I remembered some little trees in the quilt store that had caught my eye. I started playing around with putting those on top of the nine patches. Ooh, how fun! So fun, that I made one for each season! I thought I would put these together into one quilt, but my friend suggested making each one into its own small quilt. I think they might work really nicely in my new kitchen, or in the dining room!

DSCN1928

After my friend left, I got the workshop quilt back out and tried to add a bit to it. I put in quite a few quilting lines, and then played around with adding the black lines on top. I added the three vertical lines and was pretty happy. My friend suggested something needed to be done at the bottom, so I am auditioning the horizontal lines. They are not sewn down yet.

DSCN1924

And so my excellent adventure in Sisters, Oregon came to an end. I came home to a HOUSE UNDER CONSTRUCTION. I have found that it is very difficult for me to settle down to the serious work of creating when all this other stuff is swirling through my mind. So I have been working on hand stitching a previous project in the evenings. That is progressing very nicely, and I will share that in a future post.

An Ambitious Schedule

I’ve set myself an ambitious schedule for the next couple of weeks. Later, I’ll tell you exactly why I am doing this. Today I was very pleased with myself–I put the finishing touches on THREE quilts, two of which had been “in the works” for months (if not years…) Oh, and the thing that I was most pleased about? I found a particular piece of fabric that’s been missing since I packed up all my stash before the studio was built!!

First, I put the binding on “Stars in the Garden.” I think I’ll call it that since it was a star workshop that I took with Alex Anderson in the beautiful gardens at Alden Lane Nursery. It finished at about 50″X65″.

Next up, I finished “Found,” from Psalm 139. It is part of the Psalms series. I really enjoy creating these quilts and choosing just the right Psalm for the particular quilt. Most of the time I use a modern version of the Bible for the words on my quilts. This particular verse is from a favorite Psalm of mine way back when I was in my 20’s and at that time I was reading the Revised Standard Version of the Bible. I don’t read that version much any more, but I do still like it. The language is very beautiful. This quilt is about 26″X40″.

DSCN1548

In case you can’t read it: “If I take the wings of the morning, and dwell in the uttermost parts of the sea, even there thy hand shall lead me…”

Close-ups:

DSCN1553

DSCN1555

DSCN1556

And lastly I finished the latest cross quilt, from “The Signature of Jesus” series. Its a small quilt (about 10″X12″,) so I decided to embroider the whole thing. I haven’t added the words yet–I’ll decide where to put them and do that tonight. Each of these “Signature” quilts has the same words “GOD SO LOVED THE WORLD.”

DSCN1557

Close-up:

DSCN1562

Three quilts, three different sizes, all finished. Now that’s a good day!

A Little Diversion

This week I’ve gone a different way. I’m still quilting and sewing a bit. Like I said in the last post, embroidering the perle cotton to the cross quilt is slow work. Its a little boring, but its also very pleasant to do in the evening, when the only decision I have to make is what color of thread to use and how long to make the line of stitching.

DSCN0046

So I’ve been dipping back into a couple of my other fiber hobbies. I got a new electric spinning wheel that I LOVE. I can sit in my easy chair with my leg up, and spin and spin. It even has a mechanism on it called a “woolie winder” that winds the newly spun yarn evenly onto the bobbin. So I’ve been spinning up some of the fiber I bought at the Black Sheep Gathering back in June.

Two four-ounce skeins:

IMG_9860

And then I really started back in on my rug hooking. This is probably due to the fact that the big rug hooking conference is coming up in September. I’d love to show off the rug that I started a year ago. I designed it around the verses in Psalm 96. ( Let the sea and everything in it shout his praise!  Let the fields and their crops burst out with joy! Let the trees of the forest rustle with praise before the Lord, for he is coming!) I’ve finished another fish today.

IMG_9864

And I also decided to finish up a little doodle rug that I had started for fun. The theme of the conference is “Color My World.” And since I love color, and this doodle rug has colors that I love, I thought I would try to finish it for that particular category. I drew the idea of a grid for the background in my sketchbook. More easily drawn than hooked! But its coming along.

IMG_9861

Close-up:

IMG_9862

And just so I don’t forget how to use the sewing machine, I’ve been playing around with this group of fabrics, making a variety of blocks.

IMG_9867

A couple days ago, I followed this blogger’s lead, and did some patchwork scrap doodling. It was fun, and I was pretty happy with the results.

IMG_9869

IMG_9868

So that’s how its gone around here this week. A lot done, but it leaves me feeling like I haven’t accomplished much. Maybe its time to FINISH a project!

The Last Push

I have been working away on the quilts for my Housetop Quilts gallery show in January. Here are the two I just finished up last night. All washed and blocked, ready to go. They probably wouldn’t need to be washed since they are small wall quilts, but I use the disappearing blue pen on them, and it must be rinsed out. And when I work on the quilts with all the kantha embroidery on them, it takes months and they do get quite dingy IMO. I have three more I am trying to finish, and then I need to stop and make sure all the little annoying details are taken care of, like inspecting the backs for stray threads, and making some labels for them.

This first one is more of the traditional style of housetop quilts:

IMG_8542

I really like the hand stitching enhancement I did with just a few lines of perle cotton. It has the words to the verse from Joshua 1:9 on it: “Have I not commanded you? Be strong and courageous. Do not be terrified; do not be discouraged. For the Lord your God will be with you wherever you go.”

And this next quilt is, I believe, the only quilt with a non-Biblical quote on it. I love this quote so much. I saved the scrap of paper that it was originally written on for ten years in a drawer!

IMG_8543

The quote is from John Donne, and says “Since I am coming to that holy room where with thy choir of saints evermore I shall be made thy music; as I come I tune the instrument here at the door, and what I must do then, think here before.”

This type of stitching takes me months to complete. But I love every stitch. My inspiration for the circles was the verse in Hebrews that says “You have come to Mount Zion, to the city of the Living God…and to countless thousands of angels in joyful gathering.” Since it was a seascape (it is a piece of hand-painted fabric) I also thought about seashell shapes. Something between angels and seashells–you choose.

A close-up shot:

IMG_8532

The Housetop Quilts will be exhibited in Folsom, California, in the Art and Soul Gallery at Oak Hills Church from January 6-February 10, 2013. I will be there on Sunday, January 27 for a reception from 1-3pm. I’d love to see you there if you happen to be in the area!

Layer Upon Layer

I’ve been working steadily on the ‘Angels’ quilt.  Its interesting to me how this quilt has evolved.  Originally it was just an experiment with geometric squares and textures.

Then I machine quilted it in an off-kilter grid.

After I machine quilted the whole thing, I added the straight lines of perle cotton.

After that, I added the squares of wool that were zig-zag stitched on top.  And stitched some more with the perle cotton.  At this point, that was as far as I was going to go with this quilt.

And then I took it with me to Paducah and thought ‘what if…?’  And that’s when I started adding the stitched circles on top of everything else.  Usually a wool square was the center of the circle.

Not sure why I love this perle cotton and these circles so much, but I do.  I keep my stitch choices extremely simple, as you can see.  When I refer to ‘kantha embroidery’ that is the concentric running stitches.

I was trying to do something a little different, and I came up with this little design.

I liked it so much that I repeated it in a different colorway.

I was finally finished with all the circles today, and ready to add the lettering.  So you know how you kind of have an idea, but then you think–what if I ruin the whole thing by adding that???  So I drew out a rough sketch of the quilt, and figured out what angel words I wanted to add, and drew them in on the sketch, and then drew the lines (using one of those disappearing blue pens) around the circles and started stitching in the words.  And it looks just like I wanted it to!  Visible, but not overwhelming.  I like it when the words I add do not distract from the overall design, and people have to search a bit if they want to read what is written.

And now, its back to the chair, for a little more stitching and a little lap time for the doggies!

Better Pictures

Better pictures of  the quilt featured in yesterday’s post.  BTW, this is a small quilt, about 24″ X 30″.  I went outside and draped the quilt over a planter to get these close-ups.  You can really see the sheen of the silk and the texture of the wool in these pics.=


Inside, on my design wall.  It is interesting to me to see how the circles are much less prominent from a distance.  Not sure that is a good thing, as they do take a lot of work.

And now I am off to finally get some work done on this quilt.  I have not had my hands on any handwork all day long, and I am itching to get at it!