Quilting, Piecing, Embroidery, and Rug Hooking

I mentioned to a friend recently that I had been quilting, piecing, embroidering, and rug hooking, and loving all of it. I kept thinking about this, and I realized that part of the reason was because I had “stations” set up for each activity, so that it was very easy to go from one activity to another. I never understood before why people felt the need to keep more than one sewing machine set up, but now I do. I am much more likely to work on a quilt when the machine is all set up and ready to go. (And I do know that having a big new “toy” is a good motivator.) When I started working on that big rug in January, I rearranged my living room so that I could keep the rug frame up all the time. If the rug frame is not up, rug hooking just doesn’t get done–sometimes for months. And of course, my Janome sewing machine is always up, and I am more likely to go and sew together a few pieces when I don’t have to move a big quilt out of the way. My “embroidery station” is the same as always–my big comfy chair where I sit every evening with a dog on my lap, watching TV shows on my computer, and working on whatever embroidery project is at hand.

It has been so fun to look through my UFO’s and find quilt tops I had completely forgotten about, and others that were within a few stitches of being completed!

I really like this quilt. I was influenced by a little postcard of a magnificent Japanese quilt. Mine is not magnificent, but it was very fun to piece, and I enjoyed practicing “straight enough” line quilting on the new machine.

DSCN3846

This was part of a series of quilts I did for a “Pay it Forward” challenge SIX YEARS ago! I had so much fun making those little quilts for three of my good blog friends. This fourth one was for me, but I used a beautiful upholstery weight fabric on the back, and it was not fun to hand quilt through, so 7/8th’s of the way through, I just stopped. Except for the border it was almost completely quilted. I decided to try hand quilting again. Took two stitches (literally) and knew I wouldn’t finish. So to the machine it went. I am as pleased as can be with the result. I’m thinking about keeping it, just because so many good memories are attached to that challenge project.

DSCN3863

This quilt was completely finished except for the central chicken block. I got a little obsessed about that, even wrote a blog about changing it out, and then it got put away and forgotten about. I finished quilting around the motifs in the central block, and it was finished. Several of these quilts have had enough backing fabric that I was able to do the binding by just bringing the backing around to the front. VERY convenient!

DSCN3847

Piecing. I think I showed you this one  before. I just about used all of the strips in that box, and so it is done. Since the strips were cut with a ruler, I’m not sure why it has ended up a bit wonky, except that I didn’t use my 1/4″ foot all the time. Anyway, I think I will put a wide border around it to finish it off and to square it up a bit.

DSCN3844

These stars are mostly my project for Sewing Day with my ladies. So fun to do, but a bit time consuming. All done with 2″ cut squares from my box of little two inch squares.

DSCN3842

I had the idea to make these simple blocks to offset the star blocks, which are so busy, but I didn’t like the way that looked. So they might become their own little project…

DSCN3843

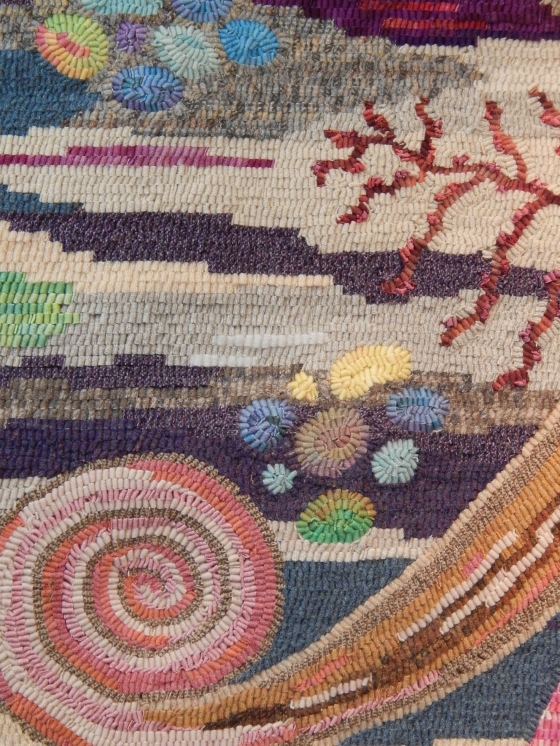
Rug hooking! I LOVE love love working on this rug. There is even more of it done now, but this is the most recent picture. Like I said, I have a place all set up in the living room, so it is very easy to just sit and do a little bit of hooking, if that’s all I have time for.

DSCN3813

Close-up:

DSCN3812

And embroidery. I have almost finished the embroidered words on all 17 of the quilts in the “what they said” series. I loved working on these, and trying to convey the thoughts and feelings behind the words through the way I embroidered the words. Now to quilt and finish them. I will show them all to you at one time, as that is the way I think they will have the most impact. Here is the one I chose to use as the “header.” Just the straight line kantha stitching over the whole piece.

DSCN3887

And that is how life is going in the studio right now. I wake up every morning excited about what I am going to work on that day.

Interruption

In case any of you reading this blog do not read my other blog or follow me on Facebook, my nice calm life was interrupted a week ago by the Butte Fire! It was fairly close to my home, but then the wind took it in a different direction. Me and the doggies evacuated for a few days. But now the fire is under control, and all is returning to normal, at least in my little life.

I don’t think I ever showed you the finished quilt P.I.N.K. I do love it, and will use it as my favorite lap quilt this winter.

DSCN3294

I quilted each block a bit differently. That probably kept me going on it.

DSCN3296

I love how a quilt crinkles after you wash it!

DSCN3298

Last week, B.F. (before fire) I was determined to get back to my rug. I finished the hummingbird and these trumpet flowers. And that’s as far as I got. Hopefully, more rug hooking will be on slate for Monday.

IMG_1520

To get back into the studio, I did a little fun, no-meaning playing around. These star blocks are all done with my box of little two inch squares. Very fun to first piece some four patches, and then to choose two more colors to make these stars. I actually like this method of making the star points (or flying goose blocks.) There is a seam in the middle, but it seems to be a very accurate way of making those   blocks. I just take the two inch squares, and draw a line right down the middle diagonal and then stitch on the line.

DSCN3354


DSCN3355

B.F. I had started hand stitching on this piece. There are 150 two inch squares, so lots of places to do a little doodling. This was the hand project that I grabbed to take with me when we evacuated.

DSCN3367


DSCN3368


DSCN3369

Speaking of evacuating, I did not take much with me when I left. How do you decide what to take and what to leave? I did not take any of my finished quilts. I took my Singer Featherweight, and I took my rug hooking wool stripper tool, as it was near the back door, and I am quite fond of this tool 🙂 I just took one handwork project, and one knitting project. Three changes of clothes (just right!) and the best thing I took was the doggie bed. It kept the girls calm in a new environment 🙂

In church last Sunday (in the midst of the Butte Fire) we had such a special service. There were several couples there that had lost their homes to the fire. I did have a little inspiration for a quilt about the fire, and I am working on that this week. I will share that with you next time.

In the meantime, be safe and be thankful!

An Ambitious Schedule

I’ve set myself an ambitious schedule for the next couple of weeks. Later, I’ll tell you exactly why I am doing this. Today I was very pleased with myself–I put the finishing touches on THREE quilts, two of which had been “in the works” for months (if not years…) Oh, and the thing that I was most pleased about? I found a particular piece of fabric that’s been missing since I packed up all my stash before the studio was built!!

First, I put the binding on “Stars in the Garden.” I think I’ll call it that since it was a star workshop that I took with Alex Anderson in the beautiful gardens at Alden Lane Nursery. It finished at about 50″X65″.

Next up, I finished “Found,” from Psalm 139. It is part of the Psalms series. I really enjoy creating these quilts and choosing just the right Psalm for the particular quilt. Most of the time I use a modern version of the Bible for the words on my quilts. This particular verse is from a favorite Psalm of mine way back when I was in my 20’s and at that time I was reading the Revised Standard Version of the Bible. I don’t read that version much any more, but I do still like it. The language is very beautiful. This quilt is about 26″X40″.

DSCN1548

In case you can’t read it: “If I take the wings of the morning, and dwell in the uttermost parts of the sea, even there thy hand shall lead me…”

Close-ups:

DSCN1553

DSCN1555

DSCN1556

And lastly I finished the latest cross quilt, from “The Signature of Jesus” series. Its a small quilt (about 10″X12″,) so I decided to embroider the whole thing. I haven’t added the words yet–I’ll decide where to put them and do that tonight. Each of these “Signature” quilts has the same words “GOD SO LOVED THE WORLD.”

DSCN1557

Close-up:

DSCN1562

Three quilts, three different sizes, all finished. Now that’s a good day!

Taking a Break and Returning to your Work

This is not the first time I have declared a moratorium on my quilting. In the past, it caused me some angst–would I ever return to my quilting? Would I lose my forward momentum? How would I ever get to all the ideas I had if I kept taking breaks? Now I think that it is an excellent idea. It really frees up a lot of time, and I usually get more done than I had even planned on. In this case, it was finishing my little oriental hooked rug, and I had the added bonus of having the time to clear out my bedroom and closet, as well as the unexpected (and time-consuming) project of choosing paint and carpet colors!

Here is a bit of the new bedroom colors, along with the quilt that is currently on my bed. Good grief, I did not even realize until I saw this picture that the color I was trying to get for the walls was the EXACT SAME COLOR as the inner border of this quilt!!

DSCN1484

I returned from my adventures at rug hooking camp refreshed and looking forward to resuming my quilting routine. I left a lot of quilt projects unfinished, and I had a lot of new ideas I wanted to try out. Being a little bit disciplined won out, and I started working one by one on the unfinished projects.

First up, I finished piecing together the dark blocks for the cross insert in this quilt.  I decided to cut the cross with a wavy edge, and then decided that it would be easiest to raw edge appliqué (zig zag) this on top of the background piece. I liked the way it looked with the cross way off center. I will add words, but I’m not sure how I want to do that yet. I’ve already made the quilt sandwich and have all of the cross quilted.

DSCN1497

Here’s a close-up of the cross “fabric.” It is fun to do this, but also slow going, so by the time I have enough for a project, all the fun has gone out of it and I am ready to move on to the next project : )

DSCN1504

Then I remembered that I had this quilt in the closet, almost completed. I got it out, marked the places where I had missed the quilting, and got that done. It just needs binding to be completely completed. This is a quilt that I started in an Alex Anderson workshop on stars. I had this background fabric (that obviously I love,) and wanted to use it as my focus fabric. Its big enough to use on my bed. Hmmm…seems I do have a coral and aqua obsession going on here.

DSCN1502

I quilted the stars “in the ditch” and then filled in the background with huge feathers surrounded by spirals and bubbles.

DSCN1503

And this next project I can hardly believe myself that I got this done. I do not like working on large quilts. I do not like making big quilt sandwiches. But once in a while I make a quilt that just insists on being big. That is the case with that double wedding ring that I was working on before the moratorium. I really do like this quilt, and so I decided that I must make the sandwich. And I have to tell you, I LOVE my big ironing surface!!! It was big enough that I could use my “steam iron method” to make this sandwich in four quarters.

DSCN1499

I took this picture to show the ruler that I slip between the ironing surface and the quilt sandwich so that I can put the pins in. When I steam the quilt top like this I do not need to put very many pins in place. I usually take the sandwich directly to the machine and either machine baste it together or stitch in the ditch between the blocks.

DSCN1500

Oh, and in the measure twice, cut once department…DON’T do the math in your head. Write all the numbers down, and probably don’t do it when you are already tired. I was VERY SURE that I had made everything plenty big. I started making the sandwich, and the backing was only an inch and a half larger than the top on two sides of the quilt. That is cutting it a little too close, even for me.

It feels good to be home, good to be back working in my studio on my quilts, and very good to be back blogging about my adventures!


Making Progress

I’ve been making progress on a number of quilts this week. I went through a huge unorganized pile of quilts and quilt tops and organized them into several categories:

  • Quilts needing a binding
  • Quilts needing finishing touches
  • Quilt tops that I would like to finish sooner
  • Quilt tops that I can finish later
  • and, Finished quilts.

So I got the binding put on one quilt. I’ll show that one later–the pics I took were not good. And today I decided to get out the star blocks I had made at that Alex Anderson workshop back in March and get it finished. If you remember, I wanted the stars to float on top of the focus fabric that I had chosen as a background.

This is how I did it. I took the yardage of the focus fabric and draped it on my design wall. Then I started arranging the stars on it. Believe it or not, I liked my first arrangement, and I was surprised to find that I didn’t think I needed any more stars. Then I got some graph paper and drew a schematic for where the stars would be placed. I made it easy on myself by making the plan on a grid of 6 and 12 inches (the size of the stars.) Then I took a photo of the star’s placement on the design wall, and printed that out as a guide for where to place each star.

DSCN0617

By using the grid/graph paper pattern, I figured out how I would be able to piece it together, and made a list of how many and what size pieces I would need to cut out (of the focus fabric.) I checked this twice (because that is where you can make a lot of mistakes…) I only cut one piece wrong–I cut it 11 1/2 inches instead of 12 1/2 inches. There was nothing to be done but to cut a 1 1/2 inch strip to add to that piece (at that point I didn’t have enough fabric left to cut a 12 1/2 inc piece.) In the long run, I don’t think anybody will notice (except me, once in a while.)

DSCN0616

And then, referring carefully to my reference photo and my graph drawing, I pieced it together. I even figured out what I will use for a backing. Tomorrow I will put that together and maybe get a sandwich made!

DSCN0603

I am excited about the possibility of a new springtime bed quilt.

Quilt Workshop!

I almost forgot to write about the great quilt workshop I went to last weekend! It was Alex Anderson’s classic Stars workshop. It was a perfect getaway. Alex holds her workshops in the beautiful Alden Lane Nursery. The people at the nursery are so friendly and accommodating. They provided us with a wonderful gourmet luncheon held in the greenhouse each day.

But back to the quilting! Alex is a wonderful teacher. She knows what she’s talking about, but has such a friendly and relatable manner that it makes you feel relaxed even as you learn new techniques. This was just what I wanted for this weekend. A lot of creativity and NO stress!

I used to love making stars. They were one of the first things I fell in love with after I started quilting. But for the last year I’ve been working on more abstract and improvisational quilts, and working on points and matching seams were a far cry from what I’d been doing.

Alex led us through a series of exercises, doing increasingly difficult stars. Here’s what I was able to do in 3 days!

IMG_9143

I’m very proud of that one Le Moyne star! I followed her directions exactly, and what do you know? It worked! The stars are laid out on the focus fabric I chose. I really love this poppy fabric, and I am hoping to make a new quilt for my bed with the poppies in the background and the stars kind of floating on top. We’ll see if that works out.

I came home and started working on the raw edge log cabin, so the stars are waiting on the sidelines right now. I’m getting close to finishing that log cabin quilt, so I’ll be back to share that with you in a day or two. Or three :))