A Tapestry turned into a Quilt

Last fall, when I went to New Mexico to learn tapestry weaving, I drew a very complex pattern. Then when I got home, I decided that I had enough hobbies, and decided not to follow up on the tapestry weaving. But I kept looking at that picture that I had drawn, and decided that it would make a great quilt.

So I ordered almost all of Jennifer Sampou’s sky fabric, and turned it into this quilt. After I did all the circles, I decided that I would put outlines of leaves in the square spaces. Here is the quilt:

DSCN6654

And here are a few close-ups:

DSCN6659

DSCN6658

DSCN6656

DSCN6657

DSCN6655

This was a fun quilt to work on. I decided that I would kantha stitch all the backgrounds, using thread that was similar to the color of the fabric.

Two Finished Quilts

Here is a quilt that I worked on for a very long time. It is basically one piece of fabric with a large pattern. I decided to use the kantha stitching for the motifs, and then use cross stitch to fill in the blank spaces.

DSCN6645

Close-ups:

DSCN6646

DSCN6647

And here is the finished wool appliqué quilt that I worked on during the Covid 19.

DSCN6653

All the little pink squares are cut out of the big print around the border. On purpose I did not quilt it heavily. I did that on one quilt and it wasn’t that pleasant to sleep under. I will look forward to sleeping under this quilt next winter!

Close-ups. I made this daffodil myself.

DSCN6648

DSCN6651

Something New

I spent a little time on Pinterest exploring Kantha Embroidery. I saw several things that were interesting. I saw some raw edge simple kantha embroidery that interested me. It looked like the strips had been torn. I didn’t want to do that, because when you tear cotton, it can get really distorted. Talking with my BF, she suggested cutting the strips and then washing them. So that’s what I did. I free-cut a lot of strips of mostly neutral fabrics. And then I put them in lingerie bags and washed them. I was surprised at how frayed they got even in the lingerie bags! Then I prepared a quilt sandwich with muslin on both sides and a cotton batting in the middle. I hand basted it, and then started. And here is the finished product. It was very fun to do.

DSCN6545

When I looked back on Pinterest, I noticed that something like this was called Japanese Boro quilting…

Here’s a close-up so you can see how I did it. On each piece, I quilted all the way through on each side so it would be quilted. On the stitching in between, I just went through the top and batting.

DSCN6546

Then I saw on Pinterest a very complex Kantha Embroidery. I kept that on my iPad for a long time. It was more complex than I really wanted to do, but it intrigued me. So finally I drew something and put that on cloth with the blue marker and started my own embroidery. I am enjoying working on this.

Here’s the blue drawing. As usual, I will add more as I go along:

DSCN6544

And here is what I’ve done so far:

DSCN6547

Close-up:

DSCN6548

Also, I finished that “Parable of the Seeds” rug. It is about 24″ X 26″. This is the fastest I’ve ever finished a rug. It was simple and very fun to work on.

56336F9C-F4DC-40B2-9702-6D22F41624A6

And here is a shot of my garden for those of you who don’t read my other blog:

DSCN6536

Its time to clean up the studio! And organize my rug wool. Its getting out of hand!

Christmas is a Time to Finish Things!

I notice I have this pattern at Christmas. I like to finish things. So far I have knit four scarves from my handspun yarn for gifts. Not just knit them, but I blocked them too! And then I decided I had delayed finishing this Christmas quilt for too long. so I just went out there and finished the quilting. I put a binding on it, and then it needed a lot of blocking because of the embroidery in the middle. I’m not 100% sure that I accomplished what I was trying to achieve with this quilt.

DSCN6412

If you remember, the embroidery was done with the Cottage Threads perle cotton from Australia.

Here are some close-ups:

The lettering:

DSCN6413

Embroidered motifs:

DSCN6416

DSCN6417

I added a little embroidery to the trees and “rocks”:

DSCN6415

DSCN6414

And, I finished my Kantha blanket! The running stitches are about 1/2 inch apart. I also put two lines of turquoise thread 1/4 inch apart about every six inches, just to add some interest. The rest of the quilt was stitched with some variegated silk thread that I bought at a weaver’s convention!

DSCN6418

DSCN6419

Oh, and most importantly, at Christmas time I always feel pressured to try to finish my rug that I started this past February. I would like to share it FINISHED when I go to my rug hooking thing this February, but I’m afraid there is a lot that is still unfinished. I wrote “make a cow” for three or four weeks on my weekly to-do list. Somehow I get afraid of rug hooking when I don’t do it consistently. But finally, I DID make a cow :))

DSCN6427

I also hooked the entire hillside behind her. It took several mornings to finish that.

If I don’t write again before Christmas, I hope everyone has a very merry and blessed Christmas.


Another Kantha Stitching

Do you remember this little piece that I made a few years ago?

DSCN1930

I decided to try to make another one, a bit larger. For both of them I made a quilt sandwich and then quilted a grid on it. Some of the design elements go through the grid, but most designs are kept inside of the grid.

When I looked at this older one from a distance, I could see that the lighter lines provided some kind of design element. So I decided to do that more purposefully on the new piece. I filled in all the lighter lines first, and then put in the brighter, darker designs. Finally, I got out my darker thread to fill in the backgrounds.

Its funny, with most anything I do, there comes a time when I am bored with it. I usually don’t put it away, but I just won’t pick it up and stitch on it for quite a while. And then one day, I pick it up again, and just keep stitching until it is finished.

To finish it, I cut one edge off at a time at about 1/4 inch, and satin stitched it with #5 perle cotton thread. (I cut one edge at a time because I didn’t want it to get frayed as I worked.)

Here is the new piece:

DSCN6396

And some close-ups:

DSCN6395

DSCN6394

Here is a picture of the back of the piece. I hope you can see the grid that I quilted before starting the embroidery. This piece is about 14″ X 11.” The grid is just a series of squares and rectangles.

DSCN6403

This is a fun project. I recommend trying it. It is already quilted by the grid. So the running stitches just go through the top and the batting for the most part.

I Can’t Help Myself

One day, (before finishing the churn dash quilt or doing that darn quilt photography) I looked at a picture on my photo board. It was a pretty quilt with large swatches of fabrics, and I had written–“be more adventurous in my quilting.” I just liked that idea of using big pieces of fabric.

And…I had an ulterior motive. I needed a new kantha blanket to work on in the evenings!

So I chose some fabrics that I loved, and I started putting this quilt together. Surprise, it only took me one day to piece these big pieces of fabric together.

DSCN6248

I made a quilt sandwich, using Dharma Trading Company’s “harem cloth” which was a cotton gauze, and muslin for the backing.

I had bought a skein of hand dyed silk at the weaver’s convention, a similar size to #8 perle cotton. I marked lines about 6″ apart on the quilt, and kantha stitched those lines to stabilize the quilt. I don’t know if you can see it, but I decided to add two lines of perle cotton in a turquoise just for something different to do.

DSCN6288

Of course, I have other embroidery to get back to. But when I don’t want to think any more, a kantha blanket is the perfect project to work on!

Teaching and Catching Up

I will be teaching Quilted Embroidery in a couple of places in the next few weeks. I will be teaching a 3 hour Intro to Quilted Embroidery at Oak Hills Church (scroll down for Art Immersion Week) on Thursday July 26. And I will be teaching a 6 hour class at The Cotton Patch on Saturday August 4, also on Quilted Embroidery.

I got an email from one of my students in a previous class. I am always thrilled to see that some students enjoyed the class and finish their project! Jackie got creative and added a small panel to the bottom of her piece so it would fit in her wire frame. I love it!

Jackie’s work:

20180712_113640

And catching up on what I’ve been working on–I finished this kantha blanket. I used all 12 gauge perle cotton (and a few Sulky blendables in 12 weight) to embroider this blanket.

IMG_0236

IMG_0238

I went to Convergence (Spinners and Weavers Guild) in Reno last weekend. I can’t stop spinning some of the fiber I got there!

IMG_0241

And finally, sometimes things don’t work out quite the way you want them to. This is the word PEACE on my big PEACE quilt. Those letters are about 8-10 inches high. It took a long time to embroider the uprights on each letter. But because I used white thread on white fabric to outline the letters, it is basically unreadable. I will use the ecru thread to outline stitch along the white thread. I do mean for the writing on this quilt to be subtle. But I still want it to be readable 🙂

IMG_0242

There are 12 verses scattered around this quilt, all about PEACE. I have started the quilting, and hope to finish it in the next month or so.

IMG_0243

More is happening here in the woods, but that will have to wait for another post!

Catching Up

Posting on Instagram has been fun. Its easy to take a picture at the end of the day and write a sentence or two about what you’ve been doing. So here’s what I’ve been doing since my last post. My Instagram name is debbyschnabel.

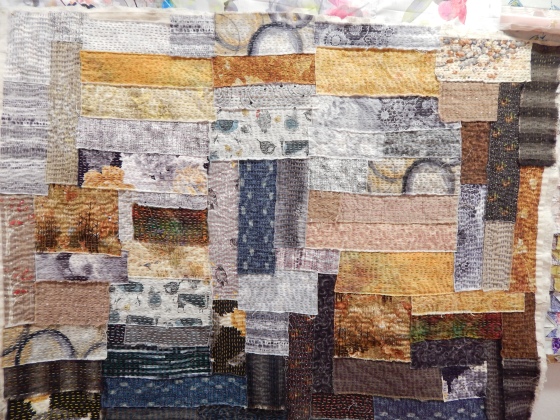
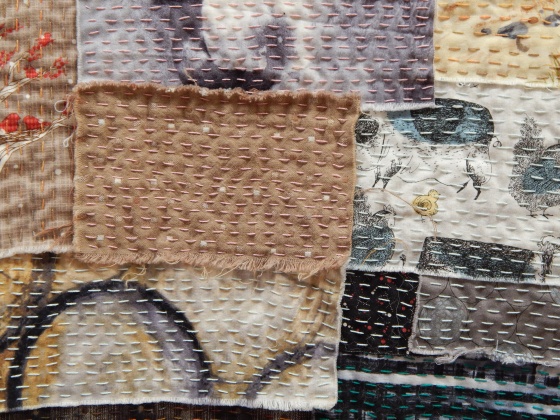
I finished another kantha blanket. This is one I pieced last fall just before I went to Art Quilt Tahoe. I really liked the central tree panel, and just chose some nice fabrics to go along with it. Still needs to be washed and blocked a bit.

DSCN6058

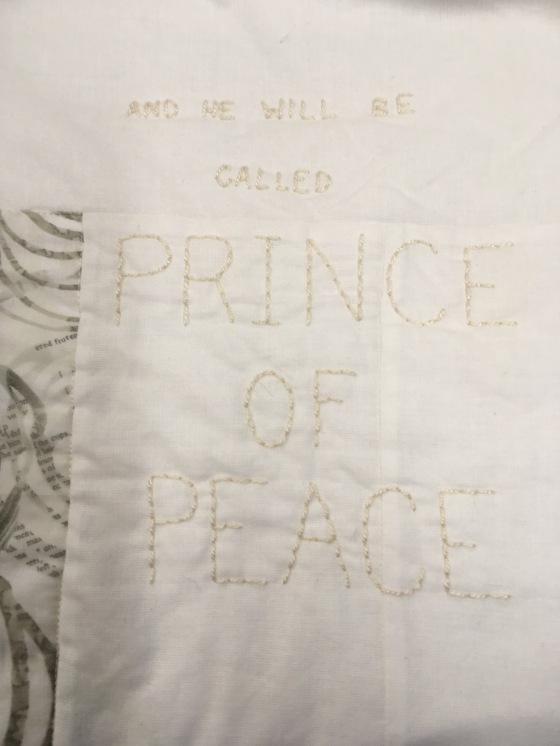
Taking a break from embroidering on the Wonderful Counselor quilt. Considering next steps. I think I still need some embroidery in there between the words. And maybe some embroidery in the borders, although I do plan to machine quilt most of the borders.

DSCN6059

Close-up of the words. You can see I used the blue disappearing ink quite a bit on this quilt. I did a sample to make sure the ink would come out before I used it on this radiance fabric (hand dyed 50/50 cotton/silk)

DSCN6060

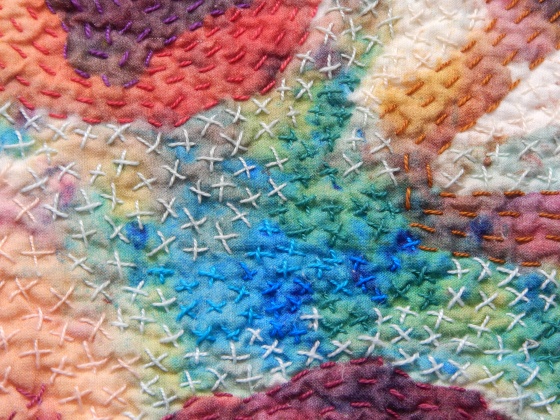
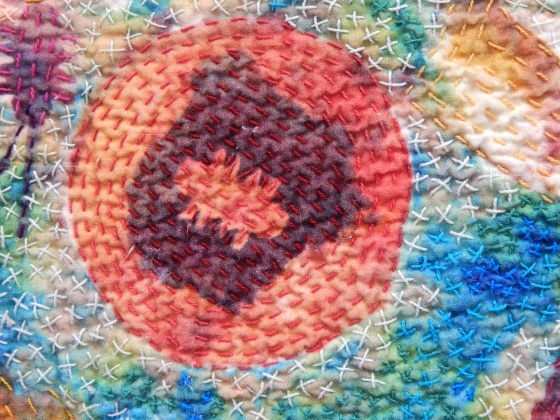
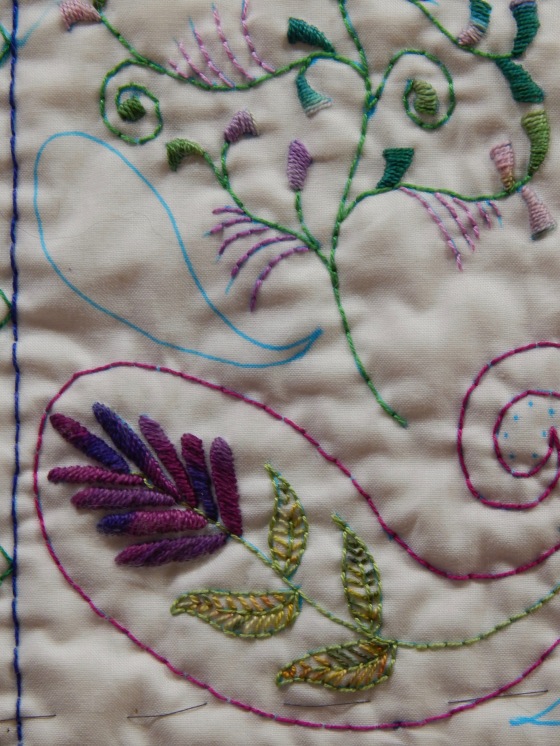
Close-ups of some of the embroidery:

DSCN6062

DSCN6061

I started working consistently on the big PEACE quilt. While it was still on the design wall, I chose 12 spots to put verses and marked those spots with the blue disappearing ink, and chose 12 verses about peace. Its been fun to choose a verse, write it in the spot, and get it embroidered on there. I am hoping that this will be the next quilt I machine quilt.

IMG_E0095

Right now this quilt is under the Juki. I am taking my time and trying to quilt it nicely. I made it a long time ago, and I still like it.

IMG_0110

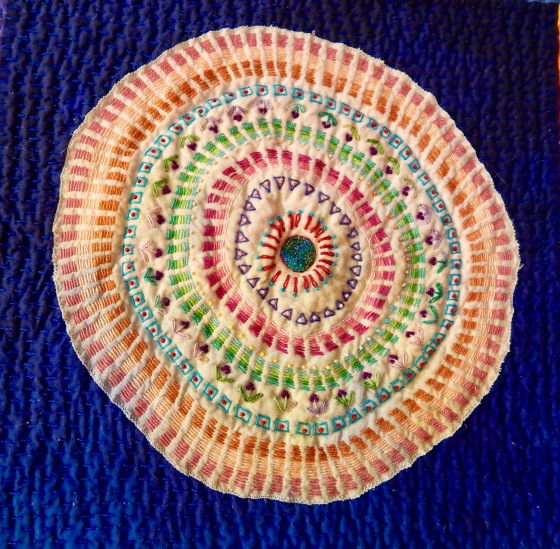
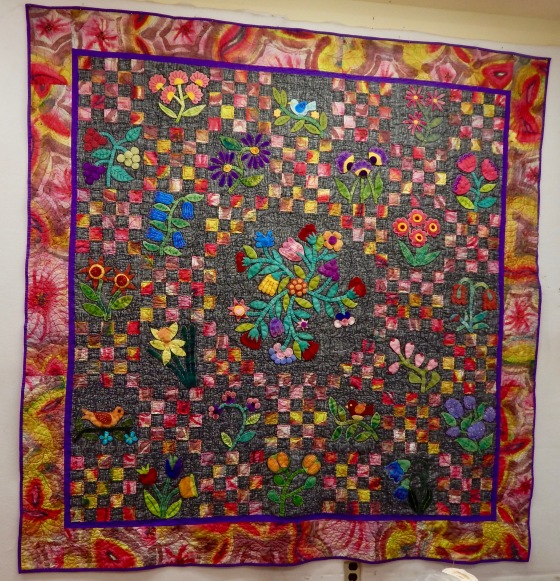
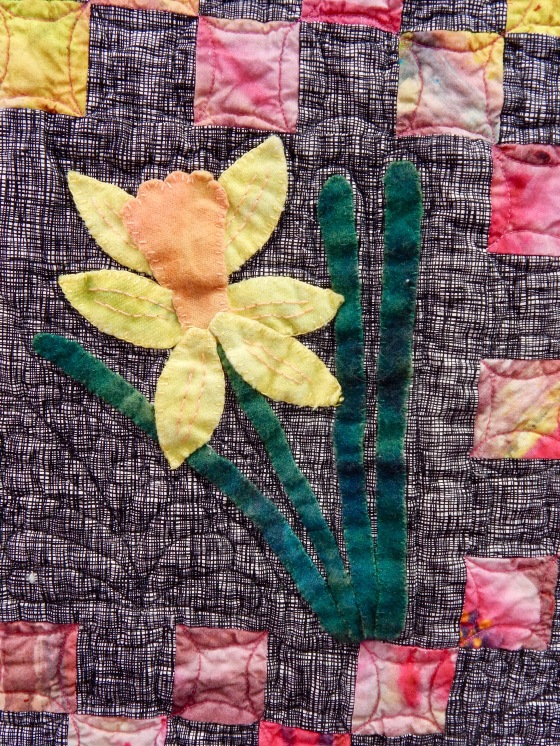
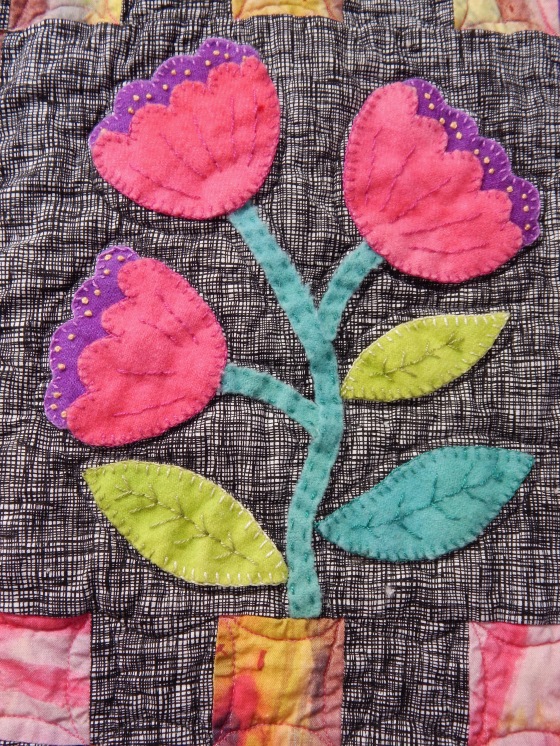
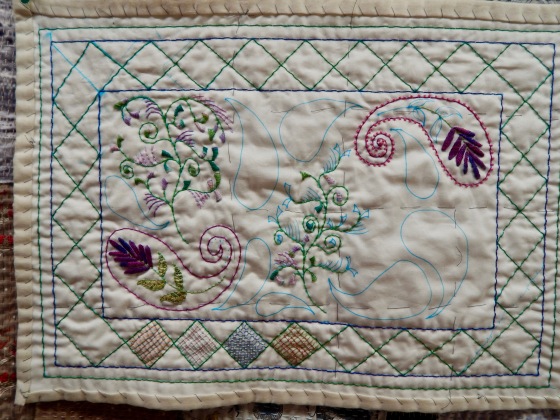
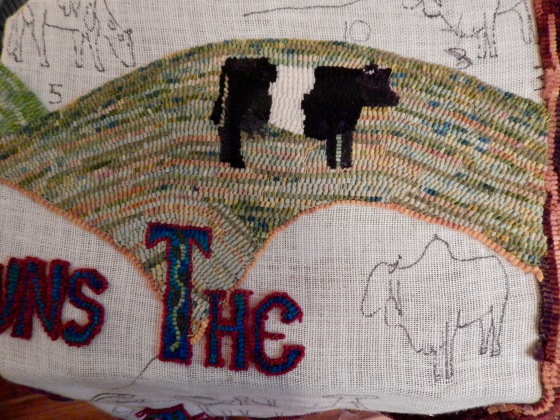
I got it into my head that I should do another sample quilt from the quilt kits I put together. So fun to make small pieces like this. The small pink triangles are actually the leftover pieces from cutting out the big pink circle! I am teaching Quilted Embroidery at the Cotton Patch on April 21. 

IMG_0109


And since I finished my kantha blanket and am taking a break from the Wonderful Counselor embroidery, I needed something to work on. Out came the big mitered square blanket. I laid it out on my bed and marked how much larger I want it to be, so at least I now have an ending place in mind. Still a lot to do on it. I’m using bits and pieces of leftover yarns and some of my old handspun yarn too.

IMG_0122

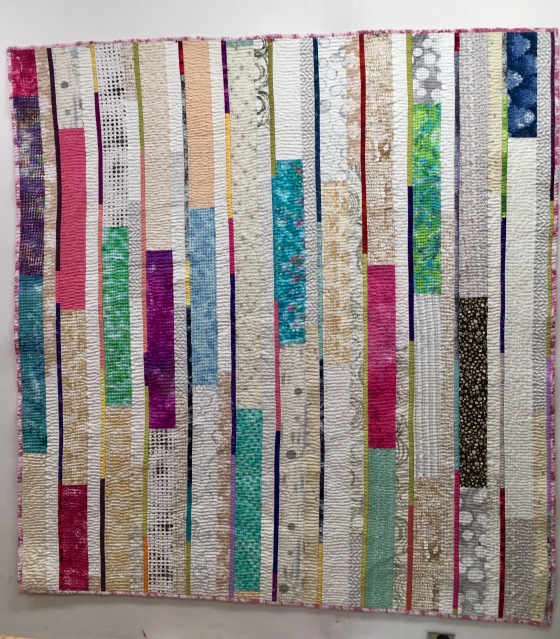
Sunday my sister called and asked if I had ever made a jelly roll quilt. Well, once I made a top using hand cut strips, basically the same as a jelly roll. As I talked with her about the math and how to do it, I remembered I had a project box with some leftover strips in it–leftover from the big PEACE quilt. They were cut 1/2 inch finished and 1 1/2 inch finished. Most of the 1/2 inch strips were brights and darks. Most of the 1 1/2 inch strips were neutrals. So I started sewing those together. I couldn’t believe it when I sewed the narrow and wider strips together–they were exactly the same length! So then I did a little math, and realized that there still was not enough for a decent sized quilt. I did some more math, and decided that if I would make some 3 inch finished strips, that would make the quilt big enough. For the 3 inch strips, I used both neutral and bright fabrics. I sewed everything together without planning. And when I finally finished, and threw it on my bed, I was really pleased with how pretty it was. Now I’m just thinking about how to quilt it.

IMG_0124

Speaking of quilting, one thing I have been doing lately, is going to Joann’s when they have a sale on (haha, when do they NOT have a sale on,) and buying four or more yards of one fabric so that I have quilt backs for my never-ending box of quilt tops that I have not finished. Since I don’t seem to be too good at selling, I have enjoyed finding places to donate quilts for people that might enjoy them. A young couple I met are working with Afghan refugees that are coming to Sacramento. I told them I could send some quilts to them.

I hope all of you are enjoying your creative time. Just working consistently every day it is surprising how much you can accomplish.


Hexie Holidays

IMG_4126

I think I mentioned before that I’d been working on a hexi project. It turned out to be the perfect project to work on in the evening during the holidays. They are 3/4 inch English Paper Piecing hexis. I ran into some trouble when I tried to do separate pieces and they wouldn’t fit together. It seems impossible, but true. I finally figured out that I was putting some together clockwise, and others counterclockwise. Still, they’re all hexies, they SHOULD fit together. Anyway, that made me paranoid and I decided that I just had to work on putting them all together in one piece. The bigger the piece got, the harder it was to work with. One day in church I got an idea to make a quilt out of them called “I’m Done!”

But they were still in a very weird sorta diamond shape. Not what I envisioned for my new idea. So I put the piece up on the design wall and put my hexies just so to make it the shape I wanted–kind of an amoeba shape. Surprisingly, it was fairly easy to take it up and down off of the design wall and add the extra shapes. I pinned each one carefully with a safety pin so that there was no doubt about where it went and how it needed to fit together.

So here’s my semi-final composition. I still need to decide on a backing fabric, and put it back up on the design wall (thus the picture 🙂 )

DSCN5964

In the meantime, I also am working on a kantha blanket. Its just a large print of trees that I really liked, put together with some other really pretty fabrics that I had in my stash.

DSCN5959

I’ve progressed much farther than this (just doing straight kantha stitching) and the edges were starting to bug me. I used cotton gauze for the middle of the sandwich instead of batting (to mimic how actual kantha stitching is done). It made the edges very flimsy. So I put the binding on it! Much nicer.

I have so many projects that I am working on right now. Mostly just for fun, and finishing some series, making more quilt sandwiches and doing more quilting. I’ll be back later in the week to share some of these projects!


An Unexpected Finish

As I stitched on various projects in the evening, I started to realize that I was close to finishing one quilt. So I started to concentrate on stitching on that one. Maybe I could finish one more project before surgery!

And sure enough, on Friday evening, I took the last stitch. I don’t usually quilt on Saturday, but I couldn’t resist applying the binding in the morning, and then when I returned from the gym in the afternoon, I set to work hand stitching the binding down. I rarely hand stitch binding any more, but I figured with all the handwork on this quilt, it deserved it. And besides, I really enjoyed working on this quilt, and it just extended the joy for one more day.

Which quilt is it? Its the second Kantha blanket. On this one, because of all the different blocks and seams, I decided to stitch each block, in the hopes of avoiding most of the seams. The pattern is so busy that I don’t think the different stitching makes a  big difference in the  overall appearance of the quilt.

DSCN5726

I used DMC Coton Floche for the stitching, and it was wonderful to stitch with, but a bit more frail than perle cotton, and also I noticed that it pulled more easily when, ahem, little doggies’ toenails got caught in the thread….  I used a nice thin cotton batting, and muslin for the backing, so again, it was extremely pleasant to stitch. I am sure I will do another one of these, perhaps with a less busy pattern, and maybe I can do more variation with the direction of the stitching.

Some close-ups so you can see the different direction of the stitching.

DSCN5727

DSCN5728

DSCN5729

And this will probably be my last post for a while. I have four project boxes all ready for my post-op period! Hopefully I’ll have plenty to share with you by the time I feel up to blogging again!