Finished!

dscn4346

When I returned home from Empty Spools, I had a couple of projects that I had left mid-stream, and I went back to work on those. Once those were well under way, I went back, determined to finish my project from Katie’s Artful Log Cabins class. Yesterday I finished the piecing and made the quilt sandwich, and today I completed the quilting, and put the binding on. Gotta love a 30″ X 40″ quilt. Even with dense quilting, it moved right along.

I don’t think its a masterpiece, but I am pleased with the finished product. I think it reflects my garden well, and I will enjoy looking at it for a while.

I did try Katie’s method of grid quilting block by block, and I did enjoy that.

DSCN4952

I am especially pleased that I made the decision to change the quilting in two areas–the reflective opening of the imaginary cathedral window, and pebble quilting to imitate the flower shapes of the white flowers. Oh, and you might notice that I circled the one little ladybug that showed up on the quilt 🙂

DSCN4953

I had enough pre-cut strips to use as the binding! And, I definitely over-cut the amount of strips I needed for class. I am thinking about making some regular  log cabin blocks with the leftovers. It might be fun to experiment with them.

Artful Log Cabins at Empty Spools

Well, here goes! Empty Spools Seminars started on Sunday afternoon. I checked into my room, unpacked my suitcases quickly, and then walked over to check into the Seminar (they have a beautiful huge hall (Merrill Hall) that is headquarters for all the goings on all week.) And then I drove straight over to Katie Pasquini Masopust’s classroom because we were supposed to have an hour and a half intro to the class. And indeed, it was an intro Plus! Katie shared with us quite a few of her artful log cabin quilts along with the inspiration photo for each of them.  Then Katie had each of us (there were 18 in our class) show our inspiration pictures (here’s the blog where I shared the pictures I had chosen.) I did discuss the little waterfall picture with her, and she agreed that there wasn’t enough contrast in it to do this technique. So I did use the same picture that I had chosen. The finished quilts are supposed to be more abstract than representational.

dscn4346

And then Katie had us take out our tracing paper and draw several grids over the inspiration photo! That was more than I had thought we would do on this  first afternoon! But I had been thinking about how I would do this particular photo, and I liked the very first grid I drew. Katie approved.

And then it was on to dinner and after dinner back to Merrill Hall for  a presentation by the  Artist in Residence. Empty Spools has been running for 30 years, and pretty much everything about it was very well organized. I appreciated that each evening session started exactly on time, and usually lasted about 45 minutes. It was fun having the evening sessions, because at Asilomar, there are no TV’s in the rooms!

And the next morning, bright and early, we were back at work. Katie had us finalize our grids, and then trace them onto acetate. Then we taped the acetate to a white paper backing so that she could take them and have them enlarged at Kinko’s.

DSCN4932

Each person decided how large they wanted their final quilt to be. So my grid, which was based on my 8X10 photograph, was enlarged 400%, which made my quilt about 36X40″. Katie had two enlargements made–one for your placement grid, and the second so that you could cut each piece out and use it as a template. I think that this is the first time I have used this method, and I do think that it could be very useful in other applications.

When Katie returned with our full size grids, we were ready to start our log cabin blocks. Each block was started with the original little block from the 8X10 drawing (we used the tracing paper pattern and cut each of fabric from that pattern, including a 1/4″ edge.)

We put the acetate back over the photograph, and used that for color placement in constructing each block. I forgot to tell you that Katie had instructed us to pre-cut our strips before we came. I was VERY happy that I had done that, as it saved a lot of time in the workshop.

DSCN4931

And even with saving that time, I still did not finish my quilt. Katie had instructed us to bring batting and backing with us, and several women got to that point, and completely quilted their pieces. Here is my piece so far:

fullsizerender

One of the most interesting things I learned from Katie was that even though she does most of these quilts with intense grid quilting, she quilts each block separately. Which seems so much easier than running long grid lines the entire length of the quilt! If you are interested in seeing more of the workshop photos, you can visit Katie’s FB page.

A little more about Asilomar and the whole Empty Spools experience. The food was very good, served cafeteria style. There were always several selections for each meal. And there were always vegetables and salad available at each meal. There was an evening program each night except Wednesday (which I was very grateful to have that night off.) But I enjoyed all the programs. Each evening there was show and tell from the students. Most of the students were showing work that they had completed a previous year at Empty Spools. Each teacher spoke, about 3 or 4 each night. Some of them had a slide show, and others showed real quilts. Katie was on her way (after Empty Spools) to do a one-woman show in Spain, and so she brought all thirty of the quilts for that show with her. It was a real privilege to be able to see her work so close-up and  to hear about the way she constructs her quilts.

Another thing that was very nice was that the quilt shop in Pacific Grove (Back Porch Fabrics) provided a shuttle van from 4-6pm each night, so you didn’t even have to drive into town and find a parking space! There was also a tour of the 17-Mile Drive. I did not do that, but heard about it from one of my table mates. And of course, there were miles of beautiful walking paths and the ocean, and they even had bikes to rent, which I would have loved, except all my energies were focused on quilting!

And then I came home and started working on and finishing projects that I had left off before I left for Empty Spools. I am planning to get back to my Log Cabin project tomorrow!

Inspiration

In just a week I am heading to Pacific Grove to attend Empty Spools! I love Pacific Grove (my favorite knitting and quilting shops just a block away from each other) and I have toyed with the idea of attending Empty Spools for a long time. When I saw Katie Pasquini Masopust was going to be teaching, and her topic was Artful Log Cabins, I decided to go for it.

You’re supposed to pick an inspiration picture, and I thought I’d share my inspiration with you. I went back through the millions of photos on my computer, looking for ones that I loved, and that I thought might work for this class.

Summer garden:

dscn0081

My house (notice the smoky background? this is when I returned home after evacuating during the big Butte fire.)

img_1544

My favorite flowering almond bush:

dscn3830

Flowering cherry tree:

dscn2720

The “secret garden” at Belknap Hot Springs in central Oregon–one of my favorite places on earth!

img_0698

Just a rose at a traffic stop:

img_1555

Lantana, another of my favorite flowers:

img_8053

The summer garden. Ultimately, I chose this picture, because I thought it had a little more contrast than some of the other pictures, and also because when I saw a thumbprint of it, I thought the light shining on the tree trunk looked like a cathedral window in the middle of a garden.

dscn4346

I had 8X10’s made of each of these pictures, and I have to say I am enjoying looking at them. I plan to take them with me to get Katie’s input on whether they will work for this technique.

Even Artists Need a Holiday

About this time of year, I start to feel a bit of angst. All of this celebratin’ puts a cramp in the forward movement of my art. I want to enjoy working on mindless projects. I want to have fun decorating and celebrating. But I also want to keep working on my art. And then I usually give in and work on the fun mindless projects, and I realize its only a few weeks. My art won’t just disappear in three weeks time. And its such a relief. I was discussing this with my BF, and she came up with that brilliant statement, “Even artists need a holiday.” I need to have that tattooed on my forehead, because evidently I can’t remember it from year to year.

Anyway, the first thing that I worked on was this quilt that I started a couple of years ago, when I took a class from Pepper Cory on the “Manx Roof Tile Quilt,” a type of folded log cabin. (And I just want to say that if you are interested in learning this technique, Pepper was an EXCELLENT teacher!) I wanted to use my dad’s pendleton shirts to make a memory quilt. You might remember that last year I used his shirts and ties to make pillows for my brother and sister. My quilt project got put away when construction on the new studio began, and I just found the box of blocks a few weeks ago.

dscn0664

Like most handwork, once you get into the rhythm of it, it moves along quite quickly. I began to think that if I could do one block each evening, I could finish it before Christmas. I didn’t do one EVERY evening, but I did work consistently on them, and when it looked like I could complete the blocks, it got quite exciting!

I was so excited the evening I put them on the design wall, and saw the pattern emerge. When I was working on the blocks, I wasn’t sure I had enough definition between the “darks” of the shirts and the “lights” of the reproduction fabrics. (I decided NOT to use the ties for this project because silk is just a pain to work with. And I do love reproduction fabrics.)

DSCN2271

I wanted to make a border by adding an extra large “binding.” Looked in my stash, and there it was–one of my most favorite “repeater” fabrics. Repeater fabrics are those fabrics that I love so much that I just keep buying a yard or two every time I see it.

DSCN2293

It took a little figuring to figure out how to make this binding, but in the end, I am so happy with this little quilt. It will be the quilt I cuddle under all winter.

DSCN2281

The finished quilt:

DSCN2295

The next fun project I let myself work on was a little table runner out of those darn Christmas fabrics that I can’t resist buying! I’ll be back later to share that with you.

The Quilt Show–Wanted to mention that my episode of The Quilt Show will be airing this Monday, December 8! If you are already a member, you can watch it then. If not, on Monday the 15th, I will be able to give you a code so that you can watch it. Also, I will just add that I am a huge fan of The Quilt Show, and it is a super good deal to pay $42.95 for a one year membership, and get access to all 200 shows! They have a wide range of quilters from traditional to abstract, with lots of good techniques demonstrated. Its a great resource. Plus its just fun to watch with a bowl of popcorn 🙂

Anatomy of a Quilting Retreat

Amidst all of the construction of the past few months, I have been able to work here and there in the studio. Not in an organized fashion so much, or as consistently as I would like, but enough to keep the creative juices alive. So when it came time for the sheetrock installation, and that involved my toilet being removed for a few days, I decided to take a little spiritual/creative retreat. Oh, what a good idea that was! I was only here for about half an hour after the sheet rock work started–kind of like being at the dentists–eeeek!

I thought I’d share the evolution of my “creativity” on the retreat. BTW, I went to a great little place in Lake Tahoe that I have gone to before–3 Peaks Resort. I had rented a regular room, but as I heard the customer in front of me discussing a “suite,” I asked how much it would be to upgrade to a suite. It was $30/night. I did think about it for a bit, but decided that for $150 total, it would be well worth it to be able to spread out a bit, and to have a kitchen for my food.

IMG_0865

I took a lot of stuff with me. I had one collection of fabrics that I had put together at the end of my Sisters trip.

IMG_0871

I gathered another pile of interesting prints and solids in darker colors. I had my zip lock baggies of Cherrywood scraps (LOVE these.) And I brought what I thought would be good background/neutral fabrics. Oh, and a couple of squares of wool that I had nabbed at PIQF, and of course a case of my beloved perle cotton thread. And a couple of journals, my sewing machine, and of course some magazines and books for inspiration.

IMG_0869

DAY ONE: I had some general ideas of what I wanted to do. I started out with this checkerboard. I thought if the strips were cut unevenly, they might look sort of woven.

IMG_0870

Ick. That was so dismal that I almost went into that spiral “what made you think you were an artist? You’ll never be able to create anything worthwhile. etc.” You all know the drill.

That afternoon I regrouped. I put together the original set of fabrics, and decided to make a strip set of them, to use in creating SOMETHING. I have found that cutting into the fabric is key to moving forward. So I will generally cut strips and/or pieces out of the fabrics that I want to use. I don’t know the end use, and that may lead to some waste, but at least I start moving forward. And that was enough work for one day.

IMG_0872

DAY TWO: I cut some bigger pieces of those “neutral background fabrics” and started inserting the strips I had cut from the strip set fabric. The kitchen floor worked pretty well as a design wall 🙂

IMG_0878

In the afternoon, I decided to put together a little composition so I would have something to embroider on in the evenings. I also wanted to use that square of wool that I had brought with me. I remembered a “kantha tree” I had sketched in one of my journals from a photo of an actual Indian kantha quilt. (The “border” there is just the backing that I fold over to the front to keep the edges neat while I am hand stitching.

IMG_0879

DAY THREE: I decided I wanted to work with some of the other fabrics I had brought, so I cut various sized strips and made square-in-a-square blocks with crosses inserted two ways. Very fun. But tedious.

IMG_0881

Back to the kantha tree. I thought it needed a little more color.

IMG_0882

Eek. TOO MANY red dots. Took them off right after snapping this photo.

Playing with the squares on my “design wall”:

IMG_0883

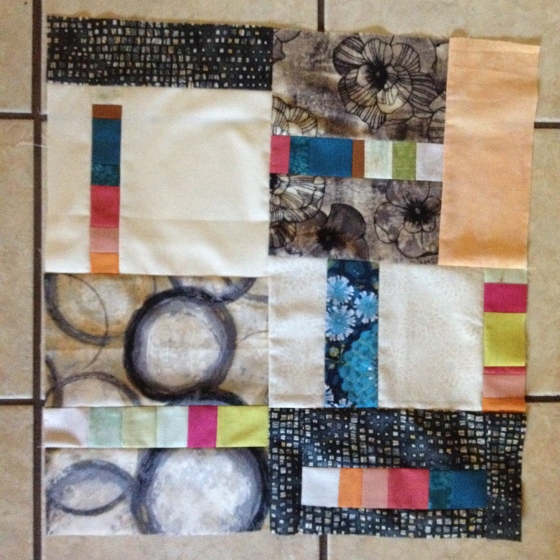
DAY FOUR: I had tired of making the little squares. But I had a lot of strips still left. Just did some big log cabin style squares to use up the strips. I actually like these big squares very much.

IMG_0884


IMG_0887

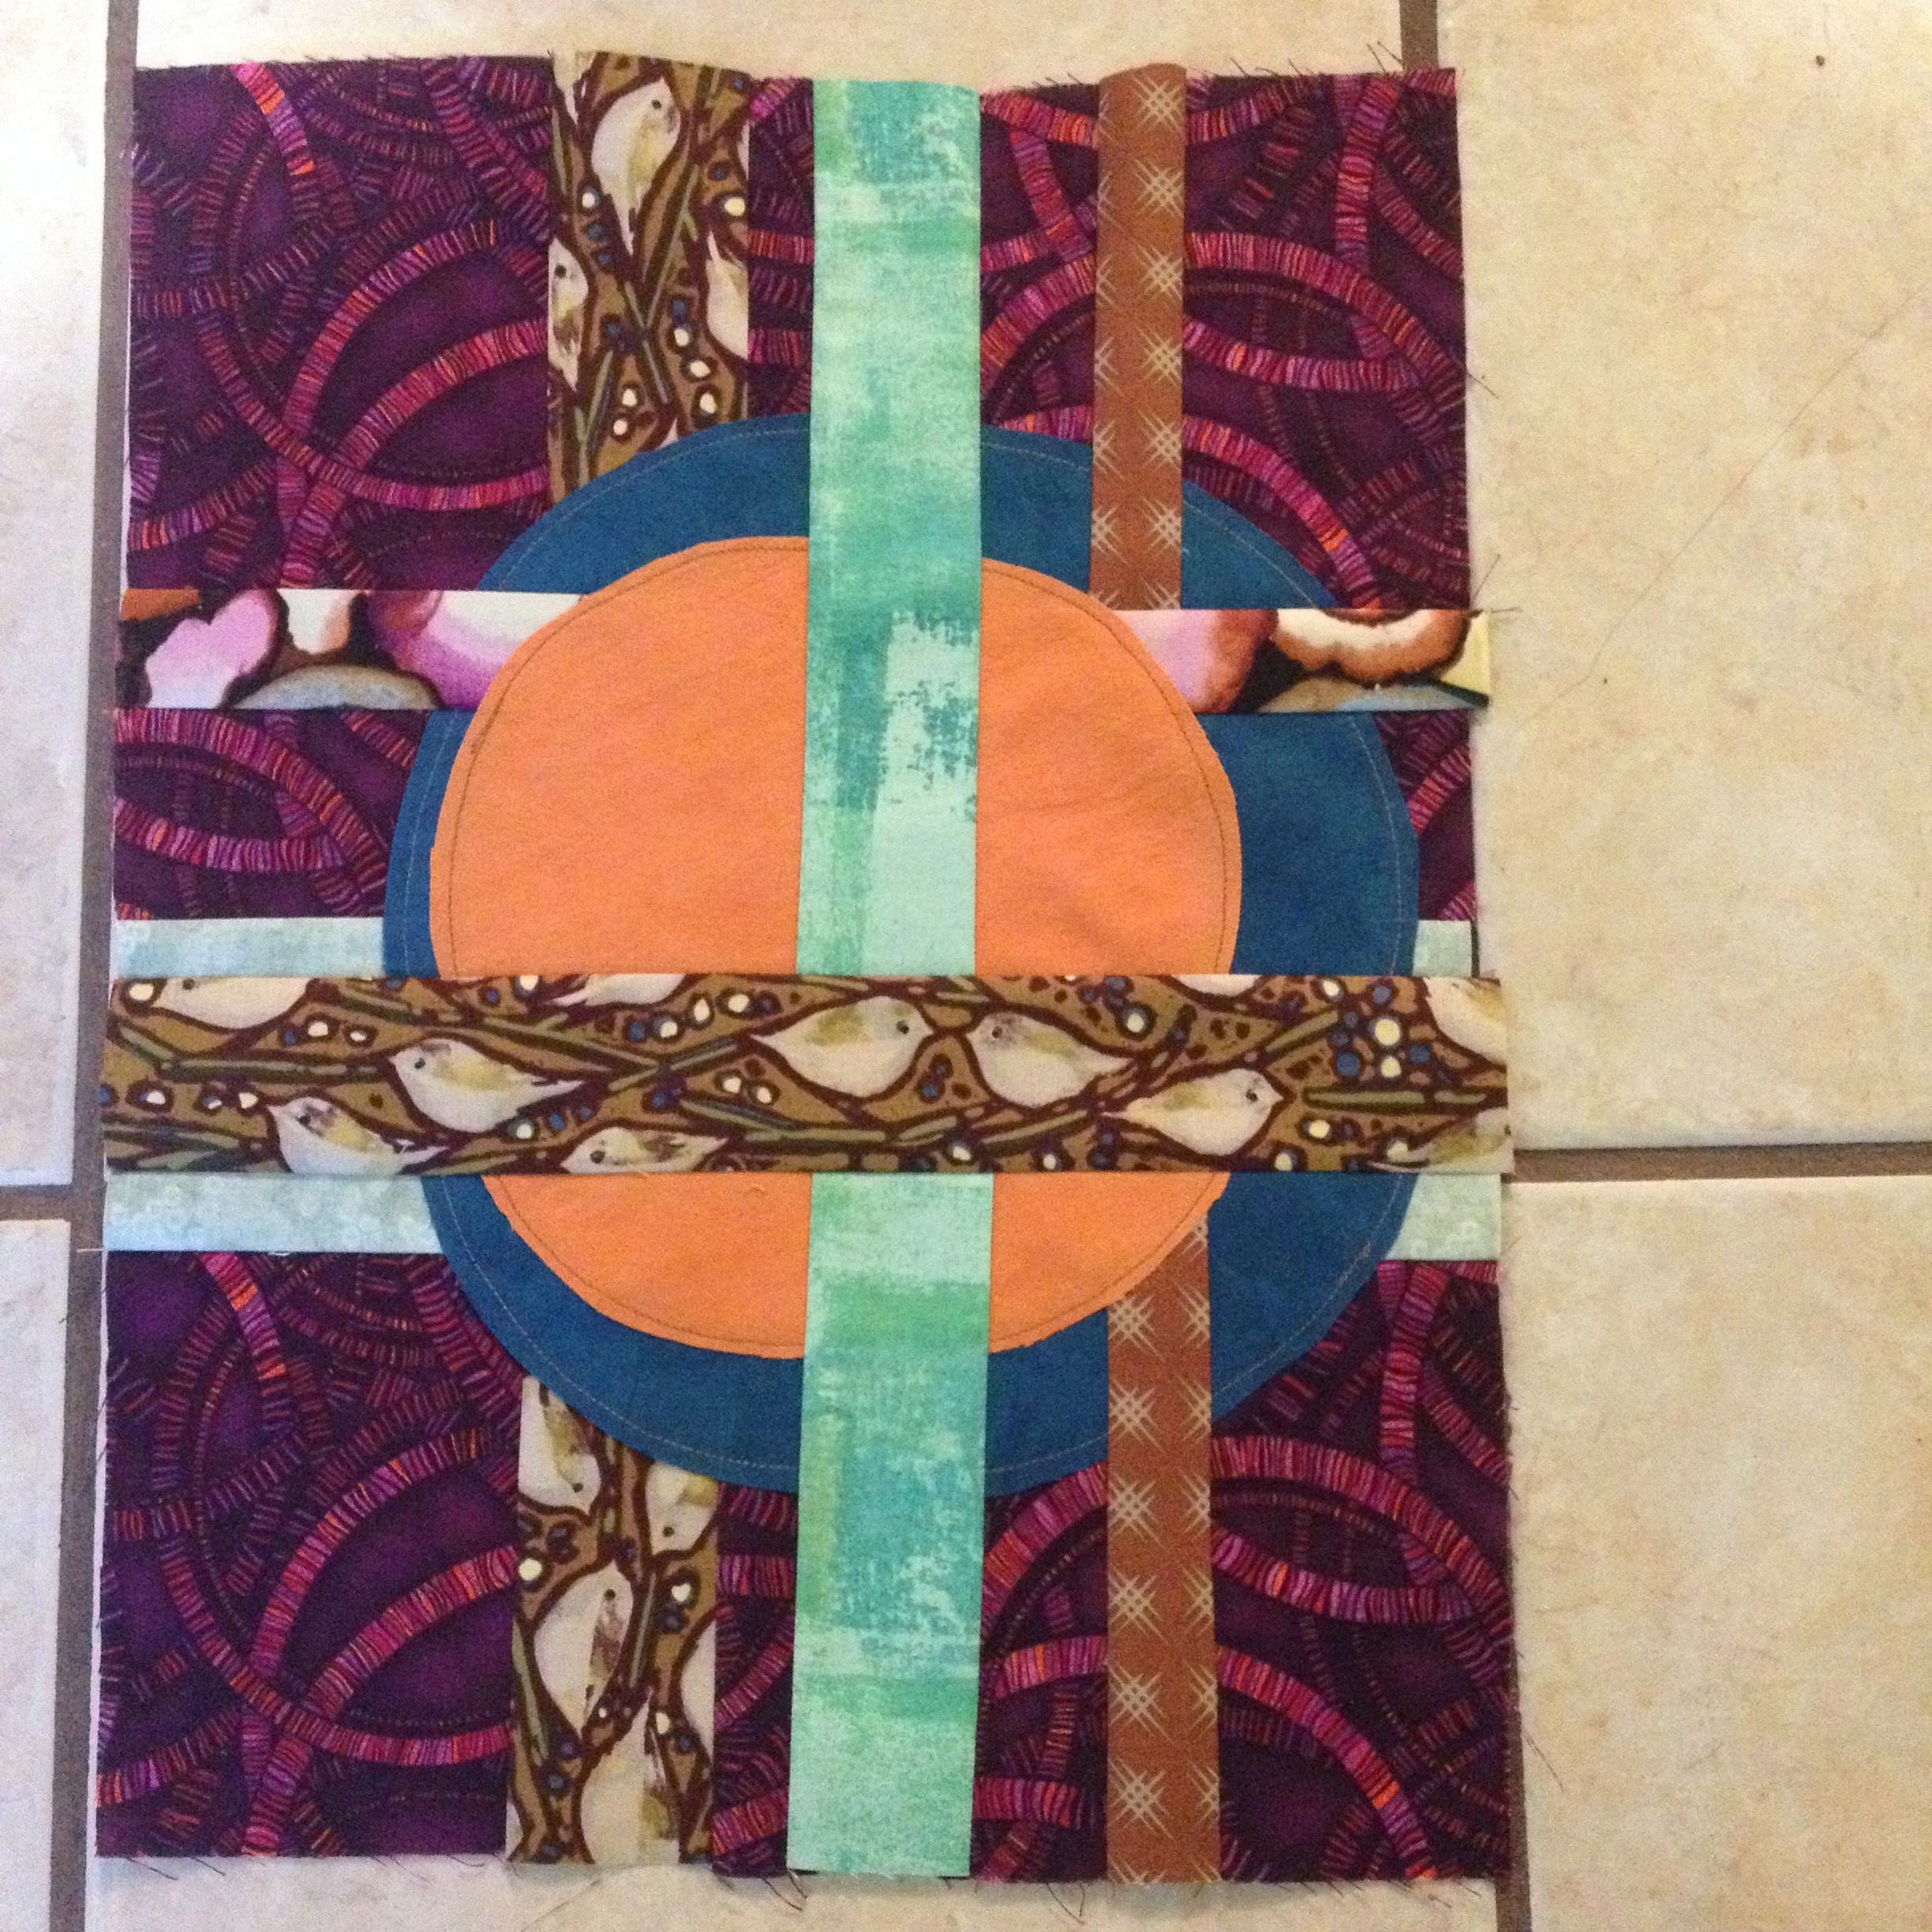
DAY FIVE: Back to the original composition. I wasn’t that happy with it. So I tried adding some “borders” to it (greatly improved,) and then, surprise! I cut out and added some circles to it. I didn’t have my zig zag machine with me, so that was as far as this piece was going to go on this trip.

IMG_0889

In the afternoon, I went out for my usual cup of coffee, and Hey! Is that a bead store I see over there?? I indulged myself with a few types of beads, and then bought one spool of beading thread and a pack of those little blanket thingies that make beading so easy. Usually, buying the beads is as far as I go 😦 So I made myself get them out and start adding some to my little kantha tree.

IMG_0893

Hey, this beading actually goes faster than my hand-stitching! Who knew?

IMG_0895

BTW, I sew those circles on raw-edge with no fusible. The perle cotton keeps the edges nicely in place.

IMG_0896

DAY SIX: I had seen an article in a magazine about adding circles and cross-cutting the fabric. Kinda like what I’ve already done with my crosses, but taking it a step further. I didn’t follow the instructions in the magazine, and I didn’t get the same results as they had shown. But it was pretty fun. And might be something I keep in my arsenal. This piece, as well as the big log cabin blocks, and the little square-in-square blocks are all from the same group of fabrics. So they might end up in the same composition, or they might be used for all different quilts. I’m considering them “parts department” a la Freddy and Gwenny.

IMG_0898

Ooh, and in my little box of sewing supplies, I found a few yo yo’s that I had made on my Sister’s trip. I auditioned them on the Kantha tree quilt.

IMG_0899

Thus ended my little retreat. It was a very beneficial trip. It seems that someone who lives alone would not have to leave home to have a quilting retreat. But (aside from the construction) there are always distractions and responsibilities at home. It is good to get away and have no other responsibilities than being creative!


From Stuck to Unstuck

After the last few weeks of creative flurry, I came to a grinding halt. Nothing I had done pleased me. I didn’t know what next step to take.  This happens often enough that I no longer get quite as alarmed about it (“will I never be able to create a single thing again?!”) 

I just take a quilting break. This time I decided to quilt during my quilting break LOL. I had seen this very simple Christmasy pattern that really appealed to me. So I got out my big box of little squares, picked out all the red and green squares, and added in a few black and white ones. Voila! Half the cutting was already done. I had some really nice muslin on hand, and I knew what focus print I wanted to use. Surprisingly, I was able to locate it right away! I love this cardinal fabric.

And I made this square:

DSCN0545

The rest of the quilt got put together fairly easily. I even got out my Singer Featherweight, and sewed on a TV tray while I watched some of my shows on my computer.

That quilt top is almost completely assembled.

But before I finished it, I got a bit of a new idea. And since it was my birthday week, I let myself play with that idea yesterday. I really like it. Just wonky log cabin blocks, with solids, and using some of my pre-cut dark strips (I love it when I am able to use up some of the fabric that has been pre-cut.)

DSCN0554

Creativity in process:

DSCN0548

I love the look of these, and think they will look good surrounded with more dark. And guess what was in the box of dark strips? A bunch of little 4 inch log cabin blocks made mostly out of the dark strips. Bingo!

DSCN0555

And as suddenly as it started, the quilt block is over!

C’est Finit!

I finished the raw edge log cabin!

IMG_9193

Here’s what I had to trim off of it after I washed it.

IMG_9200

I think its so pretty, and I love the oriental heron blocks that I added. I also added some fun fabrics in the border. I did it just like I said, with just the log cabin, the muslin (that the log cabin was constructed on, ) and the backing. Three layers of fabric (no batting) for a nice lightweight topper for my bed this summer.

This comes under the category “if you think of it, try it!” Those have been words of wisdom for me from Marianne Burr. In evaluating whether this was a worthy technique, here are some of my observations: I don’t think it saved much time to make this raw edge. I sewed twice as many seams (maybe unnecessarily, but I wanted to be sure the raw edges were secure.) And then there was the endless trimming after I washed it, and again after I dried it. I shouldn’t have been surprised, I have used this technique before in collage quilts.

The positive values: no ironing! If I had been doing a one inch log cabin (come to think of it, I have been working on one for a few years now…) there would have been a LOT of ironing of little seams as I went along. And as I placed each block on the backing I quilted it in place, so essentially as I pieced the front, I also was quilting it. I decided that to keep with the raw edge theme, I would not add a binding. I just sewed around the edge twice more to make sure it was secure, and then I cut the extra backing off with scissors. I didn’t worry about “squaring it up” or using a rotary cutter. Very freeing.