Quilting, Piecing, Embroidery, and Rug Hooking

I mentioned to a friend recently that I had been quilting, piecing, embroidering, and rug hooking, and loving all of it. I kept thinking about this, and I realized that part of the reason was because I had “stations” set up for each activity, so that it was very easy to go from one activity to another. I never understood before why people felt the need to keep more than one sewing machine set up, but now I do. I am much more likely to work on a quilt when the machine is all set up and ready to go. (And I do know that having a big new “toy” is a good motivator.) When I started working on that big rug in January, I rearranged my living room so that I could keep the rug frame up all the time. If the rug frame is not up, rug hooking just doesn’t get done–sometimes for months. And of course, my Janome sewing machine is always up, and I am more likely to go and sew together a few pieces when I don’t have to move a big quilt out of the way. My “embroidery station” is the same as always–my big comfy chair where I sit every evening with a dog on my lap, watching TV shows on my computer, and working on whatever embroidery project is at hand.

It has been so fun to look through my UFO’s and find quilt tops I had completely forgotten about, and others that were within a few stitches of being completed!

I really like this quilt. I was influenced by a little postcard of a magnificent Japanese quilt. Mine is not magnificent, but it was very fun to piece, and I enjoyed practicing “straight enough” line quilting on the new machine.

DSCN3846

This was part of a series of quilts I did for a “Pay it Forward” challenge SIX YEARS ago! I had so much fun making those little quilts for three of my good blog friends. This fourth one was for me, but I used a beautiful upholstery weight fabric on the back, and it was not fun to hand quilt through, so 7/8th’s of the way through, I just stopped. Except for the border it was almost completely quilted. I decided to try hand quilting again. Took two stitches (literally) and knew I wouldn’t finish. So to the machine it went. I am as pleased as can be with the result. I’m thinking about keeping it, just because so many good memories are attached to that challenge project.

DSCN3863

This quilt was completely finished except for the central chicken block. I got a little obsessed about that, even wrote a blog about changing it out, and then it got put away and forgotten about. I finished quilting around the motifs in the central block, and it was finished. Several of these quilts have had enough backing fabric that I was able to do the binding by just bringing the backing around to the front. VERY convenient!

DSCN3847

Piecing. I think I showed you this one  before. I just about used all of the strips in that box, and so it is done. Since the strips were cut with a ruler, I’m not sure why it has ended up a bit wonky, except that I didn’t use my 1/4″ foot all the time. Anyway, I think I will put a wide border around it to finish it off and to square it up a bit.

DSCN3844

These stars are mostly my project for Sewing Day with my ladies. So fun to do, but a bit time consuming. All done with 2″ cut squares from my box of little two inch squares.

DSCN3842

I had the idea to make these simple blocks to offset the star blocks, which are so busy, but I didn’t like the way that looked. So they might become their own little project…

DSCN3843

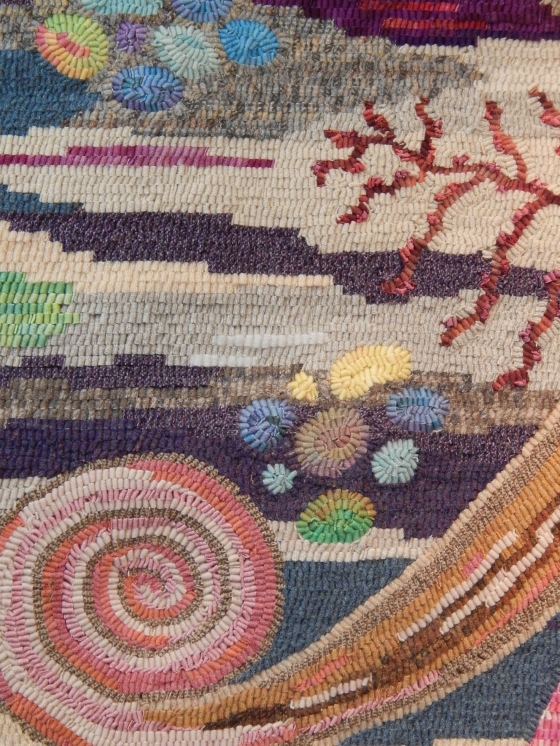
Rug hooking! I LOVE love love working on this rug. There is even more of it done now, but this is the most recent picture. Like I said, I have a place all set up in the living room, so it is very easy to just sit and do a little bit of hooking, if that’s all I have time for.

DSCN3813

Close-up:

DSCN3812

And embroidery. I have almost finished the embroidered words on all 17 of the quilts in the “what they said” series. I loved working on these, and trying to convey the thoughts and feelings behind the words through the way I embroidered the words. Now to quilt and finish them. I will show them all to you at one time, as that is the way I think they will have the most impact. Here is the one I chose to use as the “header.” Just the straight line kantha stitching over the whole piece.

DSCN3887

And that is how life is going in the studio right now. I wake up every morning excited about what I am going to work on that day.

International Quilting Weekend!

Does everybody know that this weekend is International Quilting Weekend? There are lots of giveaways out there. The Quilt Show has kindly offered to open ALL of their videos for the weekend. I am just going to include the invitation they have provided here. I hope you will take advantage of this to watch some of your favorite artists. I look forward to watching The Quilt Show each time a new episode comes out. A warning: you pretty much have to watch it with a bowl of popcorn 🙂

Dear Quilting Friends:

Big news here! In honor of International Quilt Day (March 19, 2016), The Quilt Show, the web TV show hosted by Alex Anderson and Ricky Tims, will “open” all of its shows from the first seventeen series–that is, from show 100 through show 1713–for the entire weekend of March 18 –20. That means that—for three special days—everyone will have the chance to view these 221 shows, featuring some of the quilting world’s leading artists, for FREE.

As you may already know, I appeared as the featured artist on TQS in show 1512. If you didn’t have the opportunity to see this show first time around, now you’ll have the chance to see it—and so many other terrific shows—at no cost in this unprecedented three-day offer.

I hope that you’ll share this information with all of your quilting friends. It’s a fantastic opportunity to enjoy three days of learning and fun without leaving your home…all for free.

Enjoy the shows, and thanks for helping to spread the word!

Here’s a couple of other odds and ends. I changed out the quilt display at my church. I really enjoy sharing my quilts with others, and it is fun to go through my collection and put together three that I think go well together.

IMG_2432

And this is one more quilt that I loved at Quilt Con. After looking at it for a while, I checked out the artist, and it was Christine Barnes. I have been a fan of her work for a long time.

IMG_2259

Have a great fun-filled quilting weekend!

Learning Curve Continued

My learning on the new Juki continues! This week I noticed that the machine was skipping a few  stitches every once in a while. It was really noticeable when I was using the machine to baste a little quilt. BTW, this is a great feature on the machine–you just choose “BASTE” on the LED screen, and then you have the option of slow-medium-fast. It does a really great job of machine basting. After discussing with my BF and long arm consultant, we decided the most likely culprit was that I had the presser foot too high. I had changed out the presser foot to the open toed foot (love!) and I left it a bit higher on purpose, because I wanted to be able to slip this hoop under the foot.

DSCN3820

This is the hoop I bought from Martelli.  I really like it. I tend to relax my shoulders a bit more when I use it. I think its most useful when you are doing smaller, closer quilting. When you are doing utility quilting and want to move quickly across the quilt, there is no need for it.


DSCN3821

Open toe vs the regular foot. Why would you use the closed foot? I think it might provide more stability if you were doing some pedal to the metal quilting.

DSCN3822

So, I set out one morning to SOLVE THE PROBLEM of the skipped stitches.  I should have just changed the presser foot height. But no, I wanted to do a thorough job. So I checked the needle position. The book says the groove in the needle should face to the left. I re-inserted the needle, making sure the groove was EXACTLY facing the left.

Then I wanted to oil the “hook.” That’s the thing on the bobbin case. I don’t think I told you before, but this machine is built so that you never have to oil anything except that hook! Now when I did that, I double checked to see that I had the bobbin placed correctly in the case. Looking at the manual instructions. I got so confused! I thought I was supposed to put the bobbin in COUNTER CLOCKWISE, but the instructions said clockwise. Had I put it in wrong previously, and it was actually working that way?

Anyway, three improvements made, and now I was ready to check out my NEW. IMPROVED. quilting. Only now the machine would not take a single stitch. Not one. I was sure it was my confusion over the bobbin. So I took that baby in and out at least three times, checking and re-checking the placement against the manual instructions. Still no stitches.

So then I went back to the needle position. I looked carefully at the tiny but accurate picture in the manual. Oh. The groove in the needle goes to the left IF YOU ARE STANDING AT THE SIDE OF THE MACHINE, not from the front. So I rotated the groove in the needle to the correct position, and voila! Magic stitches came out of the machine. No skipped stitches at all. My BF assures me that this is all part of learning to use a long arm machine, and is common to all long arms.

So you can see that, although I complained about the Juki manual, it does come in handy for some things 🙂

My friend who is starting the ministry for elderly people in our church needed a quilt to show her committee, so I put the binding on the first quilt I’ve done on the Juki and sent it out into the world. Funny thing about this quilt, Up close, in person, I did not think I had done the color placement right, because I could not see the secondary circular pattern. But it shows up nice and clear in the photograph!

DSCN3823


I am off to hopefully finish the second quilt on this Juki. In looking for some other things, I have found more and more unfinished quilt tops! I’m very enthused about getting some of them done and sharing them with others.

Learning Curve

Its hard to learn something new, n’est ce pas? This machine has given me a run for my money, but I think I’m on the downhill slope, so I’ll write about it now, when I can write a bit more positively.

First of all, let’s just get this out of the way: the Juki instruction manual STINKS. Everybody knows it. I read about it on the web before I bought it. So when I bought it, I quizzed the dealer and the company reps about who I should call with questions. The dealer (who will remain unnamed,) looked at me like I had sprouted a third head, and then said reluctantly, “oh, call me.” Yeah, I don’t think so. Fortunately the Juki sales rep, who I had talked to at Houston and also at QuiltCon, was more than inviting. Joe gave me his card, and said I could call or email anytime and he would respond within a day. And he has. But I feel like I need to make this clear. I am pretty good at mechanical stuff, and if there are good instructions, I am also good at reading, and figuring out the problem myself. The Juki manual, both online and the brief paper one they included, does not address some of the basic problems I have encountered. INCLUDING an alarming alarm with flashing lights that went off!! Don’t you think that might be worth a mention in their manual? Come on, Juki. You have a great product. You are marketing it to the home quilter. Don’t you think a good manual might save you a little money on reps that are bothered on a daily basis by new customers?

Okay. Now that I’ve got that out of the way… As far as taking it out of the five cartons, and putting it together, Karen Pharr, one of the other reps at Juki, has put two you-tube videos out taking you step by step through the construction of the table and the machine. THANK YOU!! That worked just great.

Oh, and the alarm? I’m still not 100% sure, but I think its just a generic “DANGER, WILL ROBINSON, DANGER.” In other words, “STOP AND CHECK IT OUT. SOMETHING IS NOT WORKING.” The first time it happened was when a thread was tangled in the bobbin holder. And the second time (which closely following the first) was when the needle broke after I put it back together from untangling the thread.

After practicing on my small piece for a few days, and then quilting one very small piece, I really wanted to try quilting on a larger quilt. BTW, for me a larger quilt is 50X60. How (and why) do you people make those giant king sized quilts? Its so unruly to just put together a backing for a quilt THIS size. But I digress. I did put together a larger quilt sandwich, and I just started in quilting. Just a simple repetitive pattern, to get the idea of moving around a larger quilt. Oh, and you can see that I found a small table (my old dog grooming table!) that was just the right size to put next to this machine to support larger quilts.

It went very well, and although its not quite finished, I got enthused and decided to make a second quilt sandwich, since I still had the big ironing topper on my cutting desk, and it was still cleared off. Plus, once you get in the groove of making BIG quilt sandwiches, its not quite so bad, and there’s not nearly as much whining and stamping going on 🙂

DSCN3815

Did I tell you that a good friend of mine has started a new ministry at our church, reaching out to the older folks who might not be able to make it to church? I thought it might be nice to have some lap quilts on hand. My friend enthusiastically agreed, so that gives me the motivation to start finishing some of these old tops I have on hand.

DSCN3816

Overall, I am loving the way this machine works. I love the sturdiness of the needle, the consistency of the stitches. And I do love the open toed foot that I got. I’m not sure if I would go back to the original foot. I can just see what I’m dong so much better. The machine is easy to thread (there are instructions for that.) And I have almost conquered the “blind placement” of the bobbin (BTW, do you know how wonderful the flashlight on your iPhone is?)

Other features I like: the thread cutter, the needle up/down button, and the baste button. The bobbin winder is on a separate motor, and works very well. Of course, I love the big bobbins. My BF explained to me that the machine gets a little noisier as you near the end of the bobbin. Changing it, and oiling the “hook” at the same time makes everything all better. Thank goodness for my own personal long arm consultant!

QuiltCon Report

QuiltCon was a different kind of quilt show. First of all, their techno-wizardry is unsurpassed. From registering online for lectures and workshops, to entering quilts, and then to signing in when you got to the show, they were amazing! They had a bank of iPads in the lobby for you to register when you arrived! (and people standing by to help those of us who might be a little technically challenged.) They had an APP(!) which was quite handy to keep track of your schedule. They also had the most amazing goodie bag I’ve ever received. So many fabric samples and other fun stuff, AND a spiral bound graph paper journal AND a beautiful day planner with a photo of a quilt on each page!

IMG_2290

Honestly, some of my favorite quilts were the big “charity challenge” quilts that they had lining the huge lobby. Very modern indeed!

IMG_2243

IMG_2289

IMG_2240

The thing I liked best was that the quilts in the show were nicely spaced so that you could get a good look at them from a distance. Jenny wrote a great two part report about the show with lots of wonderful pictures.

And Maria shared the work of Molly Upton. I have been a fan of Molly’s work since before I became a quilter, because one of her quilts was included in a publication “The 100 Best Quilts of the 20th Century.” Her work is amazing and challenging–that someone that young could create that body of work in two short years! And sad. Its still sad to me that she ended her life so soon. It was wonderful that her family was there to see the exhibit and hear the lecture.

Gwen Marston was the featured quilter and keynote speaker. I love Gwen’s work, and in fact she was one of the main reasons I wanted to go to QuiltCon. Sadly, even though I registered 10 minutes after it opened online, her classes were completely filled! Her lecture was as amazing as always. If you have not heard her speak, it is just something you MUST do! She is so encouraging, and funny, and inspirational. After hearing her speak, you want to run home and create a quilt of your own design. And you know you can do it, because she told you you could!

Here is one of her many small quilts that were on display:

IMG_2324

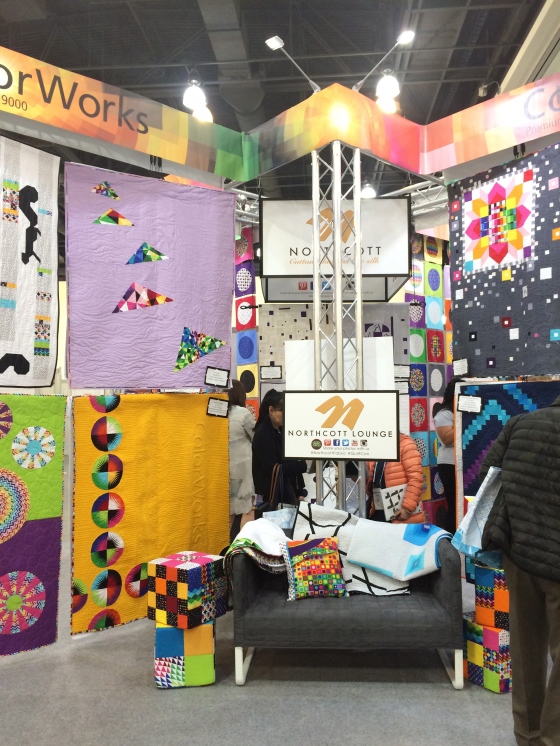
The vendors at QuiltCon were very different. Very imaginative. And the booths were quite spacious.

IMG_2300

IMG_2410

IMG_2409

This was my favorite quilt at the show. Then I remembered that it wasn’t actually IN the show. I love everything about it. I was delighted when I discovered that it was featured in the free issue of American Patchwork and Quilting magazine that was in the goodie bag!

IMG_2359

Okay, here is my favorite quilt IN the show. Of course I like it. Its a circle 🙂 After I looked at it for a while, I read the tag. It is made by Kathy York. I have long been a fan of her work.

IMG_2378

And this was another favorite of mine. The pictures don’t do it justice.

IMG_2380

IMG_2381

IMG_2382

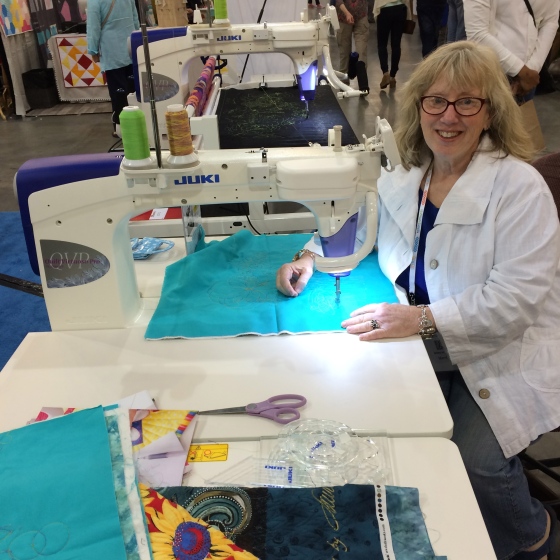
And my favorite moment in the show? Finally making the decision to buy the Juki long arm sit down machine.

IMG_2395


There is much more that I could say about the show, but I think I will leave it at that. The venue (Pasadena) was a great location for a show. It was easy to get around the town, and it was so nice to be in that great southern California weather in the middle of February.