In The Studio

Sometimes I go into the studio expecting one thing to happen, and the muse leads in a completely different direction. Yesterday I went in planning to work on my little snowball blocks. Just some boring, repetitive work (I like that sometimes.) But my featherweight sewing machine was set up on the desk. I remembered that I had set it up thinking that I might want to sew the snowball blocks with it. I decided that I wanted to use my big machine for that, but I hadn’t put the featherweight away. That made me think of my little squares.

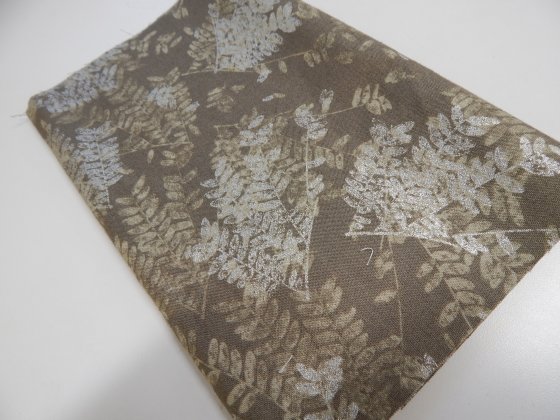
Once a month I get together with my sewing group. And for the last couple of years, I have spent that day putting together nine patch blocks, using one particular Loni Rossi fabric as a focus fabric for them. Here’s that focus fabric. I am just in love with it, and wish I could get more. It was actually on sale, and I bought one yard. Then a friend was going back to that store, and I asked her to get me more. They only had a yard and a half left. So I used about 2 yards just making the little nine patches.

DSCN2574


So yesterday I started looking through my collection of nine patch blocks, and the sixteen patch blocks (18″ blocks) that I had constructed from them. Sigh. I only had nine of those dang blocks. This was going to take another two years at this rate. I went into the closet to see if I had some more of the big sixteen patch blocks stashed somewhere in there. I didn’t find any, but I did find the bin of all the blocks I had constructed from my two inch blocks over the years. There were some little 16 patch blocks and some little 25 patch blocks. Some of them were hand-pieced, and some of them had some vague pattern work going on on them. Others were just completely scrappy. I was beginning to warm to the idea of using all these blocks that might never find a home otherwise. My original inspiration was an antique quilt, and isn’t that what it seemed like was often done–midway through a quilt, the color might change a bit, as they ran out of one fabric and made do with what they had on hand.

Hmmmm. What if I were to use all these blocks to supplement my nine patch blocks. I wonder if there would be enough to make a quilt top. So I started fooling around with them on the design wall. I counted the nine patches I still had, and there were enough to make three more of the big sixteen patch blocks. That way I could put a grid of 3X4 big blocks in the center of the quilt. I still had some of the Lonni Rossi focus fabric left. If I outlined these blocks with the focus fabric, maybe that would make sense of the quilt. I laid out the small 16 patch blocks and the 25 patch blocks around the quilt, and I had enough to make a complete top!

DSCN2571

And that is what happened in the studio yesterday. Finished size is about 68″ X 88″. And in case you’re going to ask (several friends have already asked) there are about 2,867 little blocks in this quilt.

DSCN2572

Of course, I still have a full box of little two inch squares…

Never Ending Nine Patch

**I wrote this last August, and just discovered that I never hit “publish.” Its the prequel to tomorrow’s post, so I needed to publish it today 🙂 **

Do you remember my love for my box of little two inch squares? That box always stays full. If it starts to get a little low on two inch squares, I just cut a few strips of favorite fabrics and fill it back up. If I come to the end of a project, and there are just a few scraps of fabric left, I cut that into two inch squares.

Once a month I meet with my sewing ladies. For the past couple of years I’ve just taken my box of two inch squares and made nine patches out of them. Eventually I planned to make an entire bed sized quilt out of these nine patch blocks.

This is how I do it: I just lay out 5 blocks of one color and 4 blocks of another, and construct each block one at a time.

DSCN1725

By the end of sewing day, I usually have a pile of 10-15 blocks.

DSCN1728

Eventually I started sewing the nine patch blocks into sixteen patch blocks (which made an 18″ square block.)

DSCN1726

Here I am auditioning them on the design wall. You can see I have one focus fabric, a lovely Lonni Rossi print, that I am using as a focus fabric.

DSCN1729

Sigh. I still need a LOT of those nine patch blocks.

Knitting With Fabric Strips


Banner1-TQS-125x125

So, there were enough questions about this, and not enough info on the world wide web, that I decided to write a little tutorial. I hope this is helpful, and clear enough.

I cut fabric strips 1 inch by the width of fabric (usually 40-42 inches.) I did find some recommendations to tear the strips, which they said would result in less fraying. While I agree with this in theory, I don’t like the way the torn strips get all distorted. I like the way the cut strips look. Also, I am a non-pre-washer of my quilting fabric, so none of my strips are cut from pre-washed fabric. I think that it might be more enjoyable to knit with pre-washed fabric. But again, I’m not going there.

I use size 15 needles. I went and bought myself a nice pair of bamboo circular needles, because I like that their ends are not so pointy. Remember, cotton strips of fabric are not nice and stretchy like most yarns, so you want to try to knit not too tight (that’s why I wanted needles that were less pointy.) I did a gauge swatch, and it seemed like I got 2 stitches per inch, so I cast on 40 stitches for a rug 20 inches wide. I just measured, and it is only 18 inches. So there you go. You want to knit in a stitch that will lay flat. Garter stitch is the way to go (knit every stitch.)

Progress on current rug. Sophie supervises.

Progress on current rug. Sophie supervises.

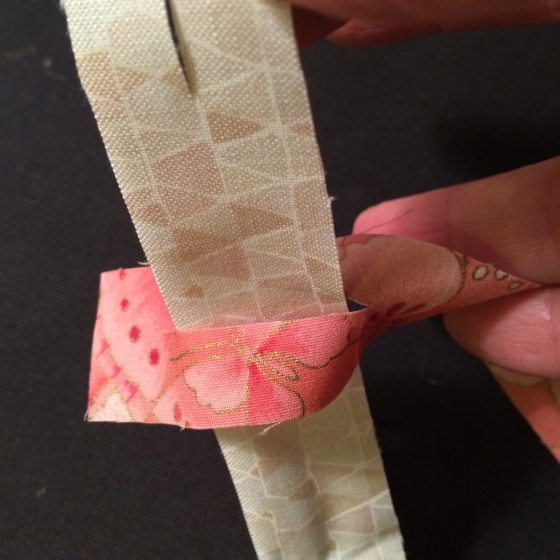
After you cut a million and one strips, you need to join them, so you will have a continuous strip of fabric to knit with.  Take one strip (you can cut off the selvedge ends or leave them on,) and fold the end over on itself like so (you can see I am actually doing both ends at the same time.)

IMG_0873

Neatly cut a slit in the end. Don’t cut close than 1/2″ to the end of the strip, or it might tear when you join the strips.)

IMG_0874

I sit and cut a pile of these while I am watching TV in the evening. When you have enough, take two strips, and PREPARE TO JOIN 🙂 Slip the second strip through the slit in the first strip.

IMG_0875

Now bring the long end of strip two, and insert it into the slit in strip two, and start to pull it all the way through itself.

IMG_0876

Pull it ALL THE WAY through .

IMG_0877

Then pull both strips taut, and TA DA! You have a continuous strip. Continue doing this until you have a big pile of fabric “yarn.”

IMG_0878


When you roll your strip into a ball, you might notice that it is getting a bit twisty. You can overcome this by winding forwards for a while, and then reversing and winding the other direction for a while.

When you first wash your rug, there will be a TON of frayed threads. Yes, I give the rug a haircut. Its kind of fun 🙂

You can crochet with fabric strips, but I find it very hard on my hand, and I noticed that another blogger said the same thing. Proceed at your own risk. Even knitting for a long time with this heavy fabric and big needles is tiring. Proceed cautiously. Your rug will develop quickly. No need to wear your hands out making a bath mat. (I keep saying bath mat, but I think they make great kitchen mats.)

Also, Shelley reminded me that the first thing I did with fabric strips was to knit Christmas stockings. They are so cute. For these I cut the strips 3/4 inch, and I knit on 4 double point needles size 13. Just use a very basic, simple sock pattern. Use a contrasting solid color for the heel and toe.

So What’s Next?

Banner1-TQS-125x125

Even though I said I was finished with the cross quilts, I continued to work up until the night before we were to hang the exhibit. As the finish approached, I already had another little idea working in my head. I had seen this ad in my rug hooking magazine, and was enchanted by the colors in it.

DSCN2561

I had already pulled a huge group of solid fabrics that mimicked the colors of yarn in the ad, so I thought about what I would do with them when the time came. I find this is a good way to work. Instead of being pressured to COME UP WITH A GREAT IDEA when confronted with a group of fabrics, I have plenty of time to think about it. So coincidentally, I saw this little snowball quilt in Jenny’s blog (thank you, Jenny!) and for the first time ever, I really really liked the snowball block. I think it is the fact that I perceived them as small blocks, and also that they really mimicked circles, with the spiral quilting. Anyway, I decided to use the snowball block as the basis for all these colors. I looked at different sizes, and decided that a 3″ block would make me happy. Pretty easy to cut out 3 1/2″ squares, and 1 1/2″ squares for the corner rectangles. Here’s the start:

IMG_0803

And then, one night, I was sitting in my chair. And I wanted to make another knitted rag rug. Here’s the thing about these rag rugs. They are really comfortable to stand on, and they have held up well to multiple washings. They are completely thought-free–the only thought required is choosing the group of colors you want to use. That’s just fun. They are scrappy, so you don’t have to think about what color comes next. And I like the repetitive motion of putting the strips together and winding them into balls. I always stay ahead of my knitting, because I actually like putting the strips together and winding balls better than knitting!

IMG_0806

As I worked on this, I started berating myself. Why do you waste time like this? You could be working on a project that has meaning and purpose. But pretty quickly I realized that this is part of the process. I need to give myself time and mindlessness in order to renew and cultivate my creativity. I wonder if Leonardo da Vinci did mindless knitting between his masterpieces. NOT THAT I AM COMPARING MYSELF WITH LEONARDO. Just wonderin’ 🙂

DSCN2563

Some Exciting News!

ohc5

Two years ago I had the opportunity to do an exhibit of my Housetop Quilts at the Oak Hills Church in Folsom, CA. Since then I have worked on two new series of quilts, The Psalms, and The Signature of Jesus. And Monday, I delivered 25 quilts to Oak Hills. They will be on display until Easter Sunday, April 5. Anyone is welcome to visit and view them. Of course, the gallery area will be open every Sunday morning, from about 9am-12noon. And you can also visit during the week, Tuesday through Friday. Just call the church office (916.983.0181) to make sure the gallery is open. (The gallery is in their very large sanctuary lobby.) I will be at the church this Sunday, February 22, sitting and demonstrating my handwork. Fun!

ohc1

I can’t say enough good things about this church. They have encouraged me to be an artist, and have provided an opportunity to share my work with others. When I delivered the quilts, two artists were there to help hang them, and they were laid out and arranged and rearranged to make a beautiful display. It is truly exciting to be able to see all of your work in one sitting like this. Teresa is the artist in charge of the program. She makes Pysanki eggs–they are phenomenal! Go to her website and view the galleries–you will be amazed!

ohc4

And another bit of very good news! The Quilt Show has gotten the kinks out of their system, and are set up for people to be able to view “my” show for free February 22 through March 8. Clicking on this link should take you directly to the show. THIS LINK WILL NOT WORK UNTIL FEBRUARY 22. I hope you will watch and enjoy. The Quilt Show does a wonderful professional job at producing each show. I truly enjoy watching each new episode. In addition, TQS has a wonderful website with lots of free instructions, ideas, news, and just fun stuff.

Here’s the trailer they created for my show!


How Small Can a “Real” Quilt Be?

I know I said I was done with the cross quilts. But I keep finding mostly finished and partly finished ones that I really do like. And so, one by one I am finishing those off. Last night I found a couple of little tops and made them into sandwiches and then hand quilted them. Wow, all that done in one night. Amazing, right? Well, one of them was 6 inches square, and one of them was 8 inches square… Both of them were actually made as sample quilt blocks. But for this exhibit, they do stand on their own. I have a variety of smaller cross quilts, and I think they will look nice displayed as a grouping.

Here’s the 8 inch quilt. I actually did this one as a project for The Quilt Show. Here are the directions for making it. If you are going to make it as a stand alone quilt, there is no reason to cut out the extra batting like I explain in the directions.

DSCN2512

And here’s the 6 inch quilt. I decided to finish this one with a fringed edging. I had done this a long time ago with one of the first “art” quilts I did in a class, and I quite liked it. Then someone made a disparaging remark about it (is it a placemat?), so I never used it again. But I think it has possibilities.

DSCN2518

Here’s how to do it. You have to cut the batting 1/4-1/2 inch SMALLER than the top and back. And then you sew two lines around the edge to stabilize it. Get some sharp scissors and cut tiny slices in the edge, close to but not through the lines of stitching.

DSCN2513


And then use your thumbnail to scrape across it and fringe it. Its just a nice alternative to binding. I am pretty tired of making bindings.

DSCN2514

A Tale of Two Techniques

I’ve been away at a rug hooking retreat! Before I left, I started an interesting project, and I thought you might enjoy seeing what happened. I had a little idea for the rug I wanted to hook, and so I drew a sketch in my 4X5 notebook. My drawing skills are very primitive, but fortunately that works very well in rug hooking 🙂

About a week before I left, I decided I wanted to have a small hand quilt/embroidery project to work on in the evenings. While thinking about what I wanted to do, I came across my rug sketch, and decided that that would be fun to do in embroidery. Plus, it would give me a chance to work out some of the details that I wanted to include in the rug (even though, inherently, I knew the two techniques would produce different results.) I thoroughly enjoyed working on the embroidery before I left. All I did was to put together a quilt sandwich and mark the outlines of the piece. As I went along, I drew in various images with my handy dandy disappearing blue pen.

The scripture inspiration for this piece is found in the poem in Colossians 1, where it says  

Everything was created through him and for him. He existed before anything else, and he holds all creation together.

Those words ignited my imagination. And since I have been doing a million “cross” quilts for The Signature of Jesus series, I saw a cross in the background.

deb1

So, I got this far with my embroidery, and then it was time for the rug retreat. Before the retreat started, my friend and I went over to Gene Shepherd’s to consult with him on our patterns. I was planning to just pick up some rug canvas and start the sketch on the rug in my hotel room. (Rug hookers use Sharpie pens to draw their designs on the canvas.) But Gene convinced me that it would be so much easier to go to Kinko’s and get the design enlarged, and then he could just trace it onto the canvas using his light box table.

deb4

Honestly, I had heard about doing this for years, but had never tried it. And I was amazed that they could enlarge a tiny little drawing to a piece that was 24″ wide!

Before the retreat started, Mary Lynn and I went to Crystal Cove Beach. They had marvelous tide pools, and I was especially struck by the layered rock that was everywhere. This has to be good inspiration for something, right?

IMG_0081

IMG_0079

IMG_0077

I worked on the rug for four days. A great deal of the time was spent trying to figure out the right yellow for the cross. I had it stuck in my mind that it had to be yellow. Somewhere along the way, having a discussion with Gene, I said that value was more important than color, because the cross would be in the background, like a watermark, but it had to be visible behind a number of different colors. After several failed attempts at dying yellow, I found this beautiful glowing apricot color right in my own stash 🙂

IMG_0138

(Does anybody else think that the fish looks like what would happen if a goldfish and a shark were to get together?)

I’ve worked on it a bit more since I got home, and here you can see that I have added some details to the top of the design.

DSCN2499

Now, back at home, I am anxious to get back into the studio and work on some quilting designs that have been percolating for a while!