The Creative Process, Part 2

I’m back to finish up my discussion of the creative process.

DSCN0523

I put this quilt top (only the top this time, instead of the entire sandwich) together pretty much according to my sketch. (This sketch doesn’t show it, but piecing the back fabric out of four different fabrics was part of my plan.)

DSCN0525

If you are a close observer, you might notice that I left out essentially ALL of the magenta fabrics from that original pile. I just wasn’t feeling the magenta as I composed this. I also added that bird fabric. I had just enough of it to fussy cut those three little birds out. According to my sketch, I only included two of them. After I put it on the wall, I could see that I needed to include the third, and I also added the smaller yellow piece. You can see that those pieces are still just pinned on there.

At this point, (after percolating a couple of days!) I definitely want to add bits of the magenta. I loved Loretta’s description (in the comments of the last entry) of adding a glaze on top of the piece to enhance it!

Both of these pieces are stark enough that I can add plenty of embellishment if I so choose. This one is meant to be a part of The Psalms series. I haven’t thought of which verse I will want to include. But I did realize as I stared at it that that small yellow piece will be the perfect place to add some words.

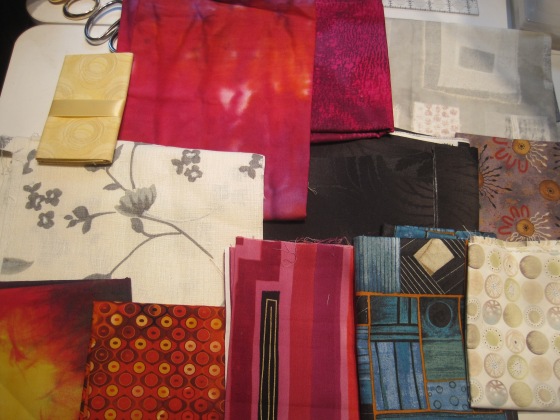
And once these two were composed, I realized that I had not really done what I had originally envisioned with that pile of fabrics. I wanted to create something that was really color-dense. So I put the original pile of fabrics back on the table and stared at them.I had used up all of the pale yellow in the first two quilts, so went through my stash to find a pale yellow that would work with this group of fabrics. I added the brighter turquoise (that I had used in the cross) and the scraps from the bird fabric, and then stared some more. Maybe I needed a solid color? I went to my solids cupboard and got out that great coral and added it. That looked really exciting to me.

DSCN0524

Last night I looked at the pile again. And I decided to cut a strip off of each piece so I can play with them this morning. Sometimes its hard for me to start if I have too big of a playing field (large pieces of fabric.) Its hard to cut into fabric not knowing if you are going to use it or not, but I highly recommend doing this to get you started on the creative process.

Off to create some more!!


The Creative Process

I’ve been sewing and quilting up a storm this week! I had to leave my car for repairs for three days, and it “forced” me to stay home.

The creative process interests me. That is always what I am most interested in hearing about from teachers in workshops and artists when they lecture. Not everyone is willing to share this information–I’m not sure why. So I thought I’d share a bit about the journey here.

These projects started quite a while ago, with my favorite part of the process, where I go through and pick out a group of fabrics for the next quilt. Sometimes I have a specific idea in mind, but most of the time I have a VERY vague, loosely formed plan for the fabrics. I think this is my favorite part of creating–picking just the right fabrics.

IMG_9993

These fabrics went into the big pile of unfinished projects because I had to finish the rug for the big rug show. I hardly remembered they were there until I scrolled back through my own blog and saw this picture! That got my creative juices flowing again. But I had SO MANY unfinished projects. Sometimes UFO’s can stifle your creativity. So I made myself work diligently on a couple of projects, and then started thinking about this pile of fabrics again.

One day I was doing a good deed (giving a neighbor a ride) and had to wait for over an hour while she finished her chore. After thumbing through a magazine or two, I got out the only piece of paper I had–a tiny notebook I keep in my purse–and drew a few rough sketch ideas for the fabrics. I thought it would be fun to do two quilts out of the same pile. This is the hardest thing for me to do–settle down to daydream and draw out my ideas. But I do believe it is one of the most valuable things you can allow yourself to do in order to move forward in the creative process. Here’s one of the little sketches I drew. (I think Noah ate the other one.)

DSCN0525

I used both sketches as I worked on these quilts. As rough as they were, I think they give you the same comfort as a pattern does for most of us. A little direction that yes, you are doing it “right.”

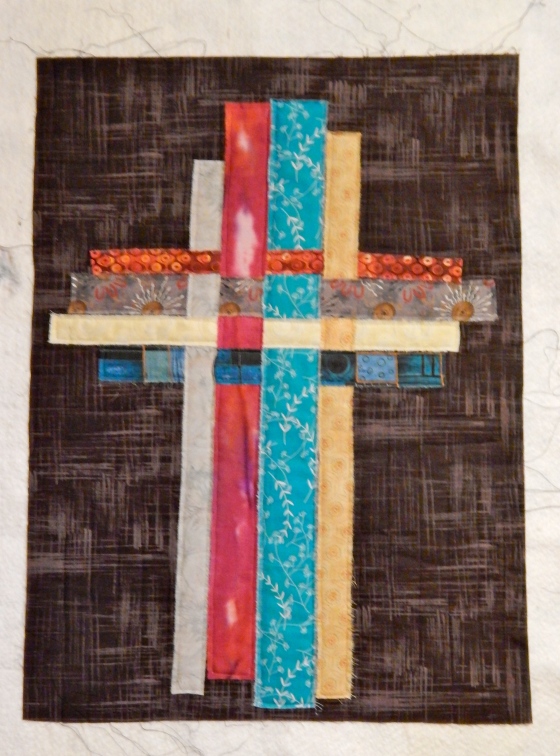
I did the simplest one first. A cross, using torn strips. Using torn fabric is fun! At first it is dismaying, because the process of tearing makes the fabric curl and do funny things. But a quick ironing brings the fabric back into shape. And because the fabric tears along the grain lines it is always straight!

Weaving fabric strips in a quilt is not a new idea. I’ve seen it for years, and thought it was a really neat technique, but I’ve never done it. Just weaving the strips across the center of the cross was easy and fun. I love the look of it. I love the rough torn edges.

DSCN0521

To make it, I put together the quilt sandwich (top background, batt, and backing) by steaming the layers and fastening them with just a few pins. Then I laid the strips on top, arranging and rearranging them to get just the right combination. At this point, I will often add some fabrics that were NOT in the original pile. In the cross, the pale gray and the darker yellow were not in the original pile. Oh, and the brighter turquoise was not there either! The background was a dark brown print I had just gotten on sale the week before, so it also was not in the original pile.

DSCN0520

After I had all the strips arranged exactly the way I wanted them, I wove together the center, pinned them all carefully in place, and started sewing them down. Since the whole quilt sandwich was already put together, I was quilting the quilt as I sewed these strips down. I decided that simply echo quilting around the cross at about one inch intervals was enough quilting.

Then I put it up on the design wall. My first thought was that it was brighter than I wanted it to be. After I put up the second quilt, my thought was that it was duller than I wanted it to be. Nonetheless, it is basically finished. Or, conversely, it could be just waiting for the next round of embellishment! By quilting it simply, it will be easy to add my perle cotton embroidery on top of it. I’m letting these thoughts percolate for a while.

DSCN0522

Well, this is long enough for one post. I’ll share my thoughts on the second quilt tomorrow. It is not finished yet.


Playing with Squares and Zig Zag

Some of you might know my penchant for working with little squares (two inch squares, to be exact,) and also my fascination with the zig zag stitch. I just think its fun to position the squares on a background fabric and zig zag them down, instead of actually piecing a block. Yes, there are raw edges. But I think it works. I have one quilt that I have used as a bed quilt and have washed quite a bit, and the zig zag’d squares are as stable as any pieced quilt I have.

IMG_9028

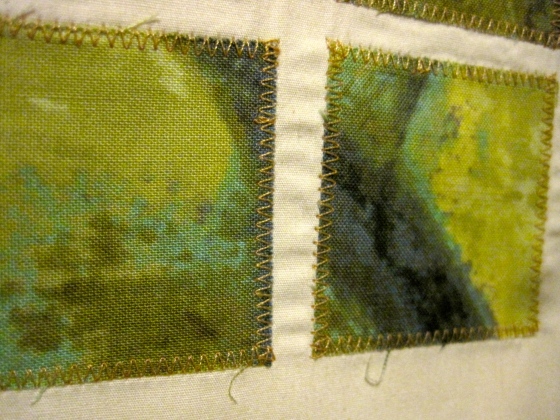
So anyway, I started daydreaming about the little squares and the zig zag technique, and the next thing I knew, I was zig zagging little squares in a grid on some neutral background fabrics.

DSCN0511


Close-up of the zig zag edge:

IMG_0038

After I worked on them for a while (thoroughly enjoying the process) I put them up on the design wall, to see if they were “worthy.” At first, I thought, no, not quite what I was looking for. But they are growing on me. I’ll probably do a few more today to see how I like them. This will end up being a bigger quilt if I continue on with these.

Here is another quilt I did with the squares and the zig zag stitch:

IMG_9022

And a close-up of how I quilted the zig zag’d squares:

IMG_9024

I am working on a lot of projects right now. Some of them are gifts, so I will share those at a later date. And some of them are just in process. I’ll share more as I progress.


Hello Again

I do wish I could be a more regular blogger. The trouble is, once you get out of the habit its very difficult to start back up. At least that’s been my experience. So I won’t try to fill in all the details of the past month. I’ll just start again from where I am today.

Between trips (Sherri Woods workshop, ATHA rug convention, and PIQF) I have been working steadily on a number of quilts. I thought this one was finally finished, and I had a new idea. I think I’ve mentioned that one of the series I am working on is “The Signature of Jesus,” and that each quilt will include a cross, and for the most part I am planning to put the same words on each quilt “God so loved the world.” So I was thinking about where to put the words on this quilt, and I had the idea to do my running stitch embroidery at the bottom, in a partial sphere in blue and green thread, to indicate the earth. That will take quite a bit of time, as this is a large quilt (maybe 48X60) but it is the kind of stitching I enjoy–not a lot of choices to be made–just which color of blue or green thread I will use next. I already have my little case of blues and greens picked out!

DSCN0479

This quilt has a LOT of hand embroidery on it in the squares that are part of the cross. I did most of the stitching in neutral or dull colors. I am not sure the final product is worth all the time it took. But maybe it is one of those elements that the viewer will enjoy looking at up close.

DSCN0487

Lastly, I want to direct you to take a look at one of the latest quilts of my mentor, Marianne Burr. I just discovered this morning that I could click twice on the picture and get a really great close-up view of her beautiful work.

I’ll sign off for now. No promises, but I will try to check in with my latest work a little more frequently!

Miss Bess perched on the arm of the sofa, waiting for me to finish on the computer!

Miss Bess perched on the arm of the sofa, waiting for me to finish on the computer!