Projects and Project Boxes

I am a multiple project type of gal. I like having multiple projects to work on. But sometimes I get carried away and the projects multiply faster than I can work on them. And that can be overwhelming. That’s when the project boxes come in handy. I can put some of the projects neatly away for a bit. They are all ready for when the mood strikes, but they are not laying around making me feel guilty for the way I choose to work.

IMG_3303

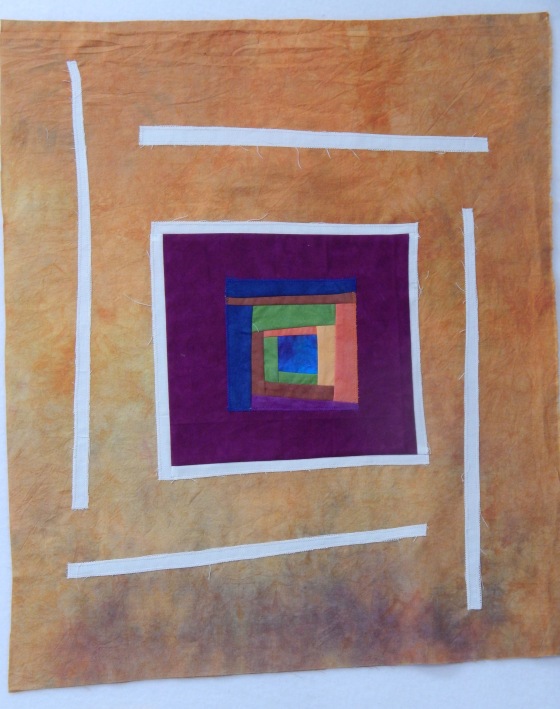
Recently I saw a tiny picture somewhere. It was just a simple quilt, a kind of a square in a square, and I thought, that would be a neat way to use my kantha stitching. It seemed to be a scrappy quilt, and the main square was large with the outer square being more of a frame (where I would embellish with kantha stitching.) Here, like this:

IMG_3300

So I went out and went through my stash, and had great fun cutting out hunks of all my favorite fabrics, and then carefully cutting them into 6 inch squares. I have enough to make each block a different fabric!

IMG_3294

As I cut the squares, I had great fun re-visiting old and new favorite fabrics. It occurred to me that this is a great idea for a memory quilt. So many memories are attached to my fabric–where I was when I bought it, who I was with, and sometimes even the quilts that I have made with the fabric.

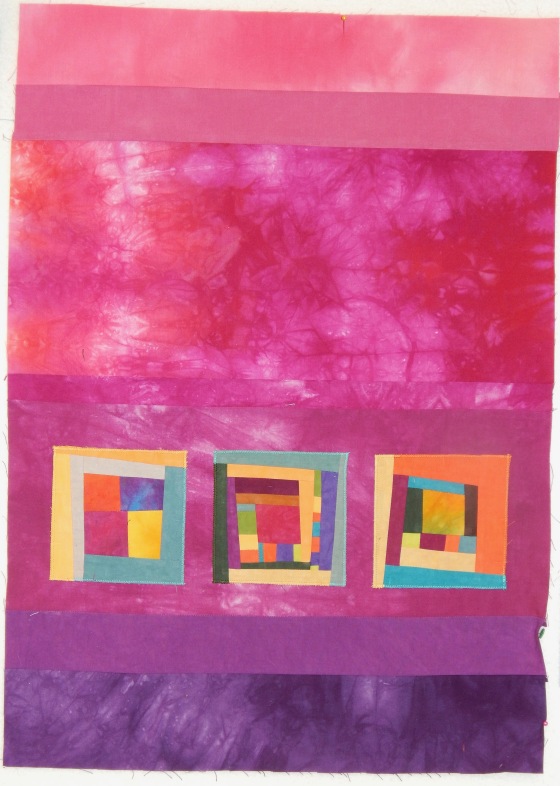
Here are some of the other projects I am working on presently. And even more are in project boxes…

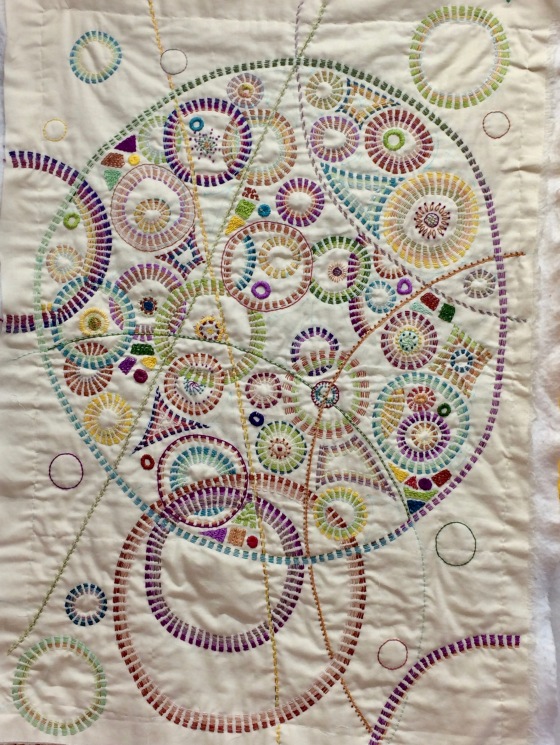
Here is the piece that I showed you bits of previously. I have to take long breaks with this one to figure out what I want to do next. So far, each time it seems like “adding more” is the best solution…

IMG_3299

I got out the ten little pieces that I intended for the “Characteristics of God” series. I am making them into sandwiches and embroidering the words on them.

IMG_3301

And in the evenings, this one seems to have taken preeminence, because it is so enjoyable to stitch on with that DMC Coton Floche thread. I choose one block to work on, and then choose the threads that I want to use. It usually takes an evening to stitch one block.

IMG_3302


And Lastly…


While patiently awaiting the return of my Juki, I started work on a new series. It started out with inspiration by this weaver. The more I looked at her work, the more I saw the “quilty-ness” of it. Then I started drawing little sketches in my journal. And I decided to let myself play with my collection of hand-dyed fabric–some Cherrywood, some Ricky Tims’, and even some of my own hand-dyes.

dscn4718

These are all really simple designs. But I enjoyed creating them, and choosing “just the right colors” for each. The small pieced squares that I am using in each were created on my Colorado retreat!

dscn4717

I am going to use these pieces for a series on “the character of God.” I wanted to use characteristics that most people could relate to. And then I found an article where the author made two lists–one of characteristics that applied only to God, and the other of characteristics that He shared with man. That helped to define what I was thinking about.

dscn4716

So although they are simple, they also provide a somewhat blank canvas that I can use to embellish with quilting or embroidery just the way I want.

dscn4715

dscn4719

dscn4714

P.S. Just got word that my Juki has been shipped! Yahoo!

This Week–In The Studio

A week  or so ago, I became enchanted by a quilt Melody Johnson shared on her blog. I sent the picture to my BF, and asked  why I liked it so much. Her answer: P.I.N.K.

IMG_20150711_132343


Ha! I truly hadn’t thought of that. I do like pink just a bit 🙂 I also liked the scrappiness of it, and lately I’ve been attracted to the friendship star. I’ve been thinking about triangles for about 6 months. And I have been thinking about doing a more traditional style of quilt. P.I.N.K. confirmed it. This is the new quilt I would make for my bed! Oh, and I also liked that the original creator used old clothing in her quilt. I had saved some of the fabric from the last few colorful scrub tops I wore as a NICU nurse, and this would be the perfect quilt to include them in.

As you can see in the original, it is based on 3/4 –that is, there are 3 squares across the blocks, contrasting to the 4 squares across the sashing. The simplest equation for this is 12. So the blocks are based on a 9 patch of 4 inch finished blocks, while the sashing would be based on 3 inch finished blocks. I only tell you all of this to tell you something cool that happened quite by accident. I decided to make the half-square triangles for the star blocks by simply cutting 4 1/2 inch blocks, drawing a line down the center, and sewing ON that line. I cut the leftovers off with my scissors. As I looked at those leftovers, I wondered if they would make the 3 inch finished  blocks I needed for the sashing triangles. Sure enough, they did! So I sewed those leftovers together as I went along, and then “squared them up” and cut them down to 3 1/2 inches.

I do not like strip piecing, or speed sewing anything. So I just went through my stack of pinkish fabrics and chose three fabrics for each star block, and constructed each block one at a time. I know this is slower, but I am so much happier working this way. Every day I made a few star blocks, so that by yesterday I had all twenty of them done! I was a little surprised to see that my creation is LESS pink than the original. Maybe it’ll pink up when I add the sashing. I used a combination of contemporary prints and reproduction prints. And added in some stripes and plaids. This will not be big enough for a bed quilt, so I will add some kind of border.

DSCN3157

And returning to the cherrywood fabric and 2 inch blocks creation:  after thinking about how or if I wanted to add the squares to the last border of this quilt, I realized that the way I wanted to do it was to follow how I had done the first round. That is, I added the borders log-cabin fashion, and I sewed the little squares on to each log before I sewed it to the main piece. So I adjusted the little squares to mimic this treatment. Its a small changed, but one that made me very happy. Its ready to be made into a sandwich, but first I have to clear away some pink fabric from my cutting desk so I can turn it into my ironing desk 🙂

DSCN3155


New Directions

I hardly ever work so continuously on one project. But I really enjoyed this one. Yesterday I put a facing on it, and TaDa! It is finished! The title is “Seeing God.” I love the verse that inspired it: For ever since the world was created, people have seen the earth and sky. Through everything God made they can clearly see his invisible qualities–his eternal power and divine nature. 

DSCN3113

In between stitching, I spent a bit of time in the studio piecing two more tops that I want to do a lot of embroidery/hand stitching on. Here is the “pink” one. The verse inspiration for this one is: Every good thing given comes down to us from God our Father who created all the lights in the heavens. 

DSCN3111

I took a picture of this top with the pink threads next to it, so you can see it will be a little more dynamic once the thread work is added.

DSCN3110

And here is one where I used my box of little two inch squares and my bags of Cherrywood hand dyed fabrics. I love those bags! They sell pieces of a large cross section of their hand dyed colors cut into about 8X10 inch pieces. There are lots of things you can do with an 8X10 piece of fabric!

DSCN3107

Anyway, I got this far, and I can’t decide whether I want to put more 2 inch squares on the outer border. I love the brighter colors and the glow that they achieve.

DSCN3108

Any opinions out there?

I am Loving This!

So many times you get a new idea, and the idea is so much brighter and shinier than what you are actually able to create. This was a very simple idea, simply executed, and to me, it looks just as good as, or better than, my idea.

DSCN3092

I have been stitching on it non-stop since my last post, and have only stopped long enough to work on another strip-pieced top to highlight–guess what? My collection of pink and coral threads 🙂 I am thinking about adding a bit to this piece besides the simple strip piecing, so it is sitting on my design wall while I cogitate on that a bit.

So fun when one idea takes you in a new direction. And that direction turns out to be something that pleases you both aesthetically and tactile-y. This straight line stitching is easy on the hands, and the only decision I have to make is which color of thread to use next.

DSCN3094

For this piece I am using #8 perle cotton. The brands I use are DMC, Finca, and Valdani. I use my favorite Clover leather thimble, and self-threading needles. The strips are cut free hand (in case you were wondering about them not being perfectly straight.)

Finishing and Starting

Starting a new project is the most fun, isn’t it? Actually, just planning and dreaming about the new project is the MOST fun. Then you start and it takes a lot longer than it did in your imagination. By the end, sometimes it is just a labor to get it finished. At my best, I try to take enjoyment in each stitch. At my worst, I simply put the project away and try to forget about it 🙂

Anyway, I have been on a creative jag this week. Who knew that taking an artist’s holiday could be so good for your creativity? I always worry that I will never have another creative idea in my life. But then, as Jerry Seinfeld says about appetites, another one always comes along.

I finished this little piece that I showed you before. When I photographed it, I realized it needed a little more quilting in the background. Well, now it has PLENTY of quilting in the background. I decided to hand quilt it.

DSCN2450

Close-up:

DSCN2452

I’ve been working on my “double cross” rug almost every evening. I finished the darker maroon crosses, and then I decided to do a simple, scrappy treatment on the alternate crosses, bringing in the blue that occasionally showed up in the maroon crosses, and also so it will be useful in my house. I don’t have maroon, but I have plenty of blue. I finished the last blue cross last night!

DSCN2455

And then I did a background top for a quilt I’ve wanted to make for a long time, containing all the words from a “poem” in Colossians 1. Twenty-six lines of writing. Here’s what I did–just did a log cabin/housetop type of rectangle, and then cross cut it to insert the cross. I am pre-quilting it with a grid before I put the words on. I’m planning to use script, and do the wording by machine.

DSCN2453

I started two other new projects this week, if you can believe it! I will show you those soon.

Starting a New Project: Process

Someone asked me to explain my process for choosing fabrics for a new project, so I thought I’d document my process here. Maybe it will cement it in my own mind : )

This new project is an offshoot of the sketch that I drew for my quilt kit. I liked the way the drawing looked, and I started thinking about making the double wedding ring with a single pattern piece, instead of using the two inch blocks for the pattern. In talking it over with my friend, she suggested the idea of doing the kantha stitching in the pattern (I keep saying pattern because that piece is not an oval, and I don’t want to call it a football!)

Right now only about half of my stash is in the studio, and only about a tenth of it is readily visible. And yet, I found inspiration in those few pieces! I started out with these two pieces that I had bought recently. I do love the color and the patterns on these.

DSCN1208

And then I started trying to find fabrics that would go with them. I was looking for a “color wash” effect. Nope, one’s too bright, and one’s too dark. That pale one might work, and for sure I like the gray/blue paisley.

DSCN1209

My solid fabrics were in the house, so I tried those next. Nope, too solid. I wanted patterned fabric. But not TOO patterned : )

DSCN1211

Trying more solids. Nope. Give it up. You’re going to have to take a trip out to the storage shed.

DSCN1212

Oh, but before I go out there, I auditioned the contrast colors that I had spied in the studio–oh yeah, those are going to work great!

DSCN1213

Trying out more mostly solids in that red/magenta/coral/orange color way. These pieces could be solid colors, because they would have the kantha stitching on them, and I don’t want too much pattern to distract from the stitching.

DSCN1214

Alright, out to the storage shed, where I picked through my blue and red/orange/pink tubs to see what I could find.

DSCN1215

I found quite a bit!

DSCN1216

And then narrowed my choices down, and laid them out neatly so I could keep walking by and looking at them.

DSCN1217

Sometimes I am stubborn, and leave in a fabric that I love, even though it seems to stick out (like that dark bright blue in the middle front.) Sometimes those fabrics surprise you, and they do work. But lots of times I am finally forced to eliminate them.

And that’s how I choose the fabrics for a project. Most of the time I do not use all the fabrics that I have chosen, and most of the time I need to go to my stash for another color or pattern. Many times this is the fabric that I need to make the quilt “pop.”

Choosing the fabrics is probably my favorite part of the process.


New Work

New work–in more ways than one! The studio is progressing rapidly. This time I wrote a post over on my other blog. You can click here to see the latest pictures of the construction and progress.

And in the midst of all the cleaning and clearing, I decided I had time to start a small piece for a SAQA exhibit. It is only supposed to be 7″X10″. Surely I can finish that before January 31st?

Well, almost all of my fabric had been organized and put out in the storage shed. There was just one last pile to organize and clear up, and as I went through those fabrics, I put aside a small pile that I thought might work for this piece.

In the end, I decided to do another in the “Signature of Jesus” series, combining the cross with the kantha embroidered circles that everyone loves so much. When I went out to the storage shed to see if I could find my thread, it was the first container I saw, right inside the door! I think that’s providential.

One of the hardest things was to figure out how to make sure it was only 7X10. I made the top, and then cut it down a little, and then I marked that black line at 8X11, so even if there is a little shrinking with the stitching, I at least have a guideline to know where the quilt will end.

This is the first time I included words within the circle stitches. I like it very much. I have a lot more embroidery to do, and then some more quilting. But I think its doable, don’t you?

DSCN0805

It makes me happy to have little moments of creativity in the midst of the building and cleaning havoc.

Solids…What Are They Good For?

I dunno.  But I guess I’m gonna find out!  Over the years I’ve been attracted to the work of artists who work with solid colors.  So I would pick up a few solids here and there.  And of course there’s the wonderful Amish quilts.  And then I started reading Melody Johnson’s blog.  And she kept encouraging you to get more solids.  She would even tell you when Joanne’s was having a sale on solids.

So Sunday I went to Joannes and picked up a few more solids…  their thread was on sale too…

I am not putting these solid fabrics away until I do SOMETHING with them!

Did you know my favorite color was pink?

Today or tomorrow I plan to work on a new project using these solid colored fabrics.  Right now I am just using the ‘think method.’ (those of you old enough will recognize The Music Man quote.  I use the think method a lot…)