Very Exciting, Very Fun!

If I get a tax return, I usually buy myself a little gift. This year I bought some fiber from Three Waters Farms. I really liked this color way, so I bought 8 ounces of it.

il_794xN.1737443575_kyv8

There is a cardigan that I like on Ravelry, and I decided I would like to make it. You can see that it uses various yarns.

1-129_medium2

So I thought that I would dye some turquoise fiber and spin that, and also mix it with the Three Waters Farms color way. But so far I’m not very motivated to go out and dye some fiber. So one day I went out to my storage shed to see if I already had some dyed turquoise fiber. And I couldn’t believe my eyes. I already had 8 ounces of turquoise fiber spun up in to yarn! And, I had these two other light and dark turquoise fibers.

DSCN6466

I might dye that turquoise yarn into a darker turquoise. And yesterday, because I had a cold, I basically just sat and spun all day (no thinking required.) So I held the light and dark turquoise fiber together and spun a variegated yarn.

DSCN6467

Quilting is continuing on, and a little rug hooking. But I am really excited about knitting a sweater again.

New and Old Things

Let’s start with the old. Do you even remember when I started this project? I don’t. But the other day I was cleaning out my closet and I remembered this very large project. I was going to make panels with front and back, and then do that “quilt as you go thing” to put them all together into a very big quilt. The front has 7 inch squares with a one inch border, and my idea was to embroider in all the borders. So I got one out and started embroidering on it again. It takes a long time to embroider each border. So I went back into the closet to see how many panels I had left to do. When I finish this panel, there will be four panels done. AND EIGHT PANELS LEFT TO GO! I was kind of complaining about this to my BF, and she said, why not just put the four panels together into a smaller quilt? Brilliant!! There are other things I’d rather be embroidering.

DSCN6442

I finished this next quilt in time for the Intersection of Faith and Arts Conference. It was actually a lot of work to piece together the background, and to embroider all that writing on it. I had thought about doing a series of these, with Biblical blocks in the background, and important (to me) verses on the front. But I wasn’t sure if I really wanted to do that again. Well, I had three people comment that they would like to buy this quilt, and so that encouraged me to make the next one. Its always nice to hear that people appreciate your work. (This verse is Matt. 11:28-29 from Eugene Peterson’s The Message.)

THE UNFORCED RHYTHMS OF GRACE

I really like making these improv cris-cross blocks. No ruler or rotary cutter necessary! So I made a bunch of samples in case anyone wanted me to teach this. Very fun to make. (And yes, I did square them up at the end so I could easily put borders on them.)

DSCN6441

And lastly, I am always so very happy when I get a picture from a workshop participant telling me that she finished her class project! Because, to be honest, I seldom finish workshop projects. I especially love the colorful border that she put on this project. Thank you so much for sharing!

IMG_4111

I’m back in the studio finally. I spent half a day cleaning up (yes, still more needs to be done but there’s at least room to move around in there!)

A Finish and a Flub

Remember that very sparkly piece I was working on? The fabric from Joann’s? Well, yes, I finally finished it, and I decided to wash it because the darn black attracts so much lint and dog hair. I should have just worked on brushing that dog hair off. Because, the GOLD washed away in the washing machine!!!

DSCN6435

Here’s one close-up. You can see where the steel color is showing through.

DSCN6436

There were a few places, like this one, where the gold stayed on better. Anyway, that was a lot of work for all the gold to wash off!

DSCN6437

I started this piece a few weeks before Christmas. I saw something like it on the screen at church. French knots, I thought! So all those dots in the sky are french knots. I used quite a few different colored pale threads in 4 sizes–perle cotton size 3, 5, 8, and 12. What I really liked was that I had a dark blue for the sky, and then I also had a piece of dark blue with a lot of little squares on it, which would work for the town. As I neared the end, I decided that I wanted to include the shepherds and  sheep and the angel with her words of good tidings! I used some wool thread that I had bought recently to outline the town and the angel and the shepherds.

DSCN6439

To be fair, I googled “french knot sheep” and of course, there were plenty of examples! I was trying to make them too complicated.

DSCN6438

The back was a mess, since I went all the way through to quilt the french knots down. So I put a second back on, and quilted a bit to stabilize the whole thing (four layers.) It makes it quite sturdy. I do like this piece a lot.

I forgot to mention that I was teaching Quilted Embroidery again at The Cotton Patch this past Saturday. It was such a nice class of women. They all seemed to enjoy working on their sample piece to learn some simple embroidery stitches. It was a lot of driving in the rain, but I do like driving over to Lafayette–it takes me through the Delta, and it is a very pretty drive.

Where Have I Been, What Have I Been Doing?

The day after Christmas, I started working on the “cow rug” seriously. I worked almost every day on it for hours. I had started it the year before at my Anaheim rug retreat, and I wanted to try to finish it to bring back and show to everyone this year.

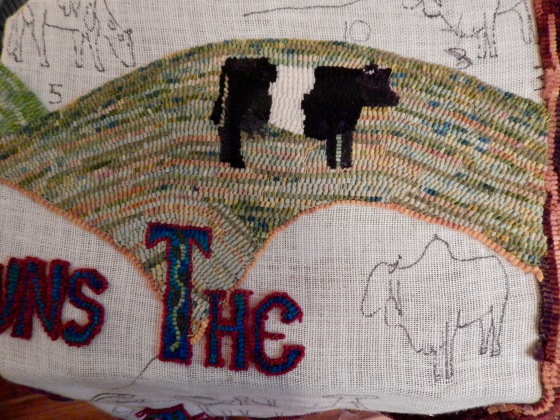
Somehow I developed a fear of hooking the cows. So periodically I would write the goal to finish one cow. Here I put the baby on the hill above the mama.

IMG_0003

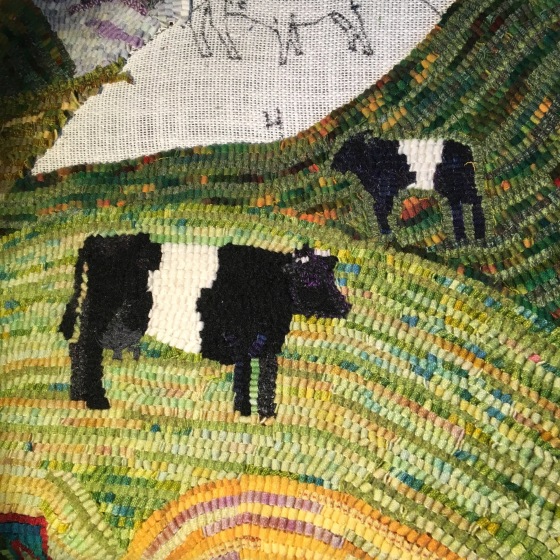
I am very happy with these cows. I was actually able to make it clear that there was a baby and a mama stuck together.

IMG_0006

This cow was my hardest. It is a Scottish Highland cow, and they have very long hair. I finally hooked it with an angora sweater that I had felted and dyed, and brushed the angora after I finished hooking it. I need to re-work the face a little. (the hair hangs over her eyes.)

IMG_0009

Finally I was finished with the cows and the hills, and I needed a sky. So I googled sky images and used this one as inspiration. I was very happy when I gathered my wool fabrics and realized that I had plenty of wool in the right colors for the sky.

dusk-colorful-dramatic-yellow-sun_1203-5704

And here is the finished rug. Of course, its not completely finished. It needs to be blocked and have some finished touches put on it. In case you don’t remember, I chose cows from all over the world. The hills are from a picture I took of our local hills. That mountain is supposed to be Mount Zion. And the redwood trees were something that Gene (hooking teacher) and I came up with as a frame. Of course, redwood trees don’t really grow in my foothills, but they make such a nice frame, and I always think the redwoods seem like a cathedral. I used hand spun yarn and wool for the redwood leaves.

IMG_E0014

For my next project, I became enamored of these wonderful Egyptian tapestries. Here is their website.

140__corn_fields_by_the_canal_2012._1.91_x_1.05_mahrous_1_1024x1024

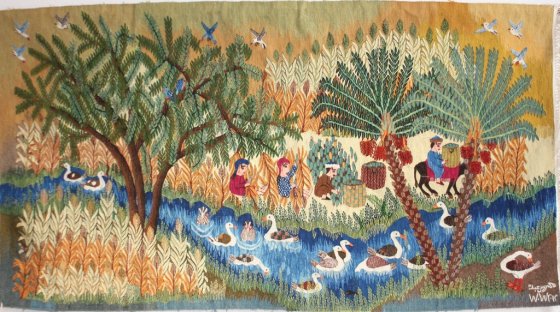
I decided to do a series of these in rug hooking, displaying the life of Christ. As you can see, my drawings are quite elementary. I add stuff as I go along. I added more people, more plants, and you can see that I changed the branches from straight lines to more curvy lines. These are going to be small rugs, about 24″ tall, and probably a bit more in width. I do like that the Egyptian tapestries display plants from that area of the world, which is different than I would draw if I was using my local plants! This rug is Jesus feeding the 5000 people. Of course, I am not going to hook 5000 people 🙂

P1060759-768x688

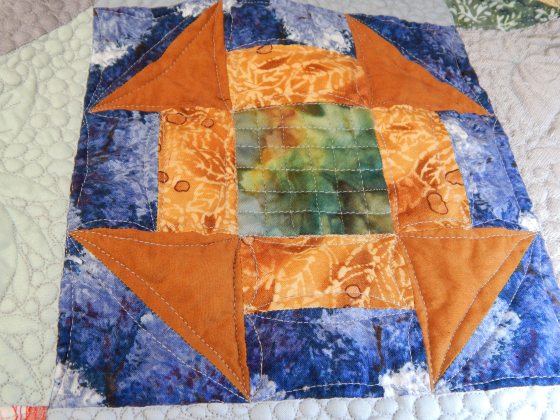
This is how much I accomplished in four days of rug hooking in Anaheim. Because these are smaller, and I want to get some details in, I am using #4 cuts, which are smaller than the #6 and #8 cuts that I usually use.

Christmas is a Time to Finish Things!

I notice I have this pattern at Christmas. I like to finish things. So far I have knit four scarves from my handspun yarn for gifts. Not just knit them, but I blocked them too! And then I decided I had delayed finishing this Christmas quilt for too long. so I just went out there and finished the quilting. I put a binding on it, and then it needed a lot of blocking because of the embroidery in the middle. I’m not 100% sure that I accomplished what I was trying to achieve with this quilt.

DSCN6412

If you remember, the embroidery was done with the Cottage Threads perle cotton from Australia.

Here are some close-ups:

The lettering:

DSCN6413

Embroidered motifs:

DSCN6416

DSCN6417

I added a little embroidery to the trees and “rocks”:

DSCN6415

DSCN6414

And, I finished my Kantha blanket! The running stitches are about 1/2 inch apart. I also put two lines of turquoise thread 1/4 inch apart about every six inches, just to add some interest. The rest of the quilt was stitched with some variegated silk thread that I bought at a weaver’s convention!

DSCN6418

DSCN6419

Oh, and most importantly, at Christmas time I always feel pressured to try to finish my rug that I started this past February. I would like to share it FINISHED when I go to my rug hooking thing this February, but I’m afraid there is a lot that is still unfinished. I wrote “make a cow” for three or four weeks on my weekly to-do list. Somehow I get afraid of rug hooking when I don’t do it consistently. But finally, I DID make a cow :))

DSCN6427

I also hooked the entire hillside behind her. It took several mornings to finish that.

If I don’t write again before Christmas, I hope everyone has a very merry and blessed Christmas.


Another Kantha Stitching

Do you remember this little piece that I made a few years ago?

DSCN1930

I decided to try to make another one, a bit larger. For both of them I made a quilt sandwich and then quilted a grid on it. Some of the design elements go through the grid, but most designs are kept inside of the grid.

When I looked at this older one from a distance, I could see that the lighter lines provided some kind of design element. So I decided to do that more purposefully on the new piece. I filled in all the lighter lines first, and then put in the brighter, darker designs. Finally, I got out my darker thread to fill in the backgrounds.

Its funny, with most anything I do, there comes a time when I am bored with it. I usually don’t put it away, but I just won’t pick it up and stitch on it for quite a while. And then one day, I pick it up again, and just keep stitching until it is finished.

To finish it, I cut one edge off at a time at about 1/4 inch, and satin stitched it with #5 perle cotton thread. (I cut one edge at a time because I didn’t want it to get frayed as I worked.)

Here is the new piece:

DSCN6396

And some close-ups:

DSCN6395

DSCN6394

Here is a picture of the back of the piece. I hope you can see the grid that I quilted before starting the embroidery. This piece is about 14″ X 11.” The grid is just a series of squares and rectangles.

DSCN6403

This is a fun project. I recommend trying it. It is already quilted by the grid. So the running stitches just go through the top and the batting for the most part.

A Home Retreat

This fall I considered going on a self-retreat. I usually go up to Lake Tahoe. The prices are reasonable in the fall, and it is one of my favorite places to visit. But for some reason I really didn’t want to leave home for a week. So I decided to do a home retreat. This takes a bit of discipline and preparation. I try to cook food ahead of time so I don’t have to spend time cooking. I also make a schedule for myself, and try to stick to that schedule to accomplish what I want to do during the retreat. The purpose of this retreat was both spiritual and creative. My goal was to spend a couple of hours in the morning reading and praying, and then work on a specific project in the afternoon. The project I chose was  what I call “the water quilt.” Remember when I dyed all that silk organza? I had the idea that it might be used to represent water. I already had a verse chosen for it. It amazes me how much I got done by limiting myself to one project for that week!

Here is the water quilt.

DSCN6355

After I took this picture, I washed and blocked it. This technique I learned from a collage quilt artist a long time ago. You do tight stitches around the border of each component, and then sometimes a nice velvety looking fringe appears. I thought that might add to the look of the rocks. Here are the pictures after it was washed:

DSCN6373

DSCN6374

All in all, it was a very successful home retreat!

Here are a couple of other things I was doing before the retreat–I finished another quilt top, and I have been spinning quite a bit of fiber. So fun!

IMG_0620

IMG_0649

I hope you all have a happy and blessed Thanksgiving!

Where Have I Been? What Have I Been Doing?

Well, I’ve been working away at my usual crafts. Just not taking time to blog about it. I’ll try to catch up with everything this week. But one thing I’ve been working on consistently is that big quilt that I was using a pattern for. The quilt was published in The Quilt Life magazine six years ago!

First I quilted all the churn dash blocks.

DSCN6345

Next I drew hundreds of pomegranate designs on the quilt and quilted them.

DSCN6346

Then it was time to add a couple of big rows of leaves and vines.

DSCN6348

And THEN there were two big rows of feathers. I also decided to put feathers all the way around the outside border. That is the only change I made in the quilt.

DSCN6347

And finally (even though you could see them in the previous pictures,) I started adding hundreds and thousands of bubbles to outline the pomegranates and leaves. Just about every day I would spend some time working on these. My eyes got very tired, and I asked my long arm friend about it. She said I needed to blink my eyes more!

DSCN6351

And then on Friday, all of a sudden, I was done with all the bubbles! Saturday I put the binding on and washed it. I am too short, so even though I was standing on a stepladder, I couldn’t get a great picture of the finished quilt. But you can get the idea. Just in time to keep me warm all winter. Its fun having a quilt that hangs over the edges of the bed more than most of my quilts do.

DSCN6352

I’m working on several projects (of course) and am enjoying spinning and knitting as well. I’ll post a few more times this week to try to catch up on my projects.


I Can’t Help Myself

One day, (before finishing the churn dash quilt or doing that darn quilt photography) I looked at a picture on my photo board. It was a pretty quilt with large swatches of fabrics, and I had written–“be more adventurous in my quilting.” I just liked that idea of using big pieces of fabric.

And…I had an ulterior motive. I needed a new kantha blanket to work on in the evenings!

So I chose some fabrics that I loved, and I started putting this quilt together. Surprise, it only took me one day to piece these big pieces of fabric together.

DSCN6248

I made a quilt sandwich, using Dharma Trading Company’s “harem cloth” which was a cotton gauze, and muslin for the backing.

I had bought a skein of hand dyed silk at the weaver’s convention, a similar size to #8 perle cotton. I marked lines about 6″ apart on the quilt, and kantha stitched those lines to stabilize the quilt. I don’t know if you can see it, but I decided to add two lines of perle cotton in a turquoise just for something different to do.

DSCN6288

Of course, I have other embroidery to get back to. But when I don’t want to think any more, a kantha blanket is the perfect project to work on!

Taking Pictures

I wanted to take some good photographs of a few quilts that I want to enter in some quilt shows. That entails getting out my super big piece of black fabric to cover the design wall so that a white quilt will show up better. This quilt is 68″ X 88″, and so I have to hang it sideways on my design wall. I was sweating by the time I got the black fabric in the right place and this quilt placed just so on the wall. After all that work, I left the quilt on the wall for a couple of days just so I could admire it as I walked by 🙂

I also learned how to change the pixels in a photograph. Its just amazing what your computer can tell you how to do when you word your question correctly.

PEACE quilt

close-up:

PEACE quilt detail

Here’s a smaller quilt–so much easier! to photograph. I really like this quilt a lot. It has wording, embroidery, and beading all over it.

DSCN6270

close-up:

DSCN6271

And this third little quilt, that I photographed after I took the black fabric off the design wall.

DSCN6281

close-up:

DSCN6284

I also took the opportunity to take a nice picture of my Hallelujah! quilt while I had the black background up.

DSCN6276

And that’s it for my photography sessions for a while.